
What is recoil?
recoil at its essence is a collision detection tool, that realistically calculates how different dynamic elements interact with each other in a scene. Starting with collision detection and Soft Body deformations, additional constraints and forces can be applied to these dynamic items to simulate a wide variety of phenomena realistically; from very simple objects dropping, bouncing and jiggling in a scene, flags waving in the breeze, to the destruction of large structured arrays. Even basic machines can be simulated realistically, calculating interactions between numerous different elements in a scene, all automatically.
These collision interactions are calculated during what is called 'Running a Simulation'. In order to run a simulation, users first need to define the target objects as being dynamic. This is accomplished by selecting the geometric element in a scene they wish to include in the recoil calculations and tagging them appropriately. There are several options, depending on the desired outcome; items can be tagged as 'Active' or 'Passive' Rigid Bodies (rigid meaning they do not bend or warp), or 'Soft Bodies' for deforming surfaces. When set as such, recoil will then consider these elements in all simulations; all other elements not tagged as dynamic will be ignored during the simulation calculations. Next, the user simply need to play the animation timeline from frame 0 triggering recoil to begin its calculations. This is where users can see the settings of recoil in action. While highly dependant on the complexity of the scene and the system recoil is running on, the resulting simulation will likely process in near real-time, displaying its results in the 3D viewport, providing a quick and easy way to see the simulation and make any tweaks to settings for further refinement.
NOTE: Motion and Deformation information for recoil dynamic items is stored in a local cache, created by recoil each time an item is tagged as dynamic, or when a scene is opened that contains dynamic elements. It is not saved as part of the scene, nor can it be saved separately. The data in the cache is generated each time a simulation is triggered, either by playing the timeline (using its standard transport controls), or by using either of the recoil simulation controls- 'Play' or 'Run'. Each time an attribute of any dynamic element is modified, it will invalidate the data stored in the cache requiring an new simulation to be calculated. Users shouldn't really need to concern themselves with the cache, but understanding how it works can help to avoid some frustration with its use. Its current state is always displayed toward the bottom middle of the 3D viewport.
When working with rigid bodies, users must define target items as either active or passive in order for recoil to consider them during a simulation. The difference between an 'Active' rigid body' and a 'Passive' rigid body is that Active bodies will have their positions and rotation channels controlled by recoil during a simulation. Beyond the rest frame, users have no control over the Active object directly. Passive bodies are only considered for collision detection, any movement of the object itself is controlled by the user applying keyframes. Passive bodies are not considered by gravity, forces or falloffs, allowing users full control over the object during the course of the simulation. Active bodies are represented in the 3D viewport by a white bounding box, and Passive bodies are represented by their green bounding boxes. For simplicities sake, users can easily consider active bodies as those that dynamically move during a simulation, and passive bodies as just collision shapes (such as a ground plane or a wall).
Soft Bodies
Like its rigid body cousin, flexible, deforming elements must be tagged as a 'Soft Body' in order for recoil to consider it in a simulation. For Soft Bodies though, tagging is just the start. The Soft Body deformer can be used to simulate a wide variety of mediums (arguably, far more than the Rigid Body solver is expected to do), so in order to get an appropriate effect, users will need to make adjustments to the attributes of the item in the 'Soft Body' submenu of the 'Property' panel. A wide variety of mediums can be created, from billowing fabric that fall onto a furniture item of choice, to squishy rubber-like elements bouncing into cups, to stiffer materials such as paper or metal that flex only a little. Understanding what each setting does will be helpful in getting the most out of Soft Bodies, even so, some amount of experimentation will be necessary to zero in on the exact combination of setting to reach the desired effect.
There are two options for Soft Bodies in the recoil toolbox menu, each a variation on the Soft Body deformer itself. The 'Make Soft Body' option applies the 'Soft Body Influence' item to the target layer. The 'Make Ropes' option again applies the 'Soft Body Influence' to the item, presumably applied only to a curve, automatically disabling the 'Shear' and 'Bend' options, creating a dynamic curve that will dangle and swing as if made of string. Additionally, users should note that in order for any Soft Body element to collide with another mesh item, it will need to first be tagged as a some type of dynamic body, rigid or soft, otherwise, it will be ignored.
Collision Detection
Collision in recoil is the calculations that restrict the intersection between surfaces of dynamic object. It is, for example, what allows a ball to bounce and roll down a stair case. Without it, solid bodies easily pass through one another with no regard or knowledge of the opposing item. Once an object is defined as an Active or Passive body, an additional 'Dynamic' subtab is added to the Item's 'Properties' panel providing settings that further control the object. The most important setting in this tab is in regards to collision as it defines how recoil sees the object. It also determines how soft body elements see the geometry. By default modo assigns a detection type that uses the actual geometry in the item layer, but often faster (and better) results can be obtained by choosing from the additional options available, for most applications the best results are obtained using the simplest collision shape appropriate to the geometry. For example, using the cylinder collision for a wheel will produce much better results more quickly than using the hi-res geometry with tire treads and all. Collisions relating to Soft Bodies are only required when there are issues with the surface intersecting itself, this can be fixed by enabling the 'Self Collision' option.
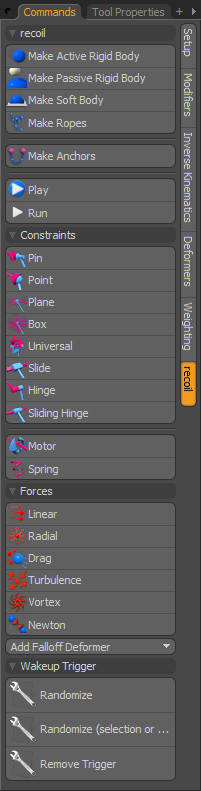
Constraints
If recoil were strictly limited to only calculating collisions between objects, it would very quickly become daunting to produce even modestly complex simulations. Depending on collisions exclusively to generate the mechanics of say a rotating drive shaft for a vehicle would no doubt introduce errors and be quite costly to calculate. Constraints are essentially joints that connect two dynamic bodies together, producing much more accurate results than collision detection alone, with very little calculation overhead. Constraints come in a variety of types that cover most any type of joint users would need. Clever users will also be able to stack more than one constraint to produce even more complex effect, such as combining a Point Constraint with a Slide Constraint to produce a swinging and sliding motion, much like riding suspended from a zip-line -a ride where the participant slides down a long, taut cable suspended between two posts.
Forces
In the real world, objects are constantly subject to numerous forces that affect their motion in subtle and not-so-subtle ways; wind, gravity, friction among others. recoil offers a variety of forces all to produce ever more realistic physical simulations. Gravity is the chief force and is part of the recoil Solver item, affecting all items globally. Its default value is meant to simulate the same downward pull at full size (1:1 scale) as gravity in the real world. If a simulation isn't reacting as one might expect, it's a good bet that the scene isn't modeled to real world size, as very large items will react much differently under the same circumstances than very small items. Users can of course scale their objects, or scale the simulation to match more closely the expected result.
modo also offers six additional force types allowing users further control of the simulation. Linear, Drag, Radial, Turbulence, Vortex and Newton. These are added as locator type item layers in the 'Items' list and, by default, affect dynamic items globally, just as the Gravity value does. Each has its particular function which is covered fully on the Forces page of the documentation. While Forces are applied globally, their application in a scene can be masked in a way using the 'Falloff' function (below) and the 'Force Shadow' option explained further in the Dynamic Items documentation.
Falloffs
Falloffs can be incredibly useful to provide additional control over Forces. Imagine flower petals drifting on the breeze, animated as Soft Body items that land inside of a box, the falloff would be used to eliminate the wind blowing inside the box, increasing the realism of the simulation. recoil uses the same Falloffs used for other deformers in modo. Deformation Falloffs are meant to modulate (reduce or increase) the effects of forces on dynamic items within the area of influence of the Falloff itself. Not to be confused with modo modeling falloffs; used for geometry creation and layout. Conceptually they are very similar, but instead of being applied as a function, recoil falloffs are added as a locator type item to the 'Items' list where users can select them and modify their attributes and even animate them within the scene. In the items properties, users can define an attenuation range that modulates the force it is applied to.
Unlike Forces that affect items globally, Falloffs must first be attached to the Force item it is attenuating in order to produce a result. This can be done several ways. Generally, it is applied by selecting the target 'Force' item(s) prior to adding the Falloff, when using the 'Add Falloff' button in the recoil toolbox. When applied to a Soft Body item, users can use the 'Deformers' viewport, and select the 'Soft Body' Influence from the list; by RMB+clicking on the item to open the context menu, users can select the 'Add Override' option and select one of the Falloffs, automatically assigning it to the Soft Body. Additionally, users can use the 'Schematic' viewport to connect the two; dragging both items into the viewport (via drag and drop) and connecting the output of the Falloff item to the input of the Force item. For more information on using the Schematic Editor, please reference that page of the documentation.
Make Anchors
The 'Make Anchors' options is used to connect Soft Body items to Rigid Body items (or vice-versa). For simulations sake, it doesn't matter if the 'Rigid Body' item is Active or Passive. This could be useful to add some geometry to the end of a rope, for instance, or connect a flag to a flagpole. In order for the Anchor option to work, user must follow this specific workflow- First in 'Items' mode, users need to select the target Soft Body item AND the target Rigid Body item. With the items selected, change into the 'Vertices' mode (press '1' on the keyboard) and select at least one vertex on the Soft Body item, and at least one more on the Rigid Body (selection order isn't important). With the vertices selected, press the 'Make Anchors' option in the recoil toolbox. The two items are now rigidly connected together via an additional 'Anchor' item added to the 'Soft Body'. To break the connection, simply delete the resulting 'Anchor' item, to make adjustments, remove the Anchor and recreate it, following the above instructions.
A recoil simulation can be calculated and cached simply by playing the timeline using the standard transport controls. For the best results, users should disable the 'Play Real Time' option. Additionally, recoil's 'Play' and 'Run' commands are provided offering some useful alternatives. The 'Play' command will process the entire 'Current' timeline, calculating the simulation for every frame, displaying the results in the 3D viewport as it is updated regardless of the 'Play Real Time' setting. The 'Run' option will do basically the same thing, but reduces overhead by not updating the 3D viewport until the entire timeline is calculated, providing a nice time savings for long or complex simulations. Users should note that neither process can be interrupted until complete. If you wish to stop the simulations before it is complete, it is best to use the standard transport controls.
Additional recoil Considerations
Items vs. Components
Animation in modo applies only to 'Items'. Keyframes are always set while in 'Items' mode with the modeling of objects done while at the component level, in the 'Vertices', 'Edges' and 'Polygons' modes. It is helpful for users to have an understanding of the differences between these modes. Layers in the items list should be thought of as containers. In 'Items' mode, users are editing the entire container, but while in the component modes, users are editing the contents of the container. recoil acts only at the item level, where each layer in the 'Items' list is its own dynamic recoil object. Therefore, if users wish to break apart a wall, each brick will need to be its own individual item layer. Users can easily accomplish stacks of bricks by simply creating the first brick item, and then assigning the 'Active Dynamic Body' tag to make the brick dynamic. Next, applying the 'Array' function in items mode will stack subsequent bricks, each inheriting the dynamics of the master object. With the wall created, all it takes is an animated wrecking ball to topple the bricks to the ground, complements of recoil.
Centers and Mass
The weight of Rigid Body objects is dependant on the position of the items 'Center'. The center point for an object doesn't only represent the center of rotation for the object, when using recoil it also represents the center of mass for the object. recoil will assume the weight of an object is equally distributed around the center point, so object will move based on this assumption. If the center point is placed too far away from the items actual center, or worse outside the volume of the object, odd behavior is sure to occur. Users can see an object Center position by hovering over the 3D viewport in question and pressing the 'O' key. In the 'Visibility' subtab, there is an option to show Centers for selected items.
There are several ways to deal with a center that's been moved, the easiest is to select the item in 'Items' mode and invoke the menu bar command "Edit > Center to Bounding Box > Center"; this will automatically move the Center point to the objects actual bounding box center (a bounding box is based on a models overall extents).
Users cannot manually (by keyframes) animate active dynamic objects, however, sleeping objects can be animated (and are handed off to recoil once they are awakened). If the animated object requires rotations from a position other than the objects true center, users should modify the 'Pivot' position and animate from there to maintain the proper center of mass.
Accuracy
The number one issue users run into when calculating a simulation is objects passing through one another (like dropping chain links together to form a chain and they fall right through each other). While it can be caused by a multitude of issues, it is most often caused by the speed at which objects move. At one frame they were apart from each other, the next they had passed right through one another. This means the default subframe calculations didn't have ample time to calculate the collisions of the objects. Even though we only see the result at the whole frame values, and lot can happen between frames. Users can increase this sub-frame accuracy with the 'Steps' values found in the recoil solver (properly calculating subframes for all keyframed items as well). Doing so makes recoil more accurate, however the additional calculations take longer to compute; more accurate = slower. Users should experiment with different values to find one that produces acceptable results with the least number of steps.
 Bullet Physics
recoil is based on Bullet Physics, an open source collision detection and rigid body dynamics library that is free for commercial use, under the ZLib license. Thank you to Erwin Coumans and the Bullet developers for their efforts and generosity.

