
 The Deformers viewport provides a view of all the Deformers in a scene. More accurately, it provides a view of the Effector and Influence items, allowing user to select, reorder, rename and remove them. Deformations in modo require two items to work properly, the Effector (deformer) itself and an Influence, the Effector describes how something is modified, and the Influence defines what gets modified, when combined, these two parts are referred to as a 'Deformer'. When multiple Deformers are applied to an item, the way they are computed is based on an order of operation, determined by the items position within this list. Items lower in the lists are computed and applied, then the next and so on, moving from the bottom of the list upwards. This is a very powerful way to work that is also incredibly intuitive.
The Deformers viewport is found in the 'Setup' and 'Animate' interface tabs of the default interface, in the upper right side panel bank. Selecting any of the items in the list will display their associated attributes in the 'Properties viewport. For organizational purposes, users can also group together multiple elements into a folder by RMB+clicking on one or more selected elements and selecting the 'Place in Folder' option from the contextual menu (RMB+click on an item layer to open).
To select any of the items in the list, simply LMB+click on the item layer name, selected layers will be denoted by the dark bar highlighting the layer, subsequent layers can be added or removed from any selection by pressing the 'Ctrl' key and LMB+clicking on the layers. Users can click+hold and drag layers to reposition them within the list. Using the standard modo click, pause click method layer names can be edited inline, and removed by pressing the 'Delete' key on the keyboard.
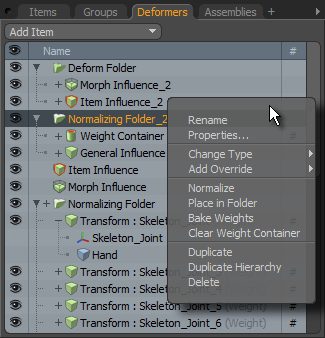
By RMB+clicking on any layers within the list, a contextual menu opens providing some additional options related to the target--
Rename: Opens a popup dialog box to assign a new name the selected item.
Properties: Opens a popup window with the associated attributes of the target item. Users can adjust the values directly and move the mouse away from the popup to dismiss the window automatically (e.g. change focus).
Change Type: Using this command, users can change like items from one type to another while retaining associations, for example changing a slack deformer to a lag deformer will keep its association with the original deformer.
Add Override:
Normalize: Invoking this command creates a 'Normalization' folder and moves all currently selected items into the folder. More information on what the Normalization folder provides, see below.
Place in Folder: Invoking this command creates a folder and moves all currently selected items into the folder. Useful to organize multiples of items within the Deformers view.
Bake Weights: Only applies to a 'Normalization' folder. The options of the Normalization folder are computed on the weights on the fly during normalization and can be changed on the fly. The 'Bake Weights' command pushes those computed weight values down to weight maps. When applied, the Weight Normalization options will be disabled.
Clear Weight Container:
Duplicate: This command will create a duplicate of the current item.
Duplicate Hierarchy: This command will create a duplicate of the current parent item and all child items while retaining the overall relationships of the hierarchy.
Delete: This will delete the currently selected item(s) layer.
Order of Operations
Being able to see the order that Influence items fire (calculate) is important as the order of operations can have a dramatic effect on the final deformed outcome when multiple deformers are applied to a single mesh. Take for instance a twist and a bend applied to a cylinder, if the cylinder is twisted and then bent, the results would be very different than if the item were bent and then twisted. The modo order of operations is determined by layer order starting at the bottom of the list moving up. Lower deformers are calculated and then the values are passed on to the next deformer in the list, and so on.
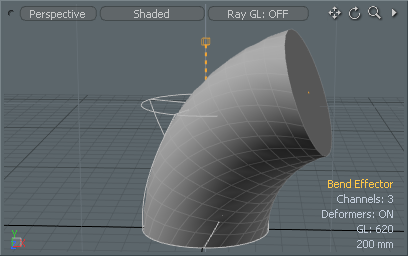 The twist applied first and then the bend |
 The bend applied first and then the twist |
Be selecting the 'Normalization' folder directly, a special weight drawing mode is enabled, allowing users to more easily see how overlapping weights affect each other. User must have the 'Vertex Map' display style applied to the viewport in order to see the weights.

![]()
Sometimes you don't want an order of operation but instead you want everything to calculate at once, such as with joints applied to a character. Mathematically, if a vertex between two bones was weighted 50% for each ones influence, one fired right after the other wouldn't add together to produce 100% of the deformation. To resolve this, users can add a 'Normalization' folder and place any Deformers and Influences into it, any items within the folder will have their weight values normalized. What this means is that when multiple weight map values are influencing a single vertex, all the values are adjusted so that their combined values add up to a 1.0 weight value(100%), this way no vertex will get more than 100% deformation, no matter how many items are influencing it, additionally the normalization folder makes sure that deformers are calculated concurrently, so that when those two 50% weighted influences will actually produce a 100% deformation. Normalization is typically applied to deformations generated using skeleton joint, where multiple weight mapped deformers can influence a single vertex. Luckily, most users won't ever need to think about this as the Normalization is added automatically during the 'Bind' operation. For more information on the Bind & Setup process, please reference that page of the documentation.
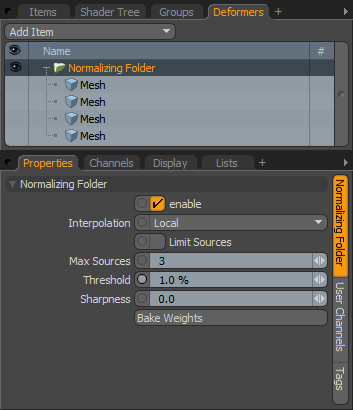
Enable: Toggles the affect of the Normalization Folder over its contents On or Off. When un-checked (disabled), the layer has no affect over the Influences. However, disabled layers are still saved with the scene and its values are persistent across modo sessions.
Interpolation: The 'Interpolation' option allow users to determine how the Normalization interpolates each Influence-
Local- Each influence does it's own interpolation, whether that's 'Parametric' or 'Linear'.
Linear- Overrides the Influences and does 'Linear' for all. Same as if influences were all individually set to 'Linear'.
Quaternion- Implements dual quaternion skinning as the method of interpolation. Only works if all the deformers are Transform Effectors (Bend, Lag etc. are not supported).
Limit Sources: When enabled, the 'Max Sources' attribute sets the upper bound on the number of influences that can affect a single vertex. It picks the 'X' amount of the highest weights and ignores the rest (Good for Heat binding which creates lots of very small weights, and for Unity which can handle a max of four joints per vertex).
Threshold: Any Weight values below this defined threshold are ignored. Also good for cleaning up Heat binding.
Sharpness: This can fine-tune the strength of the binding. Positive values make vertices bind more strongly to nearby bones, and negative values make them more permissive and bind to weaker bones.
Bake Weights: The previous three options are computed on the weights on the fly during Normalization and can be changed on the fly. The 'Bake Weights' command pushes those computed weights down to weight maps.

