
The 'Channel Links' viewport allows users to define and manage linked channels. 'Channel Links' are a means of allowing the property of one item to control the property of another.
If one selects 2 items prior to opening the viewport, the Driver/Driven channels will automatically populate. Selection order is important as the first item selected becomes the driven channel while the second item selection becomes the driver. One can also load an item into a particular column by selecting the appropriate item in any 3D viewport, or the item list and clicking the 'Load Driver/Load Driven' buttons at the top of the Channel Links viewport. The 'Swap' button will switch the driven item with the driver.

Defining a link between two channels is simple. Select any two channels, one from each column, choose the type of link you wish to define, 'Direct Link' or 'Relationship' and press the 'Add link' button. The 'S' column (Status) will update to reflect the link. The 'Driving' channel will display a tiny arrow over the keyframe indicator dot ![]() indicating its controlling state, while the 'Driven' channel will display a small gear
indicating its controlling state, while the 'Driven' channel will display a small gear ![]() indicating it is being controlled by another channel. To remove a link, simply select any 'Driven' or 'Driver' channel and click the 'Remove Link' button.
indicating it is being controlled by another channel. To remove a link, simply select any 'Driven' or 'Driver' channel and click the 'Remove Link' button.
Direct Link
When a direct link is defined, the value of the driving channel directly controls the value of the driven channel. Take for instance the example above, the 'Position X' of the locator is driving the 'Scale Z' of the mesh item. Positioning the locator item at 1m on the X axis scales the Z axis on the mesh item to 100%, at this position, it appears to do nothing, but move the X position of the locator to 2 meters, and the mesh item will scale to 200%. Once the link has been specified, only the driving item will need to be keyframed.
Relationship
A 'Relationship' is very similar to a 'Direct Link', however, the link itself can be non-linear and is defined by a graph. Unlike a 'Direct Link', where once applied, modifying the driver instantly affects the driven item, once a 'Relationship' is linked, the relationship itself must be defined numerically in the relationship interface window that appears in the 3D viewport. if you don't see the window right away, you might need to select the relationship modifier item in the item list.
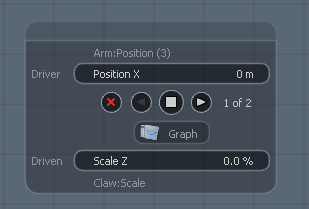
The window provides all the necessary information regarding the channel relationship, the 'Driver' channel is listed on the top, while the 'Driven' channel is on the bottom. The linked channel names appear in the darker area, LMB-clicking and dragging over the channel name will adjust the value interactively, and LMB-clicking on the value itself will allow the user to numerically input the value using the keyboard. The four round buttons in the middle allow the user to define the value relationship with set values called keyframes. The red X deletes a keyframe, the white square creates a keyframe. The two small arrows allow the user to easily jump between keyframes.
In the above window, the X Position channel is linked to the Scale Z channel. If you set a value keyframe at 0 meters for position and 0% scale, that means that when the driver is positioned at 0 meters in the X direction, there will be no scale change on the Z axis for the mesh item. Next, using the mouse to click on the scale value, enter 100%, and on Position X enter 10 meters. Once the values are entered, set another keyframe with the white square. That effectively sets the relationship, now when the first item moves to 10 meters in the X direction, the Z scale of the mesh item will automatically scale to 100%. If you'd like to visually see the relationship curve, you can use the 'Graph' button to open the Graph Editor.

You can see right off that the keyframes generated were placed into the 'Value' channel of the relationship modifier item. The driver values appear along the length, with the driven values the height. The yellow line is the graph of the relationship between the two channels; like any other curve, it smoothly interpolates between values. Modifying the slope and weight of the keyframes will modify the in-between interpolation values. For more on modifying graph editor keyframes, see the 'Graph Editor' section of the documentation.

