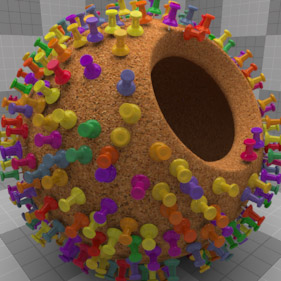
The Surface Generator works in tandem with a Replicator item offering a greater degree of control over the random placement and density of replicated objects. Once a Surface Generator is employed, additional texture layers can be used to control density, size, direction and even coloration, by setting the texture layer to the proper 'Effect'. Please reference the 'Shader Tree' page of the documentation for help with adding new layers and setting their 'Effect'. Replicators themselves use vertex data to propagate replicas, and even though there is an amount of randomization available, there is still a certain degree of regularity to the replicas. The 'Surface Generator' is a means of generating random points across the surface of mesh item, information that the Surface Generator then passes along to the Replicator for Prototype propagation.
This is especially useful for situations like if you had modeled a tree and wanted to replicate leaves over its surface. You would want better control of the overall density than you could get by simply replicating them to only vertex positions, additionally, a weight map could be employed to limit the distribution the leaves on branches themselves and not the trunk with some additional color variation added by a gradient layer, producing far more realistic results.
TIP: The 'Surface Particle' item is another method for adding random placement to Replicator elements, similar in many ways to the Surface Generator. However, since Surface Particle Items work outside of the Shader Tree, the Surface Particle item cannot see surface deformations such as Displacement. In cases where that is required, then it is necessary to use a 'Surface Generator' as a point source.
Adding a Surface Generator--
Utilizing a Surface Generator requires that it first be assigned to the target surface. This can be done by creating an Item Mask (RMB+click on the target item in the 3D viewport and selecting the 'Create Item Mask' from the contextual menu) and then adding the 'Surface Generator' item to the group using the 'Add Layer' option ("Add Layer > Special > Surface Generator"). Users can also simply add the layer to an existing surface by placing the Surface Generator into an existing Material Group . Once the Surface Generator is defined it only needs to be assigned as the Point Source in the Replicator item. Users can then adjust the Surface Generator settings to achieve the desired results.
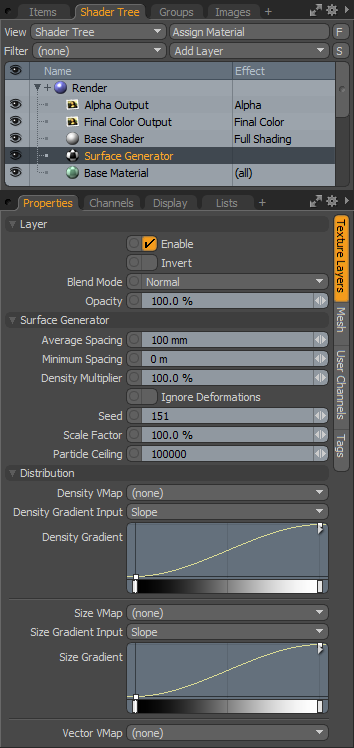
When the item is selected the following attributes are available in the 'Properties' panel-
 Layer--
Enable: Toggles the effect of the layer on and off, duplicating the functionality of toggling visibility in the Shader Tree. When disabled, the layer has no effect on the shading of the scene. However, disabled layers are saved with the scene and are persistent across MODO sessions.
Invert: Inverts the RGB values for the layer producing a negative effect. This is a standard texture layer control and provides no functionality specific to the Surface Generator.
Blend Mode: Affects blending between different layers of the same effect type, allowing user the ability to stack several layers for different effects. For more on blending, please reference the 'Blend Modes' page of the documentation. This is a standard texture layer control and provides no function specific to the Surface Generator.
Opacity: Changes the transparency of the current layer. Reducing this values will increasingly reveal lower layers in the shader tree if present, or dim the effect of the layer itself on the surface. This is a standard texture layer control and provides no function specific to the Surface Generator.
Surface Generator--
Average Spacing: Precisely as the name implies, the 'Average Spacing' value specifies the average distance between replicated items.
Minimum Spacing: Where the 'Average Spacing value only specifies an average, the 'Minimum Spacing' value allows one to specify the minimum amount of space between replicated items, especially useful in eliminating overlaps for neighboring replicas.
Density Multiplier: The 'Density Multiplier' offers simplified control over the overall density of replicated items. Lower values will reduce the overall number of replicas while higher values will increase the overall number of replicas up to the 'Particle Ceiling' value.
Ignore Deformations: When applying an animated deformer, such as a Morph or Weight deformer, changes to the underlying surface will trigger MODO to re-distribute surface particles so they retain their 'Average' and 'Minimum' spacing values. When 'Ignore Deformations' is enabled, particle positions on a surface are maintained through the deformation as if they're were were stuck to their respective positions.
Seed: The 'Seed' value is an initial setting used when random numbers are generated. Different 'Seed' values will produce different random variations, in this case, initial clone positions. However you will want to use the same 'Seed' value when it is necessary that items retain the same variations.
Scale Factor: The 'Scale Factor' acts to control the scale of replicated objects, eliminating the need to manually scale the base 'Prototype' item. With a value of 100%, replicated items would be generated at the identical size of the prototype, smaller values would decrease each replicas size, while larger value would increase each replicas size.
Particle Ceiling: The 'Particle Ceiling' is a maximum for the total number of generated replicas.
Distribution--
Density Vmap: Users can create an embedded Weight Map on the target surface and use its values to control the Density of the particle distribution, eliminating the need to create custom image maps to do so. Any available Weight Maps can be selected from this drop-down assigning it to control the density as a multiplier over the regular density. A Weight Value of 1 (100%) would be the normal density, attenuating toward a Weight Value or 0 at 0% density. Weight values can also go above 1 for added density control.
Density Gradient Input: Users can define an 'Input' criteria that will then be used to additionally control the density of the resulting particles. With the input defined, the actual 'Density Gradient' defines the density amount.
Density Gradient: Using a mini-gradient input, the density can be modified with gradient keys that represent a percentage of the original density. Much like how a keyframe defines a value in time, these keys represent a value across the selected input parameter (such as over the angle of 'Slope'). Keys can be added by MMB+clicking along the length of the gradient input and then LMB+click and drag the key icon up or down adjusting the value. The grayscale bar directly below gives visual feedback as to how the values fade from one key to the next; white will produce 100% density attenuating toward black at 0% density. Opening the Gradient editor will allow users to go above 100%.
Size Vmap: Users can create an embedded Weight Map on the target surface and use its values to control the scale of the elements connected to the generated particles, eliminating the need to create custom image maps to do so. Any available Weight Maps can be selected from this drop-down assigning it to control scale the as a multiplier over the regular sizing. A Weight Value of 1 (100%) would be the normal scale, attenuating toward a Weight Value or 0 at 0% scale. Weight values can also go above 1 for greater than 100% scale control.
Size Gradient Input: Users can define an 'Input' criteria that will then be used to additionally control the scale of the elements connected to the generated particles. With the input defined, the actual 'Size Gradient' defines the scaling amount.
Size Gradient: Using a mini-gradient input, the scale can be modified with gradient keys that represent a percentage of the original scale. Much like how a keyframe defines a value in time, these keys represent a value across the selected input parameter (such as over the angle of 'Slope'). Keys can be added by MMB+clicking along the length of the gradient input and then LMB+click and drag the key icon up or down adjusting the value. The grayscale bar directly below gives visual feedback as to how the values fade from one key to the next; white will produce 100% scale attenuating toward black at 0% scale.
Vector Vmap: Users can create an embedded Vertex Vector Map on the target surface and use its values to control the orientation and scale of the elements connected to the generated particles, eliminating the need to create custom image maps to do so. This allows users to use the sculpting tools, like with Hair Guides, to intuitively control the replicated elements. Note that elements controlled by Vector Vertex Maps will automatically adapt to surface deformations as the Vector Maps are defined in tangent space.
TIP: If you're looking for a way to add some variety to replicated objects, one needs to look no further than Groups. By creating a group from multiple mesh items, and specifying that group as the Prototype to be cloned, the Replicator will pull random items from within the group adding further randomness and variation to the cloned objects. Once a group has been created, it will show up in the 'Prototype' drop down of the Replicator item. Additionally, surfacing for replicas can be further randomized with Gradients set to the 'Particle ID' Input Parameter.


