
MODO scenes are basically collections of items- Cameras, Lights, Meshes, Locators, etc. These items are collected and cataloged either in the 'Items List' or in the 'Shader Tree', where each layer represents an entire object unto itself. Users tell MODO what particular item they wish to edit through the selection of these items, also referred to as a layer. When selected, their associated attributes appear in an Properties viewport panel where users can manipulate their values directly, or easily manipulate items directly in the 3D viewports.
Creating Items
While MODO starts with a number of basic item layers, such as a camera necessary for rendering and an empty mesh layer for building geometry, there are a variety of ways to add additional item layers to the scene. Users will do most of their scene item management from the 'Items List'. In the upper right area of the viewport is an 'Add Item' button users can LMB+click to open the popup menu, holding down the mouse button users can drag over the menu to make a selection, once over appropriate item release the mouse button to select and add to the list. New items are added directly above the current selection. Users may also add items from the menu bar, found under the "Item" menu, there are a variety of commands that add the appropriate item-
Create Camera: This command adds an additional camera item with default settings at the origin of the scene. If an item exists with an identical name, MODO will add an appropriate number to the new camera to differentiate it from the existing camera. Cameras are necessary for setting point of view and render settings specific to the frame. The Camera item is covered fully in the 'Shading, Lighting and Rendering' section of the documentation.
Create Light: This menu opens options for adding any of the variety of direct light sources MODO supports, including 'Area', 'Cylinder', 'Directional', 'Dome', 'Photometric', 'Point' and 'Spot' light types. If an existing item in the scene has an identical name to the added item, MODO will add an appropriate number to the new lights name to differentiate it from the existing light(s).
Create Locator: This command adds a locator item, also sometimes referred to as a null object. Locators are useful as reference objects, and can aid in the creation of hierarchies. Locators do not contribute to the rendered image but do have a 3D viewport representation useful for applying transforms. Locators are covered in the Items reference page of the documentation.
Create Texture Locator: This command adds a Texture Locator item. Users generally wouldn't add a texture locator manually, as they are added automatically whenever an Image Map or Procedural texture layer is added. Texture Locators define how textures are applied to surfaces at render time. The Texture Locator is covered in the 'Shading, Lighting and Rendering' section of the documentation.
Create Backdrop: This command creates a Backdrop item. Backdrop items allow users to display images directly in the 3D viewports, useful as modeling reference. These image however do not contribute in final rendered images. Backdrop items are covered in the 'The MODO Toolbox' section of the documentation.
Create Environment: This command will add an additional Environment item to the Shader Tree. Environments represent the background areas of the rendered scene. The Environment item is covered in the 'Shading, Lighting and Rendering' section of the documentation.
Primitive: This menu allows users to choose from and add a variety of unit primitives, basic shaped geometry scaled approximately to 1 cubic meter in size. These primitive objects can act as stand-in proxy geometry, the basis for more complex objects, or as final geometry requiring only simple forms. The primitive object tools that the geometry is based upon is covered on the 'Creating Geometry' page of the documentation. Users can also add unit primitives by holding the 'Ctrl' kay and LMB+clicking on the appropriate tool in the modeling toolbox. Pressing 'Shift' will add the unit primitives as a new mesh item layer.

Users can rename items by first selecting the target layer, then by RMB+clicking directly on the item opening a context menu and selecting the 'Rename' option form the menu. This opens a popup dialog box where users enter the actual new name and apply it when LMB+clicking 'OK'. Users can also inline edit the name by LMB+click pause then click again to change the field to an edit field. Once changed users can LMB+click on the edit field to set cursor focus and then use the keyboard to enter the new name. User can also select the target item in either the 'Items List' of the 'Shader Tree' and select the command "Item > Rename" from the menu bar.
Users can clone items in a variety of ways, depending on the desired outcome (and number of clones). The easiest route is the direct duplicate. Users can first select the target layer and then RMB+click directly on the layer and choose the 'Duplicate' command from context menu, making a copy of the item with a number value appended to it, differentiating it from its source. Users can also select the target item and press the 'Ctrl+D' keyboard shortcut to quickly duplicate items. The duplicate item will be an identical copy of the source item, inheriting all its attributes. Users can then modify and/or transform the duplicate to make it a unique object.
When a greater number of duplicates is desired, users can use any of the Clone and Array commands found in the 'Duplicate' tab of the MODO toolbox. These same options are also available under the "Geometry > Duplicate" and are covered in the 'Duplicating Geometry' page of the documentation. Replicators are also an excellent way to generate many duplicates of an item providing a procedural means to clone objects over a surfacing by specifying another item that acts as a point source. The application and use of Replicators is covered on its respective page of the documentation.
MODO also provides users the ability to create Instances of items. Instances are virtual duplicates that require no additional memory as they only are references back to their source, and update automatically when any component edits are applied to the source geometry. Instances of items can be positioned, scaled and rotated as it they were their own item, however users cannot make direct component level edits to Instances. Many of the Clone and Array tools provide options for users to generate Instances instead of geometric clones, greatly reducing scene overhead.
Duplicate Options: The duplicate options command provides users with a few options for the duplicated items. By first selecting the target items, users can access the command from the RMB+click context menu as before and choosing the 'Duplicate...' option. Users can also find the command in the menu bar under "Item > Duplicate Options"-
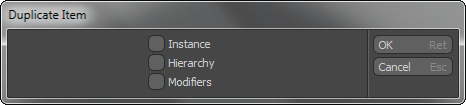
Instance: When this option is enabled, MODO will generate instances instead of duplicates.
Hierarchy: When this option is enabled, all child items of the source item will be duplicated as well, retaining their hierarchy.
Modifiers: When this option is enabled, any related modifiers associated with the source will be duplicated as well.
Converting Items
Users can convert any type of item into any other type of item using the 'Change Type' command. Found in the menu bar under "Item > Change Type" and then selecting from the various item options, this command will convert whatever is currently selected into the type of item selected. Users can also select a layer and RMB+click opening the context menu and selecting the "Change Type" option opens another menu from which to chose the item type you wish to convert to. The standard transform properties of the item (position, scale and rotation) will be retained, but in unrelated items, the converted object will be based on default item values.
Changing a mesh item into a light can be useful from time to time, but the more important function lies in converting heavy mesh items into a 'Static Mesh'. Since a converted mesh item will be frozen and triangulated it is not always the most desirable option, but in cases where items are simply to large to manage otherwise, it is a good option to have available. For more on Static Meshes, please reference that page of the documentation.
Removing Items
Users can remove an item at any time by selecting the target items in the 'Item List' or 'Shader Tree' and RMB+clicking directly on the target layer to open the contextual menu and selecting the 'Delete' command. With the target items selected, users may also invoke the menu bar command "Edit > Delete" to remove item layers. Finally, users can remove selected items by simply pressing the 'Delete' key on the keyboard.

