
Before MODO had sculpting there was the 'Sculpt' modeling tool. This was a very simple and direct way to shape polygons using a brush-like paradigm to smoothly deform a surface. When sculpting was introduced to MODO, the functionality made the older sculpt tool redundant and unnecessary. For user's convenience the 'sculpt' tool remains, using the superior sculpting functionality providing users with a more powerful way modify their mesh, but still retaining the intuitive simplicity of the older tool. To apply, users need only to LMB+click on the icon to enable the tool revealing the options below in the tool properties panel. Users can then LMB+click and drag over their models surface in the 3D viewport to deform it outward along the polygons normal. Holding down the 'Ctrl' key will push the surface inward along the normal. Users may adjust the option available to customize the effect of the brush on the surface. For more on sculpting, please see the 'Paint and Sculpting' section of the documentation.
 Sculpt Push--
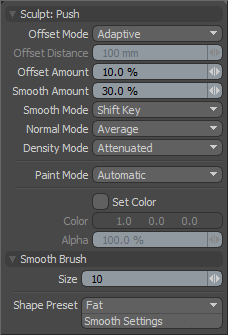
Offset Mode: MODO provides two methods for calculating the way the tool moves the surface when brushing.
Adaptive: The adaptive mode will adapt to the surface that is being brushed on based on the setting for 'Offset Amount' and the size of the brush.
Absolute: When in 'Absolute' mode, the 'Offset Distance' setting will become active and users may enter a specific distance value the brush will conform to regardless of brush scale.
Offset Distance: This control is disabled unless the 'Offset Mode' is set to 'Absolute'. When active, the value determines specifically how far to displace the surface.
Offset Amount: Active only when the 'Offset Mode' is set to 'Adaptive', this percentage value modulates the extent of the brushstroke. The total scale of the sculpt deformation will be equal to the brush size times the offset amount percentage.
(Note: This is a very important value for controlling sculpted detail and as such it can be adjusted interactively by using the MMB+click and hauling left or right.)
Smooth Amount: The Smooth tool is such a useful method for controlling sculpt detail it is available with almost every sculpting tool in MODO and can be accessed by simply holding the Shift key down while sculpting. The Smooth amount attribute allows you to control the amount of smoothing applied when using the Shift qualifier with that specific tool. This is a convenience feature implemented specifically to enhance the sculpting workflow.
Smooth Mode: MODO provides alternate methods for applying smoothing while sculpting-
Shift Key-- The smooth mode is enabled when the 'Shift' key is depressed.
Low Pressure-- When using a pressure sensitive tablet, users may apply the 'Low Pressure' option, where light sculpting strokes will have a smoothing affect on the surface. Once the pressure threshold is exceeded, the smoothing effect will attenuate toward the full pressure effect where the brush will work normally as determined by the tool providing a dual function to the brush.
Uniform-- When set to 'Uniform', smoothing is always on while sculpting, thus making softer strokes.
Normal Mode: This option controls the method used for displacing the sculpted vertices. The various options include:
Brush Center-- uses the geometry at the very center of the brush to calculate the direction along which to displace the mesh.
Vertex-- displaces each vertex along its own normal.
Average-- calculates an average normal for all the vertices inside the brush.
Screen-- displaces the vertices directly towards the active viewport.
Mouse Down-- uses the normal of the mesh surface directly under the mouse when the LMB is clicked. All displacement is then carried out according to that vector.
X,Y,Z-- allows you to pick a world axis along which to displace the vertices.
Density Mode: This control determines how the sculpt stroke affects areas of the mesh that it has already covered. For instance, brushing back and forth will cause the sculpt tool to run back over itself which can have a number of different effects. This controls the sculpt during a single stroke. Once the stylus comes off the tablet or you release the LMB the density control is reset.
Additive-- continues to add to the displacement each time the brush crosses over its own path with no maximum cap to govern the sculpt.
Attenuate-- continues to add to the displacement as the brush crosses over its own stroke until the displacement reaches the Offset Distance or Amount value.
Max Stroke-- enforces a maximum offset based on the largest displacement value of the current stroke.
Max Map-- caps the sculpt effect at the maximum amount in the current displacement image.
Paint Mode: The 'Paint Mode' determines which method of sculpting is to be used. By default the setting is 'Auto' which will perform mesh based sculpts when there are no displacement images and automatically switch to image based sculpting when there is an image available. There are times when you may want to force MODO into mesh based sculpting even if you have an image applied for displacement. This can be very helpful for blocking out shapes and form, as mesh sculpting is only affecting the cage vertices of the base geometry.
Automatic-- chooses between mesh and image sculpting depending on availability of displacement image map texture.
Mesh-- forces the tools to perform mesh sculpting only.
Image Map-- forces the tools to perform image sculpting only.
Set Color: When utilizing Multi-Res sculpting, and enabling the 'Set Color' option, users can simultaneously sculpt the mesh and paint into an Image Map layer using the same settings of the sculpting tool itself.
Color: This value determines the color applied to the image map when sculpting.
Alpha: This value determines the opacity of the stroke applied to the image map.
Smooth Brush--
The Smooth Brush creates a nice feathered airbrush effect over the surface. There are two main options for the Smooth Brush, Size and Shape Preset.
Size: This value sets the radius of the brush in pixels from screen space. This is important to understand as zooming the view will change the result of the brush. With the brush size being fixed, zooming in on the model will decrease the relative scale of the brush whereas zooming out will increase it. Users can interactively adjust the Tip size value by RMB+click and haul in the viewport, adjusting an on-screen display representing the brush's size.
Shape Preset: The popup option includes several preset brush options for varying effects. This setting drives the profile of the airbrush. Users may also adjust the In and Out Slope and Weight setting to produce further customized brushes.

| Linear-- will create a straight ramp from the center to the edge which results in a brush profile that looks like a cone. |
|---|---|

| Smooth-- will create a brush stroke that is opaque in the center and falls off smoothly to the edge of the brush with an S curve shape. |

| Bulge-- changes the bias of the curve to start out slowly and then ramp more harshly towards the middle, resulting in a brush profile that looks similar to a dome. |

| Fat-- brush starts out soft and ramps harshly at the outer edge producing a soft 'U' shaped brush that varies the most under light tablet input pressure. |

| Sharp-- the falloff is very harsh and steep at the center producing a fine stroke. |

| Very Sharp-- this preset is nearly identical to the 'Sharp' version with a more extreme falloff for even finer strokes. |

