
The Shader Tree is the main interface for adding materials and textures to surfaces in your scene. MODO uses a layered approach to texturing, allowing a simple to use, yet very powerful method for assigning textures exactly where you want them, as well as creating complex looks for surfaces with ease. The visual impact on your scene is evaluated bottom to top; an image layer with 100% opacity that is placed above a procedural checker pattern will obscure the checkers in the rendered image. Changing the image layers transparency would gradually reveal the checkered layer below. For specific information on working with Shader Tree layers, please reference the Shader Tree page of the documentation.
The viewport itself, in the default configuration, appears in the upper right viewport group. Click its tab to make the viewport visible. Whenever a layer is selected within the viewport, its associated settings will appear in the 'Properties' viewport found directly below. If the properties are not visible, one may need to also click its tab to reveal the viewport.
Shader Tree UI--
The viewport has 3 UI modes, 'Compact', 'Small' and 'Full' . Depending on your amount of screen real estate, you can adjust the viewport by dragging any edge; it will dynamically scale giving you the appropriate set of options based on the viewports size.
![]()
In 'Compact' mode, the first four buttons represent 'R' for the render item, 'L' for lights, 'E' for environment and 'C' for camera. The bar on the right, when clicked on will pop open a contextual menu allowing the user to choose individual layers specific to each 'R', 'L', 'E; and 'C' setting. Additional layers can be added using the menu bar commands 'Texture > Add Shader Tree Layer > (choose type)'

In 'Small' mode, the 'Render', 'Light, 'Environment' and 'Camera' buttons become full size and the layer selector appears below.
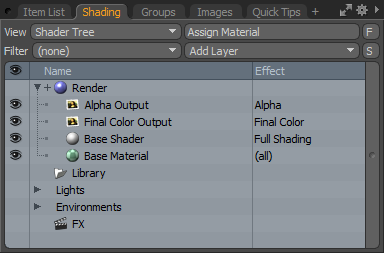
In 'Full' mode, each item is represented as a layer with a corresponding icon. Clicking on any item will select it, allowing the user to edit the various properties, multiple layers can be selected using the 'Shift' and 'Ctrl' key modifiers. Layers can also be dragged and dropped within the viewport, changing the layer order which in turn affect how they layers feed into the render outputs, They can also be dragged into material groups for better organizing scenes with many surfaces.
Some additional controls appear above the viewport as well. The 'View' option changes how the layers of the Shader Tree are displayed, with the 'Materials' option offering a simplified look at the Shader Trees layers. The 'Filter' option will automatically show/hide various type of layers. The 'Assign Materials' button will open the 'Set Material' dialog and tag any selected polygons. The 'Add Layer' button will allow the user to add additional layers to the shader tree. The 'F' buttons offers a search function (Find?) that uses standard pattern matching to locate specific layers (detailed at the bottom of this page). The 'S' button toggles the visibility of Shading layers based on item selection in the Items List.
Within the Shader Tree window itself the 'eye' icon column allows the user to enable/disable the effect of a specific layer without removing it; simply click the eye to toggle, drag over multiple eyes to toggle them simultaneously. The 'Effect' column allows the user to specify in what way the layer contributes to the rendered image, RMB-click on the effect name to open a context menu with many additional options. Any layer name, once selected, can be RMB-clicked providing a context menu with several options-
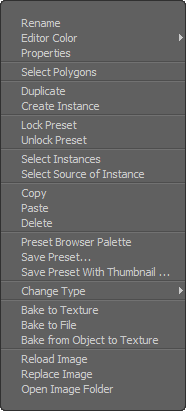 Rename: Allows the user to assign a new name to the specified layer.
Editor Color: 12 color options are provided for colorizing the Shader Tree layer itself, meant to be used as an visual organizational device. Choosing any of the colors from the supplied menu will apply the selected color as the layer background.
Properties: Opens the 'Properties' viewport with the selected layers corresponding attribute settings.
Select Polygons: This command will make all the polygons in the scene related to the current mask selected, switching the MODO interface into 'Polygons' selection mode if not already active.
Duplicate: This command will create a copy of a layer with identical settings. Changes in the original item are not reflected in the duplicate layer, nor are modification to the duplicate reflect in its original layer.
Create Instance: Creates a clone of a layer that references the original source; changes to one layer automatically propagate to all instances. Instanced layers are denoted by their italicized name in the Shader Tree. Especially useful when separate surfaces with identical properties reside within different masks. When instances are used, changing one items attributes automatically clones the changes on the instance. Changes to the Instance itself act as local overrides, modifying the attribute directly, while changes are not applied back to the source of the Instance. Further changes to the source will be propagated except to those changes made individually on each Instance, on a channel by channel basis.
Lock/Unlock Preset: When the 'Lock' command is applied to any Library material, this will prevent any accidental changes from being applied to the Material Group. The target layer will need to be Unlocked for further editing. The Lock/Unlock commands have no effect on standard Shader Tree layers.
Select Instances: If a layer has any Instances of it in the Shader Tree, the 'Select Instances' command will select all the associated Instances of the target automatically.
Select Source of Instance: The 'Select Source of Instance' command will select the parent source items of any instance. Instances are denoted by their Italicized name in the Shader Tree.
Reference/De-Reference: (only available when RMB+clicking over Material Group item) A Reference acts similar to an Instance, but works to clone all layers within a Material Group item, instead of just a single layer. Referencing a Material Group will clone the entire group hierarchy as a single layer that can be applied elsewhere in the Shader Tree. To create a Reference layer, RMB+click on the target Materials Group item (it must contain at least one layer) and select the command "Reference". LMB+click on the resulting reference item and drag and drop the layer into another Shader Tree location to see the results. Changes made to the Source will be propagated to the Reference layer(s). Reference layers cannot be modified directly, unless the 'De-Reference' command is applied converting the Reference back to standard Shader Tree layers. 'De-Reference' will also convert Library References to standard layers. (References essentially operate like Library items, but outside of the Library folder)
Copy/Paste/Delete: Entire layers, as well as the settings of individual layers themselves can be copied, pasted and/or deleted using these commands. When pasting values from one layer to another, the layers must be of the same type, i.e. material item to material item.
Preset Browsers Palette: This command opens a 'Preset Browser' palette.
Save Preset: A 'Preset' stores settings so they can be applied at a later time. In the case of Materials, a preset stores Shader Tree layers with an associated icon for visual browsing in the 'Preset Browser'. A Material 'Preset' can be as simple as a single layer, or it can contain any number of layers with complex blending. For multi-layer 'Presets', these must all be contained under a single Material Group "![]() " item. RMB+clicking on the target layer and selecting the "Save Preset" option from the contextual menu will present the user with an OS dialog prompting where to save the 'Preset' itself. If one wants the resulting Preset to show up automatically within the default Preset Browser structure, It will be necessary to navigate to the directory where Presets are stored and save in an appropriate folder. One can also create a new directory for saving presets, but make sure to use the '(add path)' command in the Preset Browser to make it visible within the browser viewport. Once the File is saved, a default icon will be generated that represents the settings of the Preset. If you prefer to produce your own custom icon, this can be generated ahead of time and assigned with the 'Save Preset with Thumbnail' command.
" item. RMB+clicking on the target layer and selecting the "Save Preset" option from the contextual menu will present the user with an OS dialog prompting where to save the 'Preset' itself. If one wants the resulting Preset to show up automatically within the default Preset Browser structure, It will be necessary to navigate to the directory where Presets are stored and save in an appropriate folder. One can also create a new directory for saving presets, but make sure to use the '(add path)' command in the Preset Browser to make it visible within the browser viewport. Once the File is saved, a default icon will be generated that represents the settings of the Preset. If you prefer to produce your own custom icon, this can be generated ahead of time and assigned with the 'Save Preset with Thumbnail' command.
Save Preset with Thumbnail...: The 'Save Preset with Thumbnail' command works in the same way as the 'Save Preset' command above, but once the preset is saved, a second dialog opens allowing users to specify any saved image that will then be used as the browser icon.
Change Type: This command offers the ability to convert a layer of one type, such as an image map to another type such as a procedural. Associated 'Texture Locators' will retain their settings if applicable but layers themselves will lose their settings.
Bake to Texture: This command offers the ability to generate a texture map image of a layer. Baking textures from inside the Shader Tree is useful for baking a single "Effect" such as Color or Diffuse into an image whereas the "Bake" command from the Render menu bakes all light and texture contributors into a final shaded image. It is reasonable to think of the Shader Tree level of baking as similar to "Flattening" layers in Photoshop. Only layers of the same "Effect" setting underneath the texture layer that is triggering the bake will contribute to the baked layer. Once "baked" this texture can remain in the Shader Tree as a pre-computed result of all contributors which results in a savings of render time and provides a real-time view of the effect. The 'Bake to Texture' command requires a UV map on the baked surface as well as a blank image map to bake into. For more on baking textures, see the Baking Images Workflow page of the documentation.
Bake to File: The 'Bake to File' command is functionally identical to the 'Bake to Texture' command above, but writes the resulting texture as a file to disc to a location specified by the user. When applying the command, a OS file requester opens to specify the file name, locations and format. The second dialog is where the resolution and bit depth are specified. When saving to a 16 bit or greater format, the 'Floating Point' option must be enabled.
Bake From Object to Texture: This command offers the ability to use the UV map of a low polygon count model to bake a texture map from a higher polygon count model. Maps can be used for any of the various 'effect' including diffuse color, displacement and normal. Like 'Bake to Texture, a UV map is required and a blank image map to bake into. Both surfaces must have different material name and cannot share the same UV map. When calculating a displacement map, the 'distance setting' from the popup requester should be used as the 'Displacement Distance' setting in the material dialog box when applied. For more on baking textures, see the Baking Images Workflow page of the documentation.
Reload Image: This command reloads the image as saved to disk. Useful for when edits made in an external app don't trigger MODO to reload it automatically or you wish to undo a series ofinternal edits all at once.
Replace Image: This command opens a OS file requester dialog allowing users to select an alternative bitmap image that will replace the selected image, while retaining its exisiting setttings.
Open Image Folder: This command opens the saved files Folder location on the internal hard disc using the systems default file manager.

INFO: For a full overview of working with the layers of the Shader Tree, please reference the Shader Tree page of the Shading, Lighting and Rendering section.
Search Function Pattern Matching Table
| Syntax | Description | Example | ||
|---|---|---|---|---|
| Inputs | Pattern | Matches | ||
| * | Zero or more of any characters. | Apple, Apricot, Grape | Ap* | Apple, Apricot |
| # | Zero or the next sub pattern. | Ae, Ape, Appe, App, Axe | A#pe | Ae, Ape, Appe |
| ? | Any single character. a? will match any two-characer strings starting with a. #? means "any number of any characters", and is functionally identical to * | Axe, Ape, Asp | A?e | Axe, Ape |
| ~ | Negates the following expression. For example, #~x? will match any two letter string except thoe starting with x. Similarly, ~(x?) will match anything except a two letter string beginning with x (so, xxa or ab but not xa). | Axe, Ape, Asp | A~xe | Ape, Asp |
| ( | ) | Any one of the items separated by the vertical bar character. Any number of vertical bars can be used, including none. | Axe, Ape, Abe | A(x|b)e | Axe, Abe |
| [abc] | Any one of the characters inside the square braces. | Axe, Ace, Abe, Abc, ACE | A[bcBC]e | Ace, Abe, ACE |
| [a-z] | Any of the range of characters within the square braces. Multiple ranges cab be combined, such as [a-dA-Dxyz]. | Axe, Ace, Abe, Ate, ABE | A[a-kA-K]e | Ace, ABE |
| ' | Escape from pattern matching. | A[1], A[2], A(3) | A'[?'] | A[1], A[2] |

