
The 'Preset Browser' is a visual reference to a library of predefined objects, surfaces and settings that are included with MODO. Users can also easily create their own 'Presets' and add them to the browser or download shared assets from the Foundry community website for streamlined application to their own scenes. The Presets come organized and categorized for quick visual browsing. The Preset Browser is found in several of the layout workspaces, most predominantly in the 'Layout' workspace. It can also be opened as a popup palette by pressing 'F6' in any layout workspace. Presets can be applied to the scene using a simple drag and drop operation or in some cases double clicking the Preset in the browser.
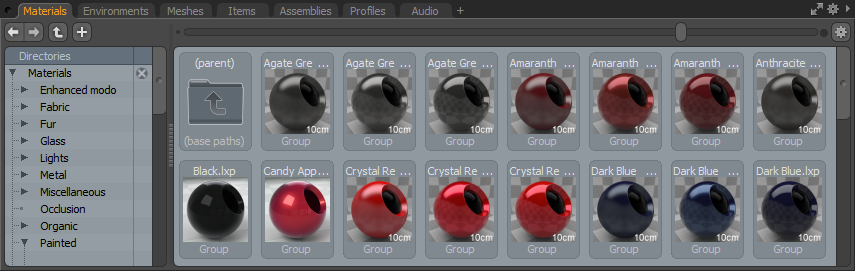
It should be noted that due to the large file size, the included Preset library that ships with MODO is a separate download and installation. It can be found in the users account on The Foundry community website where the MODO installer was obtained, found under Step 2 'Download and Install Content'. Once properly installed MODO will automatically see the Preset content, and it should look something like this-
Navigating the Browser--
The Preset Browser uses a familiar tree structure of nested folders for organization and navigation. Depending on your amount of screen real estate there are several methods for browsing the folders associated with Presets. One is the Directories tree, the left most column in the above image. If it's not there you can make it visible by LMB-click dragging on inside edge of the left side of the viewport, (over the tiny row of stacked squares) you'll know you're on the correct spot when the cursor changes to a small arrow.
Once the Directory Tree is opened there will be a list of folder names organizing the associated Presets. For instance, in the case of the Materials folder (shown above), there are a number of sub folders that organize the Material Presets by finish. To the left of each folder name there is a small triangle, LMB+clicking it will expand/collapse any sub folder within it and clicking the folders themselves will select them with a highlight and display their contents in the main browsing window. The column to the right of the folder names with the 'X' icon over it will allow the user to remove entire directories from the tree by simply selecting a folder and pressing the 'X' icon up top. A confirmation dialog will open to confirm the removal of the folder (which will also removes its contents as well!!).
If you prefer not to use the Directory tree, you can collapse it by LMB-click on the right hand edge of it (again over the stack of tiny squares) and dragging to the left until it disappears. When closed, navigating the window is accomplished with the iconic buttons in the upper left of the window -they are 'forward', 'back', 'Up to Parent' and 'Create New Folder' respectively. The 'Forward and Back options are only available when folders have been navigated (much like a web browser). RMB-click on either the forward or backward buttons to get a contextual menu of available folder names. If the Directory Tree browser is hidden and the viewport option 'Folders as Thumbnails' is set to 'Never', then a menu popup containing the path hierarchy is displayed between the navigation buttons and the zoom slider.
The slider across the top right of the viewport allows for smoothly scaling the display size of the icons. LMB+click and drag the handle left or right to scale them. When the number of items or their size in the window exceeds the amount of space available, the scroll bar down the right side can be used to scroll through the available Presets. The gear icon, directly to the right of the slider, opens the viewport options popup that allow users to further customize the icon display in the viewport itself. LMB+click to open the popup menu-
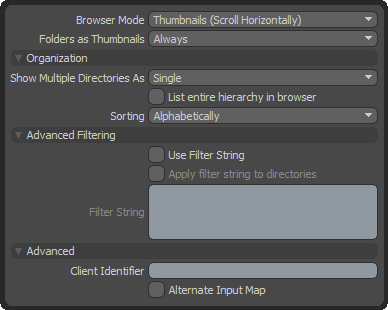
Browser Mode: The Mode options allows users to define different ways of displaying the Preset contents within the browser-
List- The 'List' option displays tiny icons next to the name of the Preset, followed by any defined Star Rating and Comment text.
Thumbnails (Scroll Vertically)- The traditional large icon view that scrolls vertically (up and down).
Thumbnails (Scroll Horizontally)- The traditional large icon view that scrolls horizontally (left and right).
Grid- The Grid view is similar to the Thumbnail views, but only displays the image icon, eliminating the Preset name from the display.
Folders as Thumbnails: The 'Folders as Thumbnails' option controls if the folders themselves used to organize the Presets will display as icons within the browser area. Only active when either of the Thumbnail options are selected above. The options a self explanatory- 'Never', 'Only when the directory browser is hidden' and 'Never'. Folders can be a helpful addition for navigation more akin to regular OS file navigation.
Organization--
Show Multiple Directories As: Users can control how multiple folder selections are displayed using this option (hold down 'Shift' or 'Ctrl' to select more than one folder in the directory tree at a time)-
Single- Displays the contents of single folders only (no multiple folder selections allowed).
Multiple (Merged)- Displays the contents of all selected folders simultaneously as if they were a single folder.
Multiple (Grouped)- Same as Multiple Merged, but separates the contents of each folder with a named divider.
List entire hierarchy in browser: When this option is enabled, all child folders in the hierarchy (subsequent nested folders) will also be displayed in the browser without being explicitly selected.
Sorting: The 'Sorting' option controls the display order of the Presets in the browser based on the designated criteria-
Alphabetically- By alphanumeric ordering
Manually- Users can define order by drag and drop within the browser (not available for 'Multiple Directories as Merged').
Star Rating- Order Based on number of stars assigned to Preset.
File Extension- Order based first on the Presets file type extension, organized alphabetically.
Modification Time- Order based on the last time the file was saved ( or modified), starting with the most recent file/directory.
File Size- Order based on the actual size of the file as saved on the disc.
Advanced Filtering--
The Preset Browser allows user the ability to add markup information to Presets (explained further below). Filtering is a different type of search that gives users the ability to procedurally refine what is visible in the browser based on specific information using a scripting like connotation. The filter options take into account both the user defined markup as well as metadata (information intrinsic to the file, such as name and format). The filtering system is a more advanced feature and is explained further below.
Use Filter String: This option toggles the filtering on (enabled) or off (disabled) for the browser.
Apply filter string to directories: When this option is enabled, the filtering will be applied to the directory folders as well, otherwise all directories will be shown.
Filter String: The 'Filter String' input field is the actual data string that filters the elements within the Preset browser.
Advanced--
Client Identifier: The 'Client Identifier' option allows a Preset Browser to have its own unique selection. This is most useful when configuring a Preset browser to be used with a specific tool; for example, this is how the Polygon Bevel tool knows which of many possible Preset Browser viewports to use (in the case of Polygon Bevel, the browser viewport is embedded right in the Tool Properties viewport). Note that each tool must be specially coded to look for a specific client identifier, so this feature is only really useful to tool developers (which, at the moment, is only us).
Alternate Input Map: The 'Alternate Input Map' toggle is an advanced setting for developers that controls the number of mouse clicks used to assign a Preset to a tool, when enabled they assign with a single click, (simply selecting them, mimicking the Photoview 360 behavior) and when disabled they apply with a double click (default behavior).
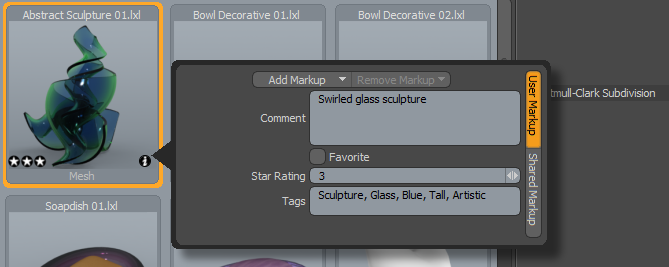
The Preset Browser allows users to manually add additional markup (metadata) to Presets to aid in organization, and enhance filtering and searching of Presets. This includes the ability to add keywords, comments, star ratings and 'favorite' Presets. Depending on the size of the actual Preset icons relative to the viewport, users will see these additional tagging attributes as overlay icons when the mouse is directly hovering over an Preset (star ratings will hide automatically on smaller scaled icons). There are slightly different way to view these attribute, depending on the mode of the browser. When the metadata icons are visible, users can LMB+click on them to set the attribute. Clicking the heart icon will 'favorite' that Preset, clicking over a specific star icon, user can rate the Preset from 1 to 5 stars, or press the tiny x to remove the star rating. Clicking the tiny 'i' icon will open the attribute popup panel where users can then add the tags, keywords and comments, as well as numerically define the ratings--
Preset Searching
Users can search for specific presets a couple different ways. One way is through the use of sorting, covered above. The other way is using the specific 'Search' option. Search is located under the 'F' button in the preset Interface, LMB+clicking it will open the search string input field. Users can type a term into the field and modo will hide all files that don't contain the defined term in either their file name or in their keyword 'Tags'.

On the right side of the input field is a small arrow users can LMB+click to open a menu with some additional options. First is a list of the most recent search terms used. Then there is 'Simple Search' which will utilize a single keyword search term at a time. 'Pattern Matching' uses advanced filtering options available to search for Presets. Lastly, the 'Match Case' forces MODO to recognize the upper and lower case characters when searching for a match.
Applying Presets--
Materials: Applying material Presets couldn't be easier. You can select a number of polygons and either LMB-click drag onto the selection or just double click the material Preset itself and the polygons will be tagged with the appropriate surface name and applied in the shader tree. If you've already tagged all your surfaces using the 'm' keyboard shortcut, that's even better, you can just drag and drop any of the material Presets onto the surface and the appropriate material will be updated in the shader tree. For Presets with associated image maps that require UVs, if no UVs are present, the material will default to cubic projection. Presets can also be dragged and dropped directly onto group items in the Shader Tree itself.
Environments: Environment Presets can be added to a scene by simply double clicking on the Preset of your choice. This automatically adds it to the Environment item of the Shader Tree. If you don't have a preview window visible, you may need to render the scene to see the effect of an environment Preset.
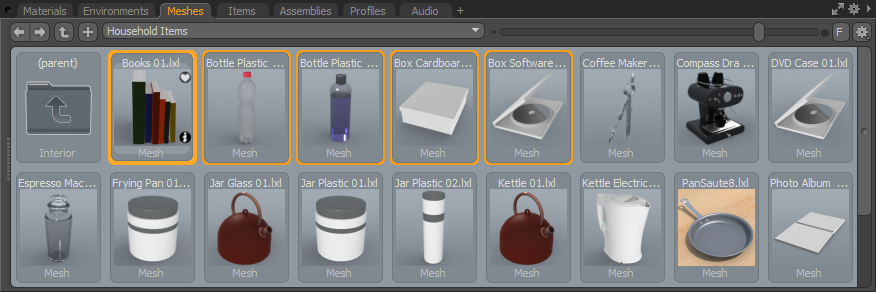
Meshes: Mesh Presets can be applied to a scene just as easily as any other type of Preset. If a Preset is dragged onto an empty part of the scene, it will automatically position itself appropriately in relation to the Work Plane becoming its own mesh item layer. If the Preset is dragged over geometry (for example a light fixture onto a wall) the item will align itself to the polygon it was dropped onto and becomes part of the same layer. If one simply double clicks the Preset, the item will be created at the origin (0,0,0 position). Once inserted, a mesh Preset is just like any other geometry in a scene and becomes fully editable.
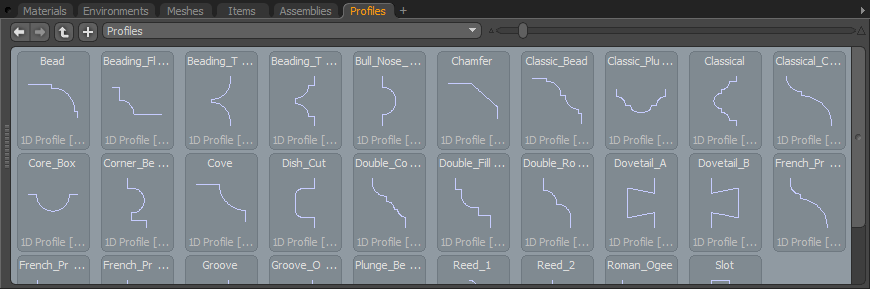
Profiles: Profile Presets work with many modeling tools and can be simply applied by first selecting the profile you wish to use and then invoking the appropriate tool, say for instance the bevel tool. With the tool in interactive mode, you can see the effects of the profile added to the bevel as you drag it out. Selecting any other profile will update the bevel profile instantly allowing users to try out different settings before dropping the tool.
Render Settings: MODO provides users the ability to save the 'Render Item' settings, such as Frame Size and Resolution, Antialiasing, and the Global Illumination settings as a 'Render Preset', making it easy for users to define commonly used default values and then apply them quickly to new scenes, without the need to change multiples of settings manually. Camera Items may also be included in these types of Presets. To apply a "Render Preset' users need only to LMB+double click over the target Preset in the viewport to apply it to the currently active scene. Once applied, the Render Items updates reflecting the new values. An additional 'Camera' item defined by the Preset may be added as well.
There are probably a number of items you create for every scene, a ground plane, a certain environment gradient, or maybe a specific material. Creating your own Presets is a great way to streamline a workflow and speed up scene creation eliminating repetitive task so you can concentrate on the important stuff.
Materials: Any layer or collection of layers in the Shader Tree can act as a Preset. If you RMB-click on a layer, and select 'Save Preset..." from the drop down menu, you will be presented with a OS specific file save dialog asking where you'd like to save your Preset. If you want the Preset to show up automatically in the existing browser, you'll need to navigate to the directory where your Presets are stored and save within that directory. One can also create a new directory for saving Presets, but make sure to use the '(add path)' command so you can see them within the browser viewport. I'm sure quite often you will have a surface made up of multiple texture layers, in that case you will want to make sure to create the Preset from the material group (![]() ) , as that will include all associated texture layers within the Preset. Don't forget that Fur is made up from texture layers so making hair Presets is just as easy as making surface Presets.
) , as that will include all associated texture layers within the Preset. Don't forget that Fur is made up from texture layers so making hair Presets is just as easy as making surface Presets.
Environments: Environment Materials can also be saved as Presets by RMB-clicking on the environment material layer and selecting 'Save Preset...' Just as with materials, you will be presented with a file save dialog asking where you want to save your Preset. If you want the Preset to show up automatically in the existing set, you'll need to navigate to the directory where your Presets are stored and save within that directory, one can also create a new directory for saving Presets, but make sure to use the '(add path)' command so you can see them within the browser viewport.
Meshes: Mesh Presets require a small amount of setup for them to work properly. Mesh Presets align themselves based on their relationship to MODO's origin when they are created, therefore it is recommended that one create mesh Presets at MODO's origin point. You'll also want them resting on the ground, so they are facing the Y up (positive) direction. That way when you create say a light fixture that you are applying to a series of walls, each one will be properly aligned to the wall in the proper orientation when placed. Note that item transforms are not considered in Presets, so make sure you make your alignment changes at the component level, otherwise use the Freeze command in the items properties tab. Once your model is properly positioned, one only needs to RMB-click on the mesh item layer in the item list viewport and select 'Save Preset...' where you will be presented with a file save dialog asking where you'd like to save your Preset. If you want the Preset to show up automatically in the existing set, you'll need to navigate to the directory where your Presets are stored and save within that directory, one can also create a new directory for saving Presets, but make sure to use the '(add path)' command so you can see them within the browser viewport.
Render Presets: Users can easily save the settings of the Render Items, which contains core rendering attributes such as 'Frame', AA and ray trace 'Settings' and 'Global Illumination' settings, by simply LMB+clicking on 'Render Item', the top-most item of the 'Shader Tree', to select, then RMB+Clicking on the item to open the context menu and selecting the 'Save Preset' option. Additionally, users may select the 'Render Item' and invoke the menu bar command "File > Save Item Preset". Either way opens an OS specific 'File Save' dialog. If you want the Preset to show up automatically in the existing set, you'll need to navigate to the directory where your Presets are stored and save within that directory structure; one can also create a new directory for saving Presets, but make sure to use the '(add path)' command so you can see them within the browser viewport.
If a 'Camera' item is also selected when the Preset is saved, then that camera and its associated settings will become part of Preset and when applied will be added to the scene in addition to any existing cameras. Useful to set-up automatic DOF and motion-blur cameras.
Profiles: Profiles are based off of a curve drawn in MODO. You can create them in a number of ways, including the curve tool, Bezier curve tool or the sketch tool. Once you have your profile curve defined, select it and in the menu bar select the command 'Geometry > Profile > Save...) where you will be presented with a file save dialog asking where you'd like to save your Preset. If you want the Preset to show up automatically in the existing set, you'll need to navigate to the directory where your Presets are stored and save within that directory, one can also create a new directory for saving Presets, but make sure to use the '(add path)' command so you can see them within the browser viewport. Once you click 'Save' you will be presented with this dialog box...
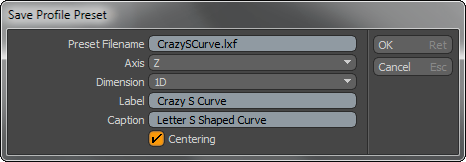
The 'Preset Filename' will contain the name you specified in the previous file save dialog, so it shouldn't be necessary to edit it here, 'Axis' specifies the plane which the profile was created on, either X, Y or Z. 'Dimension' specifies to MODO whether the drawn profile is '1D' or '2D'. 'Label' and 'Caption' are pretty self explanatory, and will appear above and below the profile respectively in the Preset library window. The 'Centering' toggle will automatically center the curve when enabled (if it was created away from the origin). Click OK to finalize saving of the profile.
Assemblies: Assemblies are Presets that contain collections of multiple items, even including full hierarchies of rigged elements if desired. To save a regular Assembly Preset (a collection of multiple items), select the root item of the setup in the 'Item List', or all the individual items you wish to save (from the various viewports, such as related materials, if applicable), and in the menu bar go to "File > Save Assembly...", alternatively users can RMB+click on the root element in the items list and use the 'Save Assembly' command from the contextual menu. Saving the Assembly opens an OS specific dialog where users specify the file name and save location. When saved to the existing Presets folder structure, under the Assemblies section, the resulting Assembly Preset will be available immediately in the Preset Browser.
To save a rigged Assembly Presets, with channel connections, modifiers and/or constraints, it will be necessary to save the Assembly Preset from the Schematic Viewport. In order to retain the schematic layout of nodes and their connections, it will be required to first create an Assembly node of all the desired elements in the Schematic viewport and from the resulting Assembly item, RMB+click on the header/title area of the node and select the "Save Assembly' option form the contextual menu. For more information on creating Assemblies in the Schematic viewport, please reference that page of the documentation. Also note that any scripts used by the Preset will need to be saved into the root script location so they can be found automatically.
Contextual Menu--
By RMB-clicking on a Preset icon, users are presented a contextual menu with several options for managing Presets as well as customizing the icon display-
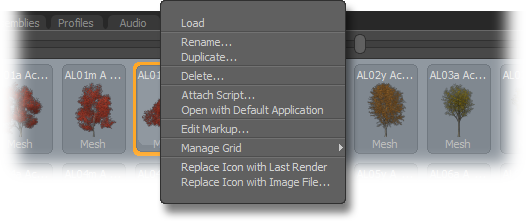
Load: Will load the currently selected Preset into the scene, for mesh Presets, this will create a new item centered at MODO's origin. For Materials, you need to select a material group in the shader tree before the material Preset will load in this way.
Rename: Allows the user to apply a new label to the Preset, replacing any previous labels.
Duplicate: This command will pop up a dialog box requesting a new filename for a new duplicate Preset file.
Delete: Will remove the currently selected Preset. Note that this also removes the file from the hard drive.
Attach Script: This option opens an OS specific dialog where users can specify a script- an LXM macro file, or a Python, Perl or Lua script. Selecting the target script attaches it to the Preset in a way that the next time the Preset is added to the scene, such as through a double click or drag and drop action, the script will fire, running the commands it contains. This is useful to script some automatic setup for assets added to a scene. Keep in mind the script will need to remain in the same disc location relative to the Preset, it is not embedded into the Preset itself and needs to be present in order to run.
Open with Default Application: For non-MODO specific assets, such as image maps, this command will use the OS's default application to open the file for further editing.
Edit Markup: Opens the 'Preset Tagging' dialog as a popup for editing.
Manage Grid: When viewing the Browser in 'Grid' mode, users can easily organize the files in a specific order, when the 'Sorting' option is set to 'Manual'. When set as such, users can then use these Manage Grid options to add grid spacing lanes, additional lanes with which to organize and sort the Presets.
Replace Icon with Last Render: Will embed the last 'F9' render result into currently selected Preset item.
Replace Icon with Image File: Opens an OS specific dialog box used to select a saved image that is embedded into the currently selected Preset item.
Adding Your Own Preset Tab--
If you wish to further customize the tabbed Presets Browser to your personal workflow, such as creating a repository for project specific Presets, adding your own Preset tab to the workspace is a relatively easy task. First, navigate to the Preset browser itself, to the right of the 'Profiles' tab in the default configuration, there is a little 'plus' sign (+) for adding additional tabs, LMB-click on it. Within the pop-up, select 'Data Lists > Presets Browser' and a new tab will be added to the right side of the existing tabs. Now, RMB-click on the tab where it says 'Preset Browser' and in that pop-up, select 'Viewport Controls > Rename Tab' and type the name you'd like to use in the window. From there you can display a custom folder of Presets by navigating with the standard controls to your preferred directory.
Working with Replicators--
Mesh Presets are fully compatible with Replicators, though are not automatically applied as such. To use a Preset mesh as a replicator, double click the mesh object in the Preset viewport so it will be created as its own mesh item at the origin. Then, in 'item mode', select the Point Source and the newly created Preset item mesh and create the replicator in the usual way --menu bar "Item > Add Replicator" Please reference the Replicator item for more information on working with replicators.
In the Viewport Options, there's a simple multi-line edit field labeled 'Filter String'. This allows advanced users to limit what is displayed in the Preview Browser by testing the markup and metadata. This filter affects the currently visible files in the thumbnail browser or flat list, and can be set to filter only files or both files and directories.
The basic input format for the filter is--
(NOT class:attribute(options)={value}..{value}) COMBINER
You can have as many of these as you like, space-delimited.
Parentheses
You can optionally wrap multiple tests in parentheses for grouping purposes. The COMBINER (described below) determines how this test is handled relative against the next test.
NOT
The optional NOT prefix inverts the following test
class
The class is one of "intrinsic", metadata, user or shared, and determines where the attribute is pulled from.
attribute
The attribute is the internal name of the attribute to test. Attributes are case sensitive, and are fairly arbitrary (beyond the fact that they obey internal string naming rules).
The intrinsic class supports the following special properties:
-
path: (filepath) The full local path to the file.
-
name: (string) The name portion of the path, including the extension.
-
ext: (string) The extension of the file, if any.
-
size: (memory) The file size on disk. Directories currently return a size of 0.
-
isFile: (boolean) True if this is a file, false if it is a directory.
-
numFiles: (integer) The total number of recognized files in a directory.
-
numDirs: (integer) The total number of subdirectories in a directory.
-
numChildren: (integer) The total number of recognized files and subdirectories in a directory.
-
modTime: (string) When this file or directory was last modified or created (whichever is more recent).
Some examples of common user and shared markup include:
-
isFavorite: (boolean) True if this entry is flagged as a favorite.
-
starRating: (integer) 0-5 indicating the star rating assigned by the user.
-
tags: (string) Arbitrary strings provided by the user for tagging purposes.
-
author: (string) Author of the file.
-
copyright: (string) Copyright information.
-
desc: (string) Description of the file.
The markup is extensible by the user, and can contain arbitrary attributes.
(options)
These are optional, but if present must be in parentheses, and follows the attribute name. The available options depend on the datatype: The list of options are space-delimited.
For strings:
-
substring: Search the attribute for the test value as a substring. This is the default.
-
pattern: Do pattern matching.
-
case: Make the comparison case sensitive. The default is case insensitive.
-
exact: The string must exactly match the test value. This can be used with case to enforce a case-sensitive compare.
Operator
The operator is a standard mathematical test, although the behavior is a bit different depending on the datatype.
-
= (Equal); the value must match exactly. When used with strings, this will do pattern matching, a substring search or an exact match depending on which options are set.
-
< (Less Than), > (Greater Than), <= (Less Than or Equal), >= (Greater Than or Equal); basic logic tests.
-
On numeric types, this works as you would expect.
-
On float numbers, this compares against a very small threshold (epsilon), since you can't directly compare floats for technical reasons.
-
On strings, this does the C function strcmp (or the case insensitive version, depending on if the case option is set) and tests the result. This is most useful when comparing the modTime attribute against another time to find files newer or older than that time.
If no operator is provided, then the filter matches as long as class:attribute exists on the file or directory.
Note that if the attribute does not exist on the file or directory and an operator is present (meaning, you're not just doing an existence test), the test will be considered a failure irrespective of the value being tested against.
Value
The value to test against. It must be wrapped in in one of the following ways:
-
Curly braces {...}: The value string is parsed as a "raw" format value.
-
Square braces [...]: The value string is parsed as a "nice" format value.
-
Less than/greater than bracing <...>: The string is in the form class:attribute path and represents another attribute to be tested against. The path is optional; if present, it is the full local path to another file or directory in the dir cache; if omitted, then the attribute is pulled form the current entry.
These braces are allowed to nest, in case you need braces inside the search string. if there is an unbalanced curly brace inside of that string, it must be escaped with backtick (`). If you actually have to search for a back tick, that needs to be escaped with another backtick (i.e.: ``)
Testing Against Non-Existent Attributes
It is also important to note that a value test will only happen if the attribute actually exists on the item. This means that if you wanted to check for everything that has the isFavorite attribute set to false and you did this:
user:isFavorite={false}
It would only match entries which have been previously flagged as favorites and then turned off again (since turning it off just reset the attribute to false; it didn't remove it from the markup). Thus you would need to do this for your filter:
user:isFavorite={false} OR NOT user:isFavorite
Which would match if the isFavorite attribute is false, or if the isFavorite attribute does not exist.
Range Testing
The .. (two period) syntax can be used to do a range test between the value described above and a second value. The second value after the .. follows the same formatting rules as the first value. This is only valid with the '=' (equal) operator, since it doesn't make sense with any of the others.
When comparing numbers, value from class:attribute must by greater than or equal to the first value and less than or equal to the second value.
When comparing strings, they are both tested against class:attribute's value with strcmp() (or a case-insensitive version, if case is set; other string options are ignored). For those who don't know, strcmp() returns if a string is "less than" (which can generally be thought of as meaning "comes before in sort order") or "greater than" another string. The class:attribute value string must test greater than or equal to the first value string, and less than or equal to the second test string. This is primarily useful when testing file times with the intrinsic:modTime attribute, allowing you to see if a file was created in between two time ranges.
Combiner
When performing multiple tests, the AND and OR combiners can be used to decide if they all must match or only some must match. AND is optional and is inferred if not provided. This is most useful when combined with parentheses.
For example, this matches if a Favorite flag is set in the user markup, or if the user markup Star Rating does not exist, or it does exist and is less than 1.
user:isFavorite={true} AND (NOT user:starRating OR user:starRating<{1})

