


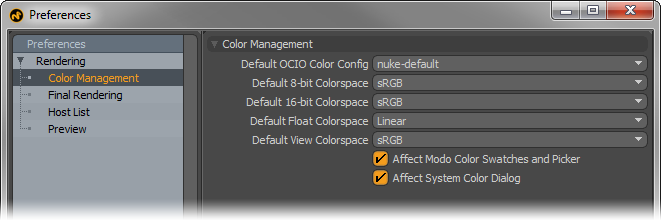
Color Management--
Default OCIO Color Config: This option controls which configuration type with be the default for new scenes, Each separate Config controls which color spaces are available for use by items in the scene. Each config type contains a different set of Profiles. Users can also designate a Config for individual scenes manually in the Scene item.
Default 8-bit/16-bit/Float Colorspace: These options designate the scene default Profile assigned when reading and writing the associated bit depth of image for any Items that have their Colorspace control set to 'Default'. Users can also designate colorspace profiles individually on the Image Map item under the 'Image Still' subtab.
Default View Colorspace: These options control the colormapping assigned to user interface elements, including the Color Picker, Color Swatches, the Render Display window and the interactive Preview.
Affect Modo Color Swatches and Picker: When this option is enabled, the 'Default View Colorspace' option will adjust the display of individual color input fields in the Properties form to match the colors of the Render Display.
Affect System Color Dialog: When this option is enabled, the 'Default View Colorspace' option will adjust the display of the Color Picker popups and Windows to match the colors of the Render Display.
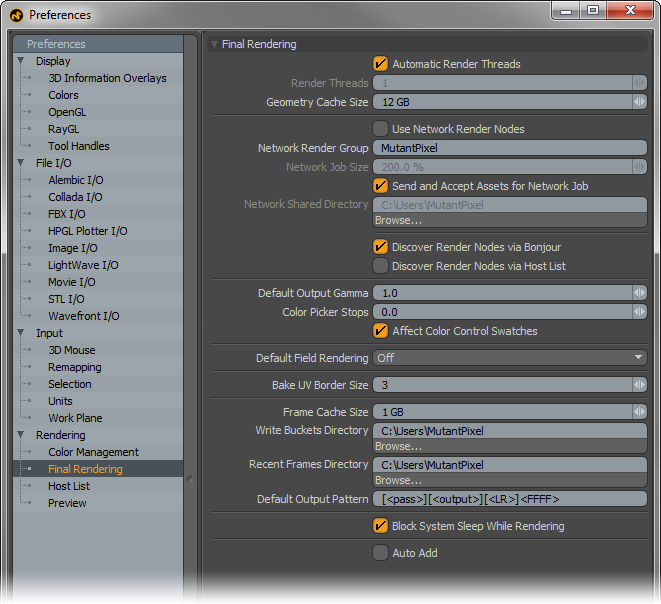
Final Rendering--
Automatic Render Threads: When enabled, MODO will determine the number of threads automatically based on the number of CPU cores and other factors, such as Hyper-Threading support.
Render Threads: When 'Automatic Render Threads' is disabled, users can manually set the number of 'Render Threads'; which reflects MODO's ability to simultaneously calculate rendering information, each calculation taking place as its own thread. The greater the number of threads, the faster scenes will render. However, there will be a point of diminishing returns, where overhead of thread management will outweighs benefits of the extra threads. Generally speaking, the best performance is obtained when the number of threads equals the number of total cores, virtual or otherwise.
Geometry Cache Size: This value, set as GB (Gigabytes or 1 billion bytes) determines the maximum amount of system RAM MODO will use to parse scene geometry for rendering. When the amount of geometry exceeds this value, an error message will be displayed. Users can increase this value to render geometry intensive scenes, such as those using 'Fur' and 'Subdivision Surfaces' with 'Micro Poly Displacement'. For 32-bit systems, this cannot exceed the maximum amount of addressable ram (minus that needed by the system itself), typically around 3GB. For 64bit systems, the amount can be much greater, dependent only on the amount of available system RAM.
Use Network Render Nodes: When enabled, MODO will seek out additional online MODO slaves, and use the network attached systems for additional rendering horsepower. For more information on the setup and use of Network Rendering, please reference the 'Network Rendering' page of the documentation.
Network Render Group: The Network Render Group is an identifier that will allow users to pool the resources of like named systems for network rendering, providing users a degree of control over how the network resources are allocated. For example- If there are 24 systems available on a network for rendering via 'Slave' mode, an administrator could give twelve of them the 'Network Render Group' name "Klaatu" and the other twelve the group name "Barada". When any network rendering jobs are submitted on a system named 'Klaatu', only the 12 systems with the same group name would be utilized for network rendering, leaving the other 12 available for rendering only within the 'Barada' group.
Network Job Size: The 'Network Job Size' setting determines the number of buckets distributed to the Slave machines. The general rule is to take the total number of slave cores for rendering and multiply it by two, producing double the number of total buckets to be distributed. Depending on the scene makeup and network speed, the default 200% value (i.e. 2x) may not be optimal for load balancing across the network. If the master machine tends to sit idle, it may help to increase this setting.
Send and Accept Assets for Network Job: In MODO 501 and earlier, network rendering files were propagated by way of a shared network folder, where all slaves could access the scene and its assets. Users can now enable the 'Send and Accepts Assets for Network Job' option and MODO will instead send the scene and any assets directly to a Slave (using networks sockets), avoiding the permission issues caused so often by a shared network folder. When enabled, it is not necessary to specify a 'Network Shared Directory'.
Network Shared Directory: When using Network Rendering, with the 'Send and Accept Assets for Network Job' option disabled, users will need to define a folder (directory) that each Slave across the network will use to read and write to. Once a folder has been determined, use the 'Network Shared Directory' option to specify this location.
Discover Render Nodes via Bonjour: With this option enabled, MODO will seek out systems connected to the same network, that are placed into 'Slave' mode and use those systems for network rendering.
Discover Render Nodes via Host List: With this option enabled, MODO will connect directly to systems listed in the Host List for network rendering. In instances where Bonjour fails to connect networked systems, the Host List is a way to bypass Bonjour and connect to systems directly if the IP address is known.
Default Output Gamma: When adding new Render Output layers to the Shader Tree, this value determines the default Gamma setting for the item. Users may over-ride this value by adjusting the Gamma value within the Render Output item itself.
Color Picker Stops: This option sets the default 'Stops' value for the Color Picker viewport. 'Stops' are basically an exposure control that allows users to more easily view and select high dynamic range colors.
Affect Color Control Swatches: When this option is enabled, the UI advanced color selectors are affected by the 'Color Picker Stops' value.
Default Field Rendering: For users that render animations that require interlaced frames, this option determines the default field rendering state for new scenes. Users can adjust the setting individually, per scene within the Render item. Most modern broadcast mediums do not require the use of interlaced frames, so unless you are certain you need them it is best to leave this option at the default 'Off' value.
Bake UV Border Size: When Baking a texture, or applying the 'Expand UV Seams' command, this option determines the amount of expansion around the UV border. The default value of 3 pixels is generally fine in most instances. When generating very high resolution images, or in cases simply where texture seams are visible, users may benefit from increasing this value.
Frame Cache Size: This option controls how much of the rendered image is loaded into memory at once. Rendered images are organized internally as a set of tiles, so with this option, the user can adjust the balance between faster redraw speed and lower memory consumption. Setting this option to a value that is smaller than the amount of memory necessary to display the rendered image can result in some tiles being purged when zooming or panning, which can greatly affect redraw speed (depending on storage speed and how many tiles need to be reloaded as the image is drawn in the viewport).
Write Buckets Directory: When users enable the 'Write Buckets to Disk' function, this option determines the specific directory where these files are written.
Recent Frames Directory: MODO saves its rendered results in this user specified 'Recent Frames Directory'. These rendered image files can be selected, navigated, modified and saved from their proprietary MODO rendering format using the Render Display window. Rendered image files are persistent across MODO sessions until intentionally removed by the user or the 'Max Render Slots' value is achieved.
Default Output Pattern: This option defines the initial Output Pattern, an option to automatically name rendered frames, in any new Render Output item that is created. Users can override this on a per-output basis by editing the value directly in the Render Output.
Block System Sleep While Rendering: This option, when enabled, will block the system from entering low power usage 'Sleep Mode' when rendering. When disabled, MODO may stop functioning properly when the system enters 'Sleep Mode' while rendering.
Auto Add: This option defines the initial default setting for the 'Auto Add' option of the 'Passes' functionality.
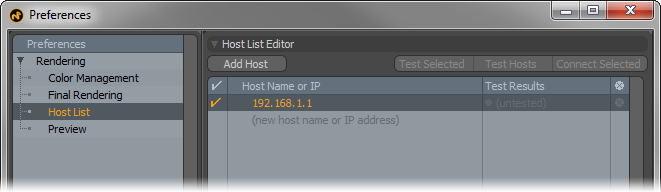
Host List--
When using the Network Rendering function, the Host list is the list of possible target computer systems that can be used for rendering (The 'Host List' option must be enabled in order to define hosts). This system can bypass the traditional Bonjour automatic node discovery, allowing users to manually enter a systems IP address and test it. This is done by finding the target system(s) IP address using the computers networking tools. With the IP information in-hand, use the 'Add Host' button to open a dialog where the 'Host Name' or 'IP address' is entered and them press OK. Once a host's address is entered, it can be tested with the 'Test Selected' button, or all addressed can be tested with the 'Test Hosts' button. For any successful connections, users can use the 'Connect Selected' button for systems that don't connect automatically. For more information on Network Rendering setup, please reference the 'Network Rendering' page of the documentation.
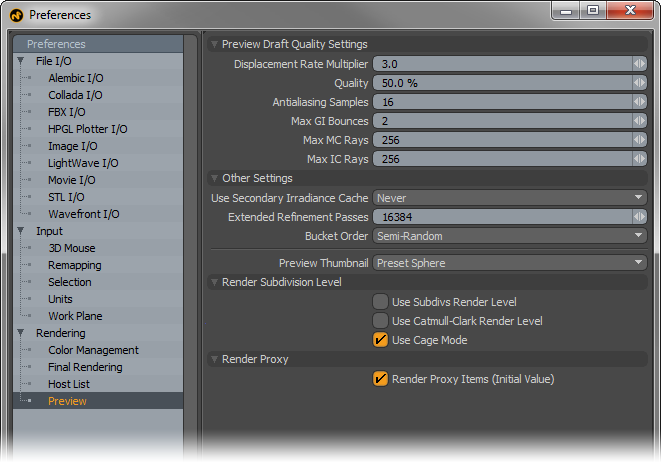
Preview Draft Quality Settings--
When using a preview viewport with the Quality settings in the RayGL section set to 'Draft', the following options determine the quality settings solely for the preview viewport itself. Users can throttle material and render setting values for more responsive preview performance.
Displacement Rate Multiplier: Sets the maximum Displacement rate for Micro Polygon Displacement.
Quality: Sets the preview 'Quality' as a percentage. At 50%, all 'Samples', 'Number of Rays' and other related quality setting will be cut in half reducing rendering quality, but increasing performance.
Antialiasing Samples: Sets the maximum amount of Antialiasing samples calculated for the preview.
Max GI Bounces: A general quality settings multipliers that throttles the total number of rays related to IC, Transparency, Reflections and Refractions. The default setting of 50% reduces the total number of rays specified by half.
Max MC Rays: This option determines the maximum number of Monte Carlo global illumination rays used to calculate indirect lighting.
Max IC Rays: This option determines the maximum number of Irradiance Cache rays used to calculate indirect lighting.
Other Settings--
Use Secondary Irradiance Cache: The Secondary Irradiance Cache is used to increase the quality of the Preview render, but it takes additional cycles to calculate the additional irradiance values and therefore slows down the preview. If you want to use Preview like a final render tool and get the additional IC passes like you get when pressing "F9" (to generate a Final Render), this option enables it. Combined with 'Extended Refinement Passes', it will act more like progressive rendering engines, where MODO will continue to improve the image quality as long as you let it set and cook. Disable this option when you want the preview to be more responsive.
Extended Refinement Passes: This value determines the maximum number of rays when using the 'Extended Refinement Passes' option for 'RayGL' and 'Preview' quality. Once MODO arrives at the number of samples as determined by the item settings, MODO will continue firing rays for IC, MC, Reflections, Refractions, Transparency and Subsurface Scattering up to the number of rays set here. This option allows for interactive style rendering when using the Preview viewport.
Bucket Order: This option determines the update order of buckets-
Semi-Random- Updates buckets in a semi-random order providing a more iterative update to the render.
Scanline- Updates the buckets in a left to right, top to bottom order producing a more regular update pattern.
Preview Thumbnail: Determines the default rendering style for Preview Thumbnail icons when saving Preset materials.
Render Subdivision Level: In any Mesh items properties, users can define a separate Render level for both regular Subdivision Surface geometry and Catmull-Clark subdivisions. There is also an option to disable the display and rendering of the subdivisions altogether without affecting their settings, called 'Cage' mode. These toggles are simply global override options to disable or enable these functions. These options must be enabled here for the associated function to work, when disabled, this value will override the settings of the mesh item.
Render Proxy--
Render Proxy Items (Initial Value): Proxy Items are a means to save individual item layers to external files, making the source Scene file smaller. In order for Proxy items to render they will also need to be loaded into memory which may slow the scenes performance down, depending on the scene size and other factors (defeating the purpose of the Proxy). By default the 'Render Proxy Items' option is enabled, meaning Proxies will render. Users can set the "Render Proxy Items (Initial Value)" to disabled meaning that Preview will then default to not rendering Proxies. This can also be changed directly in Preview under options.