
When an item is parented to another it will inherit that item's position, rotation and scale. Any transforms of it's own are added to the those of it's parent. Normally this parent child hierarchy is a fixed link. Parenting defined in this way cannot be animated and remains in effect for the duration of the scene. (For more on setting up hierarchies, click here)
There are many situations where the ability to change the parent of an item is very useful. Consider, for example, a robot arm on an assembly line, perhaps a component is picked up and attached to a product being assembled on a conveyor, once done the product moves off for the next stage of assembly. This could be animated by having multiple versions of the component, one in the parts bin, one parented to the robot arm and another parented to the product on the conveyor. By animating the visibility of each of these component copies you could give the impression that it's being picked up and attached to the item being assembled but this can quickly become tedious to implement, and difficult to manage.
Ideally you'd want to specify that, at this point in time, this item is parented to that item and, at another point in time, it's parented to another and so on. 'Dynamic Parenting' allows you to do just that and has many applications for animation beyond this example.
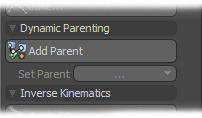
To define a Dynamic Parent relationship first select the item that will be the child (in the example above, this would be the component) and then the acting parent item (for example; the Robot Arm). Once both items are selected make sure that 'Compensation' is on (so the item remains in it's current relative location) and click on the 'Add Parent' button to define the link.
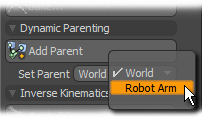
Underneath the 'Add Parent' button is a popup menu that becomes active when Dynamic Parenting is applied and allows you to choose the current parent for the item. If you open the menu now you'll see it contains two entries, one for the parent that you just assigned and one for the 'World', which effectively means 'no parent'. If you select and move the new parent item, the constrained item will follow along just as if it was parented by conventional means. To add further parents, you simply select the constrained item and the item that is to become the parent and press the 'Add Parent' button again. You can add as many items as you wish and they can be added at any time.
To change the current parent, just select the constrained item and choose the new parent from the popup menu, either in the tool bar or in the properties viewport for the 'Dynamic Parent' Channel Modifier item (click the '+' sign expansion widget that appears next to the constrained item in the Item List). Once all the parent items are defined, they can be changed over time with keyframes. If Auto Key is enabled, then by just moving the timeline to a new position and specifying a new parent, the child item will dynamically change to the new parent. You can also manually apply keyframes on the 'Parent' Channel under the 'Dynamic Parent' modifiers channels. They are specified numerically, but represent the items in the list top down. So, for our example 0 would equal World, 1 equals Robot Arm, 2 Component and so on. Note: It will likely be necessary to enable 'Compensation' when dynamically parenting items to ensure items don't jump around when parented.

