
Hierarchy is defined as a series of ordered groupings. In 3D animation these hierarchies are also known as 'Parenting' or 'Parent/Child' relationships, MODO uses these grouping hierarchies to define how multicomponent objects relate to each other, such as a car with spinning wheels. Moving the car around is much easier when the wheels move with the car automatically, but they still need to be separate objects from the car as they move in a different way than the body itself, this is where hierarchies come in really handy. Every hierarchy starts with it's base item, called the 'Root', this is the main parent item, each subsequent item in the chain is considered a child, and the item directly above a child is always considered its parent.
Hierarchies are essential to animation as they define the orders of inheritance for transformations in a chain of linked items. Consider an arm, if you move your shoulder (or torso), your arm follows along, as does your wrist and hand. So the shoulder bending is passing its transforms on to the elbow, which can also bend, both of those transforms are passed on to the hand so on. MODO visualizes these hierarchy chains as cascading items within the Item List.
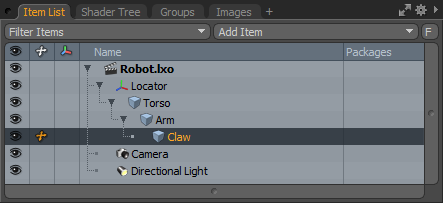
Defining Hierarchies
In the image above, note the indentations of each subsequent item in the list. The top layer called 'Locator' is the parent item, the next its 'child', followed by siblings in lower orders. Proper ordering of items in a hierarchy is imperative as it defines how the transforms relate to items further down the chain. Creating hierarchies in the item list is a simple process that utilizes drag-and-drop functionality. By simply selecting any layer and then LMB+click and dragging and then dropping the layer onto another layer (target layers are highlighted) it will automatically parent the items in place, meaning the items will intelligently inherit the parent items transforms, if it exists (i.e. it won't move from where it is when parented). By pressing the 'Ctrl' key before releasing the mouse button, it will Parent the items directly, so if the target has any transforms, this will cause the child items being parented to move as if it were connected to the item all along (i.e. if it were parented before it was moved from the origin at 0,0,0).
The animation 'Setup' workspace layout provides some additional tools for creating and modifying hierarchies. Found in the default toolbox under the 'Setup' subtab, the hierarchy tools can be used to assign hierarchy to item selection directly in the 3D viewport.
![]() Compensation
Compensation
When parenting items together that have prior transforms applied, you might find your items popping out of position, what is happening is the child is inheriting the transforms of the parent, instantly sending it off to a position you likely don't want. Enabling the 'Compensate' button which is positioned in the top area of the 'Setup' layout, next to the mode buttons, changes the Parent/Unparent function to Parent in Place/Unparent in Place. What this does is ignores prior parental transforms, so items retain their initial positions in relation to their parent.
When in item mode, the 'Parent' and 'Unparent' commands produce the same results as the item list, but work with selections in the 3D viewport. Selection order is important when using this function as it sets the relationship properly. The last item selected becomes the parent while everything else becomes the child of the parent. Multiple items selections won't create an entire chain, to do that, you would need to apply the parenting command multiple times. To use the parent command first make sure you are in 'Item' mode. Select an item in the 3D viewport by clicking on it, this will be the child item, hold down the shift key and select the second item, with both items selected, click the parent button. And that's it. You can see that the first item selected, has now become the child of the second item. Unparent works the same way, select any item or items and click the unparent button to remove them from the hierarchy. Keep in mind when setting up hierarchies that any item can be parented to any other item, cameras, lights, and locators.
The 'Insert' command is a useful function for adding items into an existing hierarchy without breaking or upsetting the existing chain. 'Insert' will add the first selection as a child of the second selection, inheriting the latter selections transforms and siblings.
The 'Insert at Parent' command reverses the insert command, inserting an item as a parent instead of a child, while still inheriting transforms and siblings. Useful for inserting an item into the top of a hierarchy.
The Extract command will remove an item from within a hierarchy, without disrupting the rest of the hierarchy chain, by automatically parenting children of the extracted item, to its parent, once the item is removed.
3D Viewport Parenting Actions
While in 'Items' selection mode users can use keyboard shortcuts to quickly set up basic hierarchies simply using selection. The last item selected always represents the parent item. While in any 3D viewport, users can select two or more items and use the 'P' keyboard shortcut to parent in place, 'Ctrl+P' performs normal parenting, 'Shift+P' unparents in place, and 'Ctrl+Shift+P' unparents the selected items. For more complex actions users can utilize the 'Drop Action' function.

Users can also utilize drag and drop actions directly in the 3D viewport to define more complex hierarchies, the 'Drop Action' menu in the 'Animate' and 'Layout' interface tabs define what action happens when an item is dropped onto another. Users must be in 'Items' mode with no active tools for the actions to work. Simply LMB+click on an element and drag it toward the target item. The actual element in the interface won't move until the target item is reached and the mouse button is released, producing the desired action.
None- No action is performed on the elements.
Parent- Source item is made a child of the Destination item.
Parent in Place- Source item is parented as above, but with 'Compensation' applied.
Match- Source item is modified to match position scale and rotation of destination.
Match Position- Source item is modified to match the position only of the destination item.
Match Rotation- Dropped item is modified to match the rotation only of the destination item.
Match Scale- Dropped item is modified to match the scale only of the destination item.
Insert- Inserts the source item into the hierarchy of the destination item. The item will be positioned and orientated to match the destination item and will become the parent of the destination item.
Insert at Parent- Similar to 'Insert' but the source item will match it's position and orientation to the destination item's parent (if a parent item is present).
Insert in Place- The source item will be inserted into the destination item's hierarchy as it's parent but will retain it's current position and orientation.
Place- Positions the selected item at the intersection of the mouse pointer and surface.
Place and Align- Positions the selected item at the intersection of the mouse pointer and surface rotating the item to match the surfaces normal direction.

