The Spacing Chart is designed to aid animators in a workflow popularized by traditional hand-drawn animation, concentrating on the poses of the character, treating a keyframe position like a single drawing in an animated sequence. Basically it allows animators to define specific key poses for a character before working out the timing. Once the poses are set, then the timing can be modified independently.
The following worflow is based on the approach used by Keith Lango (see References below) where the timing of the animation is done after the creation of all the key poses, demonstrating the used if the Spacing Chart interface. This shouldn't be considered the only way of working with this interface though, the animation can be timed out at any point, the use of breakdowns and inbetweens is just as valid whenever the timing is done.
Setup
A few things need to be setup before starting:
-
Create an 'Actor' for all the items being animated.
-
Create an 'Action' for the animation.
-
Set the Action 'Interpolation' to "Stepped" or "Linear" in the Action popup form.
-
Make sure that all the channels that will be animated have a keyframe at the start frame.
Usage
The 'Spacing Chart' interface (HUD) is opened by clicking on the button at the top left of the toolbar area in the 'Animation' layout.
This opens that Spacing Chart UI within the 3D viewport where it can be repositioned by dragging on the header bar area of the UI.
KeyPoses
The first step is to create the 'KeyPoses' for the animation, these are often referred to as "Golden Poses", "Story Telling Drawings" or simply "Keys". These are the poses that tell the story, meaning that they are the specific poses that have to be there to show what's happening in the animation, not necessarily how, unless it's important to the story.
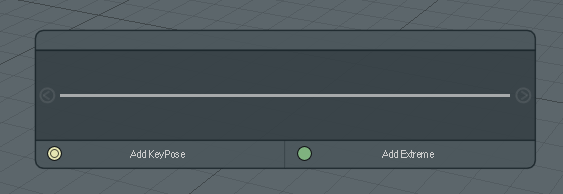
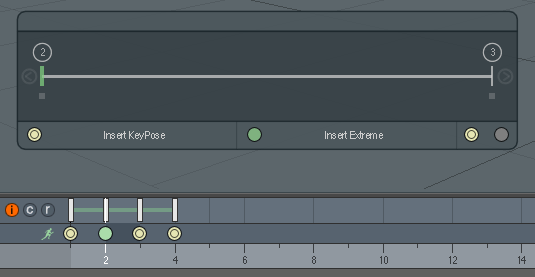
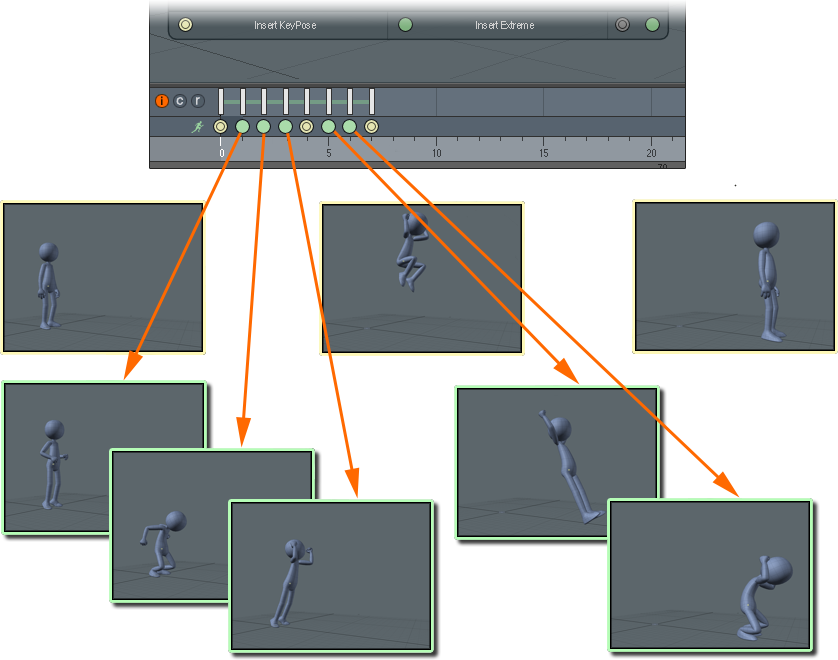
Clicking on the 'Add KeyPose' button in the HUD will add a 'KeyPose' time marker to the active 'Action' and keyframe all the animated channels in the 'Actor'. A 'KeyPose' is indicated in the timeline as a yellow double circle marker for easy reference. Next, pose the character in it's starting pose. Once the first 'KeyPose' has been created move to the next frame of the timeline and click on 'Add KeyPose' again and pose the character. Repeat this operation as many times as necessary until all the story telling poses have been added. A good way to determine whether you have all the poses you need at this point is to slowly step through each pose, you should be able to tell what's happening in the animation from these poses.
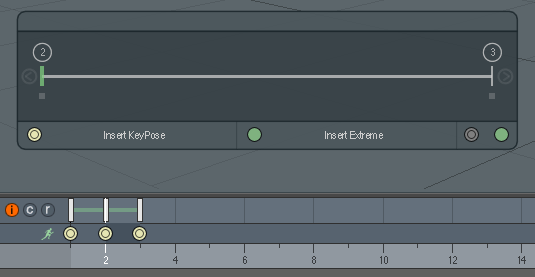
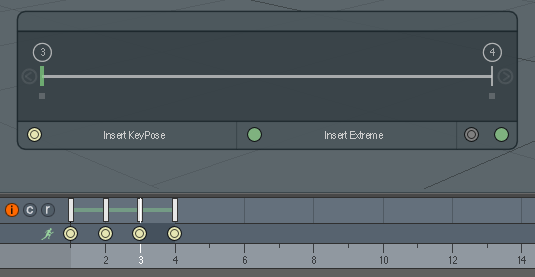
If you ever decide an additional 'KeyPose' is needed, go to the frame/pose where you'd like to add it and the interface will change to show the 'Insert KeyPose' buttons. Click on it and a new frame is inserted after the current frame, moving all subsequent poses along to make room. A 'KeyPose' Time Marker is added, the 'Action' keyframed and the current time is set to that of the new frame, ready for the new pose to be defined.
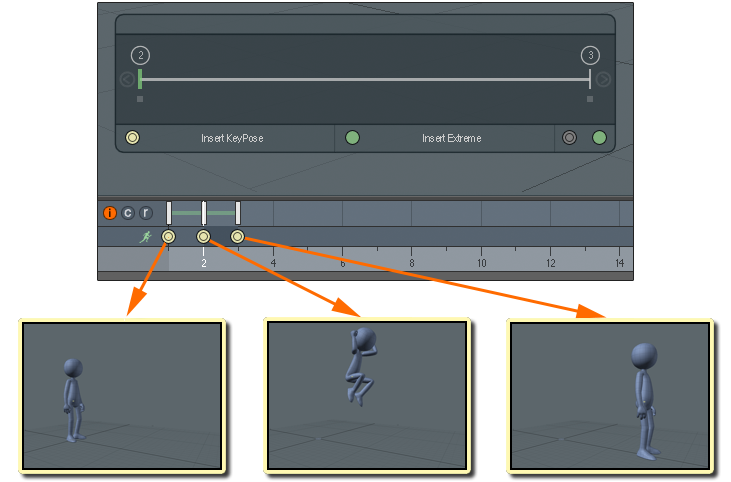
A complete series of key poses for a jump might look something like this example-
Extremes
After all the story telling poses have been added the next step is to add "Extremes", these are poses that have to be there to show how the character moves between the 'KeyPoses' and are added for contact positions, e.g. heel contact poses in a walk, changes of direction etc. These are inserted between the "KeyPoses" by setting the current time to the start frame of the pair of 'KeyPoses' between which the 'Extremes' are to be added and clicking on "Insert Extreme".
As with inserting a 'KeyPose' a new frame will be inserted and the 'Action' keyframed. An 'Extreme' Time Marker is added to the Action, these are a different shape and color to distinguish them from the 'KeyPoses'. Add as many 'Extremes' as needed to define the animation between the 'KeyPoses'.
If you add an 'Extreme' and decide it's important enough that it should be converted to a 'KeyPose', or it's decided that an existing 'KeyPose' is really more an an 'Extreme', conversions between the two can be done using the pair of buttons at the bottom right of the toolbar. When on an 'Extreme' the button shows the 'KeyPose' option and vice-versa for a 'KeyPose' frames. Simply click the opposing button type to toggle.
Animation Spacing Charts
The Animation Spacing Chart is a tool used regularly in traditional hand-drawn animation. There are a number of articles on the Internet about them that are easily located with a search. For the unfamiliar, they were basically invented to increase the amount of animation an animator could produce. Instead of drawing every drawing, the animator would only draw the key drawings (KeyPoses & Extremes) and one or two Breakdowns, enough to define the motion. Then a Spacing Chart would be created for each pair of key drawings that defined where and in what order the inbetweens should be added. An assistant would then take these drawings and using the Spacing Chart create the inbetweens, a simple half way between each of the drawings in the order specified on the chart.
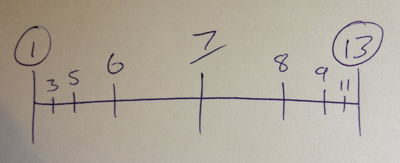
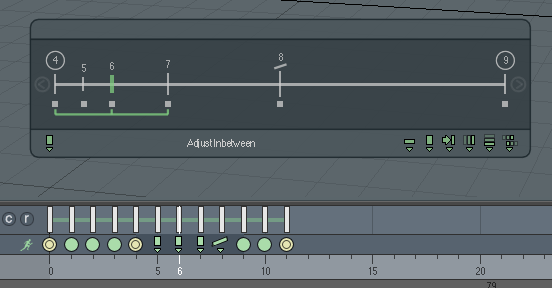
The interface in modo follows the same principles, it displays a Spacing Chart for each pair of 'KeyPoses' whose frame numbers are shown circled at either end of the chart. The primary 'Breakdown' is shown with it's frame number underlined as is traditionally found on these charts. 'Inbetweens' are shown as lines of decreasing length with their frame number. The length of the lines indicating their order of creation (longer lines first). The Spacing Chart makes it easy to read how the motion between the key drawings flows, the shorter the gap between the markers the slower the move, large gaps indicate fast movement.
Clicking on an inbetween or breakdown marker in the chart will set the current time to that frame and the chart marker is drawn green. In the example above the current frame is frame 6. The green brackets shown under the markers indicates which pair of drawings, or poses, the breakdown or inbetween was created from. The frames between the pair of key poses are shown under the chart markers as small squares, solid for the defined breakdowns and inbetweens and dimmer for those that the computer will automatically create inbetweens for. The arrows at either end of the chart allow you to navigate between each chart in your animation.
Breakdowns
Breakdowns (or "Passing Positions") are extremely important poses whose primary role is to define "how" the character moves between the key poses. It provides the interest for the move and is the basis for defining the arcs and delays used throughout.
Creating a Breakdown
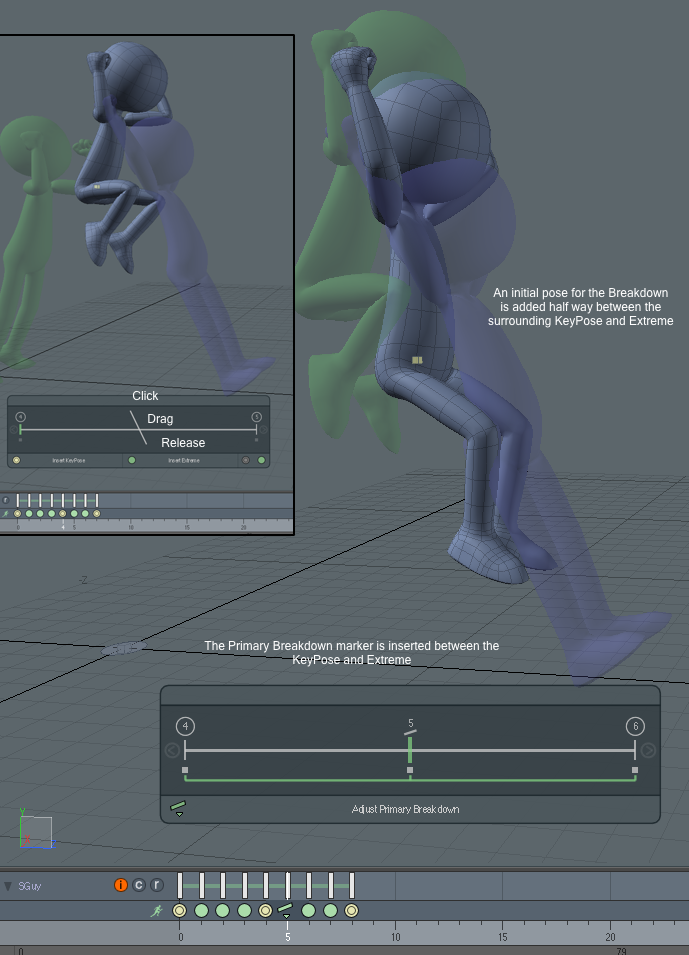
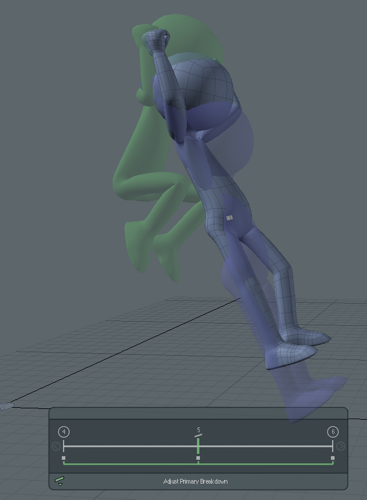
Breakdowns are created by "drawing" in the Spacing Chart area of the HUD, simply click anywhere above the central line and drag down and release below the line. A new frame will be inserted, the 'Actor' keyed, and a 'Breakdown' marker added to the timeline and an initial pose is set half way between the surrounding poses.
Note: If you have spaced out the KeyPoses/Extremes already so there are empty frames between them then the button at the bottom of the interface will change to "Add Primary Breakdown". This will create the pose at the current time without shifting following poses forward. Similarly "drawing" the Breakdown on the Spacing Chart will not shift following poses but will find a frame half way between, or as close as possible, and add the Breakdown pose there.
As can be seen in the above image the computer is good at creating mathematically correct inbetween poses (most of the time!) but it has no personality or feeling, it's just a linear blend between the two poses, but it is a very useful starting point for creating a more interesting pose.
Editing a Breakdown
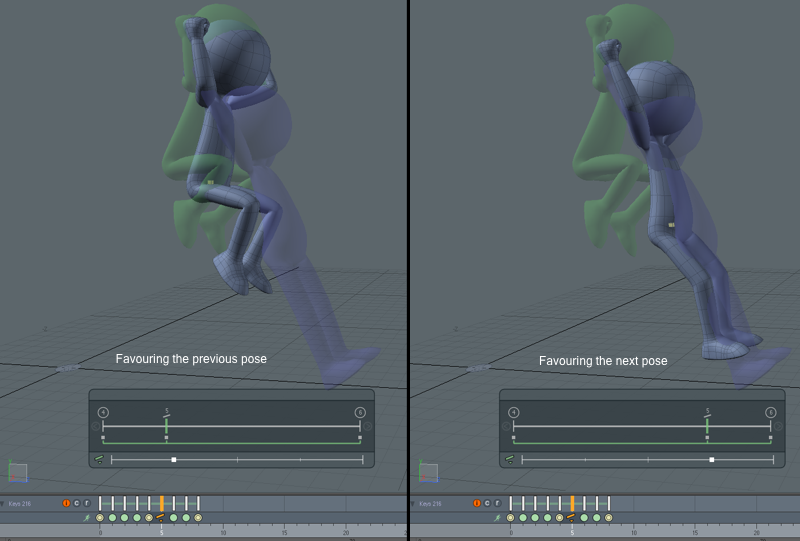
The Breakdown & Spacing HUD provides the ability to interactively favor a pose for the entire character or just the currently selected items belonging to the 'Actor'. Favoring a pose means that it's closer to the previous or next pose, traditionally this is indicated on an animation spacing chart by drawing the marker closer to the previous or next pose on the chart rather than half way between to aid the inbetweener.
Favoring is achieved by clicking on the marker in the 'Spacing Chart', or using the the 'Adjust Primary Breakdown' button at the bottom of the HUD and dragging it left or right. The marker in the 'Spacing Chart' will slide either way to indicate that the pose is favored. When there are no selected items then the entire pose is affected, this can be limited to specific items by selecting them first. In the latter case the position of the marker on the Spacing Chart is not affected.
Adjustments to the pose can of course be made in any way, using the Transform tools or Pose tool etc, the favoring helps to define the initial pose in a broad manner before fine tuning. If you make adjustments to items by favoring selected items or manually by using the Transform or Pose tools you can still use the favoring on the entire character and the adjustments you have made will be taken into account.
Creating Inbetweens
Traditionally "inbetweens" are drawn by assistant animators who works from the spacing charts created for each pair of key drawings. The drawings they create are straightforward half way poses between the animator's drawings and are drawn in the order indicated on the chart. In our context the computer is our assistant and as it's a dumb machine that needs to be told what to do! We achieve this in the same way, by defining the inbetweens in the required order.
Inbetweens are created in the same way as Breakdowns described above, by 'drawing' a stroke in the HUD on either side of the primary Breakdown or between existing inbetweens and a new frame will automatically be inserted, the 'Actor' keyed and a half way pose defined.
Editing an Inbetween
The computer usually does a decent job of creating the half way poses but there are situations where editing the inbetweens pose itself is needed, either for correcting the computer's mistakes (which can happen when interpolating Euler angles) or when the motion needs to be further refined, adding a secondary breakdown for example.
Editing of the inbetweens is just the same as described above for Breakdowns. The green brackets drawn under the chart markers indicate which frames the Inbetween was initially created from and these are the pair of poses that will be interpolated between when using the favoring slider or dragging the Inbetween in the chart. This is different to the 'Inbetween Tool' which always interpolates between the previous and next keys.
There are several Time Marker shapes that can be used for Inbetweens which can be used to indicate it's purpose. For example, if you've created an Inbetween and edited it to act as a secondary breakdown or the start of a moving hold etc you can change the marker shape by using the icons on the right of the button area. These are purely graphical, changing the shape has no effect at all on how the Inbetween functions, and just serve as a reminder for you as to the purpose of a particular inbetween and make it easier to find and identify when there are a lot of markers.
Timing
All of the above has concentrated on collecting all the poses, or "drawings", needed for the animation and depending on how many of these you have the timing can be done quite quickly, since you've effectively defined a lot of it in advance. A good place to start is to set the 'Action' interpolation to 'Linear' and generate a GL Preview. Make notes of where time needs to added and use the 'Time Edit' buttons on the animation toolbar to insert and remove frames as needed. Repeat this until you're happy with the timing. Each click of the button inserts or removes one frame at the current time shifting subsequent keyframes as needed.
If your scene is light enough to play back the animation in realtime then you can make the timing adjustments while it's playing. Press the 'Play' button and using the middle mouse button to set the keytime along the timeline defining which position to insert or remove frames, a green line is shown in the Timeline. Using the "Time Edit" buttons will then insert or remove frames at this point as you're watching the animation play.
It's also possible that you'll want to make some edits to various parts of the character on the frames that you've added for the timing. Simply use the standard keyframing tools to make your adjustments. Since all the main poses you created have Time Markers associated with them it makes the adjustment edits to other frames easy to identify. The timing stage can also be done earlier than described here, some people may prefer to roughly time it out after the breakdown stage and insert inbetweens after. It really depends on what's comfortable for you and on the animation itself. There is a lot of scope for tailoring this process to suit the way you prefer to work.
Cleanup
Once the animation has been timed and any adjustment keyframing has been done the process of cleaning up becomes quite straightforward. Set the 'Action' interpolation now to 'Curve' and starting with the root of the character look at the curves in the Graph Editor and check for any anomalies. Since they're pretty well defined by the poses only small adjustments should be needed.
Keep a careful eye on the animation in the 3D view if you make changes, any small "bumps" may well be there for a reason. It's important to remember that it doesn't really matter what the curves look like, no one will ever see them, the only thing that matters is the animation as seen in the viewport or through the camera. Work outwards from the root along the spine before moving onto the extremities such as the arms and legs etc.
Deleting Markers/Poses
In order to preserve the relationship of breakdowns and inbetweens to each other they can only be deleted in a specific order, from the lowest level inbetween upwards. For example the Primary Breakdown cannot be deleted if it has inbetweens that are derived from it. The easiest way to see this is by selecting a marker in the Spacing Chart, if the green brackets enclose other markers, excluding the extents, then they will need to be deleted first. A range of markers can be selected, in any order, and modo will delete all that it can in the right order. If any could not be deleted then a warning dialog will be displayed.
Time Markers
The Time Markers used by the Spacing Chart have a few differences from the normal Time Markers.
-
Selecting a marker will also select keyframes at the same time as the marker.
-
Deleting a marker will also delete selected keyframes that are at the same time as the marker.
-
Dragging a marker will also move it's associated keyframes.
-
Markers cannot be moved past surrounding markers of this type.
-
Only one Primary Breakdown marker can be made between each pair of KeyPoses/Extremes.
Richard Williams advocates this process in his book "The Animator's Survival Kit", in particular the chapter "Advancing Backwards to 1940". Keith Lango's VTS tutorials explain this in great detail as well and really highlights the benefits. These are both very educational and quite amusing too! Eric Goldberg's "Character Animation Crash Course!" has great descriptions and examples of charts, key drawings, breakdowns etc. Also recommend is Jason Ryan's tutorials, he does most of his work in 2D beforehand but the principles are just as valid, more so in a way as this process comes from traditional 2D animation workflows in the first place.


