
![]()
Across the bottom of the 'Animation' interface, under the keyframing and timeline transport controls is located the Actor, Action and Pose control bar. These controls provide users with a streamlined method of animating in MODO. An Actor is a special type of 'Group', acting as a container that stores Items and/or Channels. This allows users to quickly assign keyframes for all associated Channels, then save the Channels values as alternate layers using the 'Action' function, where each 'Action' is an alternate of the entire timeline. Additionally, the 'Pose' function stores specific keyframe values that can then be easily applied at any point along the timeline.
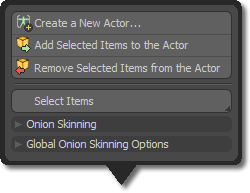
An 'Actor' is simply a container that groups together related items. This could be an entire hierarchy of joints for a character, or it could be all the parts to a dump truck, an 'Actor' doesn't need to be a character at all. The main benefit to creating an Actor would be that is makes applying keyframes for all associated items easier. To create an 'Actor', make sure to select all the target items you want to include and then LMB+click on the 'Actors' button. This opens the 'Actor' popup menu-
LMB+clicking the 'Create a New Actor...' button then opens the 'New Actor' dialog box where the actual 'Actor' Group is created-
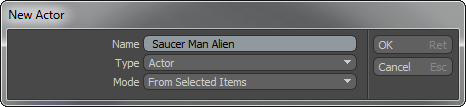
The 'Name' option defines the Name of the resulting Group that is created. By default the 'Type' option is set to 'Actor' (and should remain that way), defining how the Group is treated once created. The 'Mode' menu lets users choose which Items or Channels will be automatically added to the new 'Actor' when it is created- there are several options all dependent on the selection made prior to invoking the command. 'Empty' will create an Actor Group with no automatically assigned Items. The 'From Selected Items/Channels' options will automatically add all the selected elements in the scene and the 'From Item/Channel Edits' will add any items of Channels from the current selection that have been changed from their rest state (modified from the 'Setup' action state). In most cases, users will use the 'From Selected Items' entry. What this means is that all selected items will be automatically added to the 'Actor' (Group) when it is created. LMB+click 'OK' to create the Actor. If you need to add more Items or Channels to an Actor, or remove Items/Channels from an Actor, this can be done from the 'Add' and 'Remove' commands in the 'Actor' popup menu by selecting the target element and invoking the appropriate command.
Setting Keyframes
With an 'Actor' defined, users can simply LMB+click on the 'Key' button to define keyframes for every animated channel belonging to each item in the 'Actor'. Make sure to define at least one keyframe for each channel you wish to work with before hand (For Characters this would typically be the Position and/or Rotation channels). For information on creating keyframes, reference the 'Working with the Timeline' page of the documentation.
'Actions' serve to store keyframes for the entire timeline per 'Actor', what this means is that each separate Action can be complete set of keyframes for the entire length of a given scene within a particular 'Actor' group. Each 'Action' can be created as either a completely separate animation, like a run cycle in one and a crouch action in another, or a subtle reworking of an existing animation, such as non-destructively modifying a characters motions. In movie terms, each 'Action' is its own take of the scene. To create a new 'Action' layer make sure the 'Actor' control menu shows the particular Actor for which a new animation is desired. Next, LMB+click on the 'Actions' button, opening the 'Create a New Action' popup-
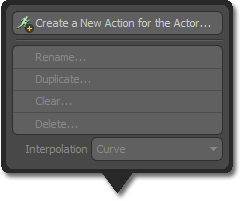
Pressing the 'Create a New Action for the Actor...' button then opens the 'New Action' dialog box where the actual 'Action' is created-

Enter a name for the 'Action' and click 'OK' to create it. Now when animating, for all items belonging to the current 'Actor' any defined keyframes will be stored in the current 'Action'. Any number of alternate animations can be created for an 'Actor' by repeating the above steps. Enabling the 'Transfer' option in the 'New Action' dialog will copy any keyframes assigned to the item at the scene level into the new Action. Users can choose which action to view or edit by simply selecting it from the 'Action' control menu. Editing of Actions is done with the controls in the popup panel by selecting the Action and pressing the appropriate command button.

IMPORTANT: When animating in a scene with multiple 'Actors', the current Actor will switch automatically when any item belonging to an another 'Actor' is selected and that Actor's last active 'Action' will become the current Action.
A 'Pose' stores a static snapshot of the current keyframe values of the active 'Actor' that can then be easily applied back to itself at another point in time. Poses don't need to be the full character either, they can be limited to just part of it, or even a single joint. For example, one might want to create poses for a character's hand positions, such as "Fist", "Point", etc. These Poses can then be quickly applied to the Actor at any point in the timeline.
To create a 'Pose' users must first position the target elements as desired and define keyframes for them. For the hand example this would be making the hand look like a fist by bending the fingers appropriately. Then with all the target items selected (LMB+double clicking on the wrist joint will select the item and all its children automatically!) Next, press the 'Poses' button opening the Store Poses popup-
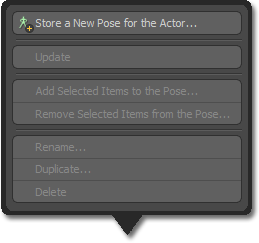
Pressing the 'Store a New Pose for the Actor...' button then opens the 'Store Pose' dialog box where the actual 'Pose' data is stored-
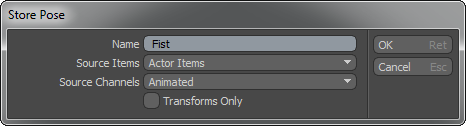
Defining a name in the 'Name' input field, then selecting the 'Selected Actor Items' option from the Source Items options and finally pressing 'OK' will store the Pose for later application. The options for the 'Store Pose' dialog include the 'Source Items' option which allows users to choose which Items belonging to the 'Actor' will be stored in the 'Pose'- 'Actor Items' will store values for all elements in the Actor, disregarding any current selection and 'Selected Actor Items' will limit the values stored to the current Item selection. The 'Source Channels' option controls which channels from the Source are stored- 'Edited' will store Channel values from the Source elements only for channels that are different than their rest state (modified from the 'Setup' action state), 'Animated' will store only Channels from the Source elements that have keyframes applied to them, 'All' will store all related Channels, animated or not, from the Source elements in the Pose. The 'Transforms Only' option when enabled will only store transform specific Channels- Position, Rotation and Scale.

TIP: The items in the actor will not be affected when creating a Pose, their channel values are copied not cut. This allows further Poses to be created using the current values as a starting point.
Applying a Pose
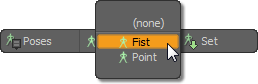
To apply a stored pose, go to the position on the timeline where the pose is desired and choose from one of the stored 'Poses' in the Poses popup menu. With the Pose now active, LMB+click on 'Set' button to assign it and all the stored Channel values for the elements within the Pose will be assigned as keyframes. Once the values are set, they can be treated like any other keyframe value.
Actor Controls
In the 'Actors' popup control panel there are additional options for working with Actors documented here-
Create a New Actor: This option opens the 'New Actor' dialog for creating groupings of items.
Add Selected Items to the Actor: This button will add additional Items to the current Actor. To use, first select the item(s) to add and LMB+click the button, instantly adding the element to the Actor.
Remove Selected Items from the Actor: This button will remove Items associated to the current Actor. To use, first select the item(s) to remove and LMB+click the button, instantly removing the element from the Actor.
Select Items: LMB+clicking this button will select all Items related to the current 'Actor'.
Select Channels: This button is the alternate button under the 'Select Items' button. RMB+to open the button popup and then LMB+click the button to select all the animated channels related to all the Items in the Actor.
Onion Skinning (covered further below)
Action Controls
In the 'Action' popup control panel there are additional options for working with Actions documented here-
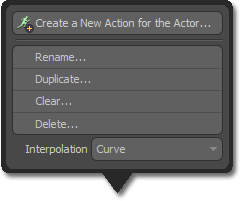
Create a New Action for the Actor: This option opens the 'New Action' dialog for creating alternate versions of the entire timeline.
Rename: This button will open the 'Action Name' dialog where users can replace the existing Action name with a new one.
Duplicate: This button will open the 'Action Duplicate' dialog where users can clone an existing Action into a new one with a different name, with the added option to make the new Action the current, active Action.
Clear: This option removes all keyframes form the current Action, but retains the empty action itself. When selected, users will be prompted with a confirmation dialog box.
Delete: This option removes the Action from the scene entirely. Pressing the button opens a confirmation dialog box.
Interpolation Curve: The 'Interpolation Curve' option defines the default method of interpolation between keyframes. 'Curve', Linear' or 'Stepped' are the options, that can be modified per keyframe in the Graph Editor.
Pose Controls
In the 'Poses' popup control panel there are additional options for working with Poses documented here-
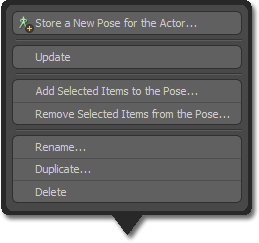
Store a New Pose for the Actor: This option opens the 'Store Pose' dialog for saving collections of keyframe values for reuse.
Update: Keyframe values are stored when the Pose is created. The 'Update' button provides users a way to update the keyframe values in an existing pose. With the target 'Pose' selected, users can make adjustments to the posed elements and then LMB+click the 'update' button to save the value in the current 'Pose'.
Add Selected Items to the Pose: The 'Add Selected Items to the Pose' button opens the 'Edit Pose' dialog that allows users to add additional Items to those already included in a specific 'Pose', with options to control which Channels from the added elements are stored in the 'Pose' when added with an additional toggle that can be enabled to limit the included channels to just the transform channels (Position, Scale & Rotate)
Remove Selected Items from the Pose: This option opens the same dialog as the 'Add Selected Items to Pose' button, but defaults tot he 'Remove' Mode option, instead of the 'Add' Mode.
Rename: This button will open the 'Pose Name' dialog where users can replace the existing Pose name with a new one.
Duplicate: This button will open the 'Pose Duplicate' dialog where users can clone an existing Pose into a new one with a different name.
Delete: This option removes the Action from the scene entirely. Pressing the button opens a confirmation dialog box.
Onion Skinning is a term related to traditional hand-drawn animation where the initial rough motion studies were drawn on thin, translucent paper (similar to that of an onions skin) allowing the artist to easily see the previous frames in a sequence through the paper, becoming more an more faded the lower the drawing was in the stack. This way of working made it easier for the artist to visualize the overall motion of an action and adjust the timing as necessary. The 'Onion Skinning' feature in MODO mimics this same method of working, but offers additional controls not available to the analog artists.
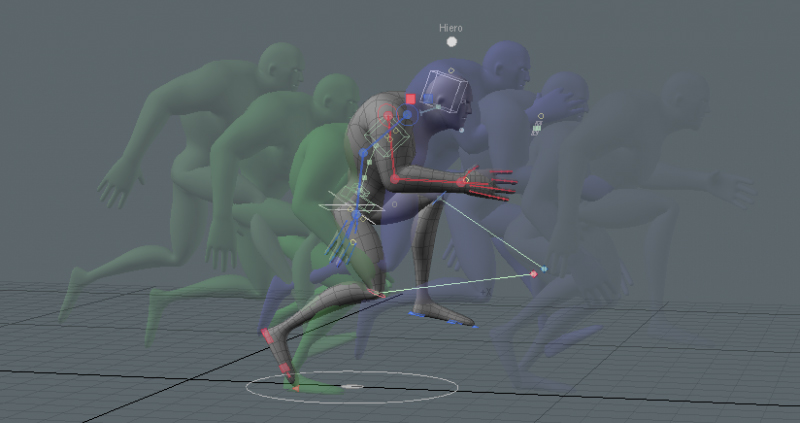
The Onion Skinning controls are found in the 'Actions' popup tool panel, as 'Actors' are used to determine the items that will be drawn with Onion Skinning in the 3D viewport and the animated motion is taken from the active 'Action' for the 'Actor'. When the active Action is set to '(none)' the Onion Skinning will not be displayed. Onion Skinning is also not displayed during playback or while scrubbing the timeline. The Onion Skinning controls are used to assign and modify common Onion Skinning settings for the current Actor as well as general options for the Onion Skinning drawing. LMB+clicking the 'Actors button' opens the control panel-
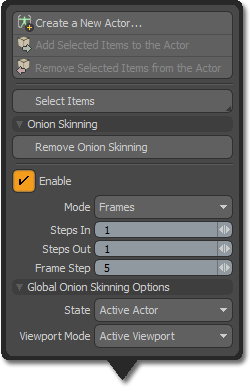
Users must first create an 'Actor' to have something to assign the Onion Skinning to. It can also be helpful to have some animation applied to the elements in the actor giving the Onion Skinning function something to display. With the target Actor selected, LMB+clicking the 'Assign Onion Skinning' button enables the function in the active viewport. Once activated users will be able to see the preceding and following frames from the current point in time with the display of the current time position being the most prominent. When opened, the 'Actor' control panel has the following options-
Onion Skinning--
Add/Remove Onion Skinning: This button toggles the Onion Skinning function for the currently selected 'Actor'.
Enable: A toggle to temporarily enable or disable Onion Skinning, while retaining all the existing settings.
Mode: The 'Mode' option determines the intervals used to display the Onion Skinning- 'Frames' uses the whole frame values of the timeline, 'Keys' will take the displayed intervals based on defined keyframes for the selected 'Actor', and 'Time Markers' will use the time markers associated to the selected 'Actor'.
Steps In: This option controls the number of steps to draw prior to the current time (limited to a max. number of 5).
Steps Out: This option controls the number of steps to draw after the current time (limited to a max. number of 5).
Frame Step: This option controls the number of frames between each drawn step (only applies when the interval 'Mode' is set to 'Frames').
Global Onion Skinning Options--
State: The 'State' option provides choices to globally control all onion skinning display in MODO-
Off- This option allows Onion Skinning to be turned off, all settings will remain intact for each Actor, only the display is disabled.
Active- With this option the Onion Skinning will only be drawn for the current Actor. This is the default setting.
All- With this option Onion Skinning will be drawn for all Actors that have Onion Skinning assigned and enabled.
Viewport Mode: The 'Viewport Mode' offers options to control the display of the Onion Skinning effect-
Active Viewport- Onion Skinning will only display in the current active viewport
All Viewports- Onion Skinning will display in all visible 3D viewports.
TIP: Onion skinning can also be applied to Cameras and other Locator based items (such as lights), and will include custom drawing features. Simply create an 'Actor' that included these types of items. Note that 'Locator' items will not fade though due to how they are drawn in the viewport.
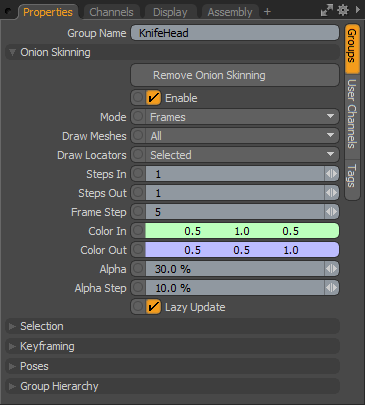
When an 'Actor' is selected, the Onion Skinning options can also be activated in the 'Properties' viewport. The properties panel also contains some additional options for controlling the look of the displayed Onion Skinning-
 Add/Remove Onion Skinning: This button toggles the Onion Skinning function for the currently selected 'Actor'.
Enable: A toggle to temporarily enable or disable Onion Skinning, while retaining all the existing settings.
Mode: The 'Mode' option determines the intervals used to display the Onion Skinning- 'Frames' uses the whole frame values of the timeline, 'Keys' will take the displayed intervals based on defined keyframes for the selected 'Actor', and 'Time Markers' will use the time markers associated to the selected 'Actor'.
Draw Meshes: The 'Draw Meshes' option provides fine control over what elements of the 'Actor' group are drawn as part of the Onion Skinning-
None- Meshes that are members of the Actor will not be drawn.
Selected- Only selected meshes belonging to the Actor will be drawn.
All-
All meshes belong to the Actor will be drawn.
Draw Locators: The 'Draw Locators' option provides fine control over what Locator type elements of the 'Actor' group are drawn as part of the Onion Skinning (included Locators, Cameras, Lights, etc.)-
None- Locator type items belonging to the Actor will not be drawn.
Selected- Only selected Locator items will be drawn (default).
All- All Locator type items belonging to the Actor will be drawn.
Steps In: This option controls the number of steps to draw prior to the current time (limited to a max. number of 5).
Steps Out: This option controls the number of steps to draw after the current time (limited to a max. number of 5).
Frame Step: This option controls the number of frames between each drawn step (only applies when the interval 'Mode' is set to 'Frames').
Color In: This option defines the display colors for the steps prior to the current frame.
Color Out: This option defines the display colors for the steps following to the current frame.
Alpha: This option defines the transparency amount for the frames directly before and after the current frame.
Alpha Steps: This option defines the additional amount of transparency for subsequent steps.
Lazy Update: With the 'Lazy Update' option enabled, Onion Skinning will only display once an edit has been applied, this is the default to increase the interactivity speed of the option. For simple scenes, this option can be disabled and all edits will be previewed in real time.

INFO: Sometimes it may not be desirable to have the mesh of a given character in the 'Actor' group along with rig control items. In this situation a standard 'Group' can be created containing the character mesh and then parented to the 'Actor' group (in the Groups' viewport) to keep it separate. The Onion Skinning settings will be applied to the 'Actor' as well as the child item of it.

