
Constraints at their most basic are controllers, controlling how one item relates to another. Constraints can serve many purposes, and when used in combination with each other can create very complex controllers and motions. modo's constraints are weighted, meaning that a weight value can determine the influence a constrain has over the item it's controlling. Constraints, once applied, can be selected by toggling (LMB clicking) the small '+' sign expansion widget that appears next to the constrained item in the Item List. Once selected, its attributes can be edited via the 'Properties' viewport or within the 'Channels' viewport. While individual Constraint items can be added to a scene using menus in the Schematic view and other locations, only the buttons found in the 'Setup' interfaces toolbox, under the 'Modifiers' subtab will automatically connect the selected elements when assigned.
Automatically Assigning Constraints--
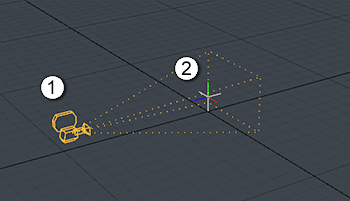
There are three basic methods for applying constraints, the default method creates the appropriate constraint item(s) from item selections. The simplest constraint is between two items. For this example, below, the Camera has been selected first, followed by the Locator item (once an item has been selected, hold down the shift key to select subsequent items). Now LMB+clicking on the 'Direction' constraint button applies the constraint. Once applied, the Locator will control the direction of the camera; wherever the Locator moves to, the camera will point directly at it.
| 
|
|---|
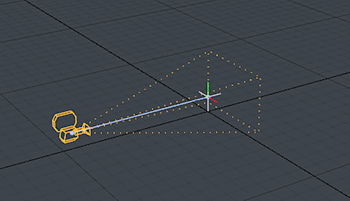
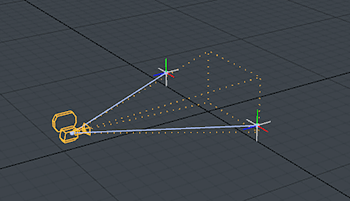
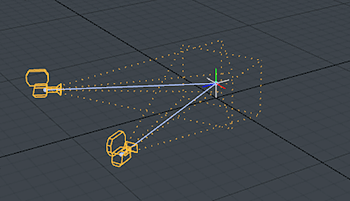
The second method provides a means for multiple items to control another. For this example, the camera was selected first, followed by the two locator's. Clicking on the Direction constraint button applies the constraint so the position of both locator's is used to determine the orientation of the Camera. In this case aiming towards a point half way between the two locator's, and average of the two positions. The influence of one item over the other can be controlled by adjusting the weight amount, tending the camera to face more toward the item with higher weight (influence). This can be adjusted in the constraints properties viewport or channel list.

| 
|
|---|
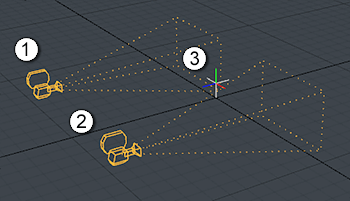
The third method provides a means for multiple items to be controlled by a single item. For this example, the two camera items were selected in sequence, followed by the Locator item. The difference this time, is the constraint is applied by holding down the 'Ctrl' key, the button will change to say 'Direction (multiple)' (signifying that multiple items will be affected by the one controller). Click the button to apply the constraint. Once applied, you can see that each camera now independently orients toward the one Locator.
| 
|
|---|
Removing Constraints--
Constraints can be easily removed from any item, by first selecting the constrained item, the holding down the 'Shift' key, the Constrain buttons will then change, for example the direction constrain button will now read 'Remove Direction'. Click the button to remove the constraint from the selected item. Additionally, the constraint can be selected below the constrained item, (click the small '+' sign expansion widget if you can't see it) and by RMB+clicking on the constraint itself, one can select 'Delete' from the drop down menu.
Constraint Weights--
When an item is constrained to multiple items, a weight channel is added to the constrained item, one for each of the constraining items. The weights control how much influence a particular item has on the item being constrained. Weights can be adjusted and animated so the effect of the constraint can be biased towards (or away from) a particular item's input. Setting a weight channel to 100% means that the constraining item will exert full influence on the constrained item, a value of 0% means the constraining item will have no influence on the constrained item. To access the weight channels for a constraint, select the constraint item in the Item List. The weight channels are listed at the end of the constraint item's channels in the Channel List viewport. Values can be manually entered here or the Channel Haul tool provides a means to interactively adjust the values in the 3D views (select the weight channels and press the 'C' shortcut key or the button in the Modifiers tab).
Manually Assigning Constraints--
Users can also manually add Constraints to a scene. They can be added directly using the menus in the Items List (Add Items button), in the Menu Bar (under "Animate > Channel Modifiers > Constraint") and in the 'Schematic' viewport. This method of adding the Constraint to the scene only adds the element itself and won't have the same effect of connecting the Constraint to any selected elements. Once added, the element must be properly linked to Constraining item. This is done in the Schematic viewport. For more information on adding elements and assigning links between them, please reference the Schematic viewport page of the documentation.

