
The Item List has a number of functions. First, and most obviously, it lists all of the Locator type items within your project (For more info about Locators and lists see 'Item List versus Shader Tree' section below). In the Item list users can create, edit and organize modo's various Item layers- Meshes, Locators, Cameras, the various Light types, Texture Locators and Backdrop Items. The functionality of the Item List includes, simple selection of the Items in the list, creation and deletion of Items and entire scene files, re-ordering items in the list, creating parent/child hierarchies, setting visibility, edit item properties and creating basic groups for general organization.
Item List modes
The Item List has three UI modes depending on the size of the viewport. When the Item List is fully expanded it shows all Items and acts as a complete project manager. When the viewport gets collapsed it converts to a Mesh List allowing a very compact user interface for quickly selecting the various meshes in your project. The Mesh List mode has two sizes, medium and small depending on the amount of screen space available to the viewport. This allows users to compress the list into a very small space on the monitor, making room for other UI elements. The viewport can be resized by LMB+clicking on any frame edge and dragging, the viewport will automatically change UI style depending on the amount of space available.
![]()
The small view first shows the current project popup, this popup allows users to select any of the currently loaded scenes. Directly to the right of that is the left/right navigational widget that is used to move forward and backward through large lists of mesh layers. The small cells to the right of that represent the mesh layers within a scene file. The top row is for Active mesh items (also called foreground objects) and the bottom cell indicates an inactive (but visible) mesh item (also called background objects). Ghosted dots in the top row indicate the mesh item contains geometry. White dots indicate that a mesh item exists but contains no geometry (an empty layer).
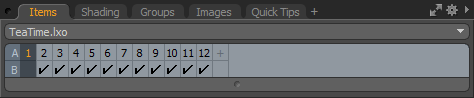
The medium mode functions exactly as the compact mode, with the only significant difference being the layout of options. In this viewport configuration, the file pop-up button is found at the top of the viewport. The layer "cells" are found just underneath that. In this case there are 3 rows, the topmost row shows the layer number, the next row is the foreground row and beneath that is the background row. Finally, at the bottom of the row is the layer navigation slider bar that allows you to drag to the right or left to navigate to layers that do not fit in the mesh list in this configuration.
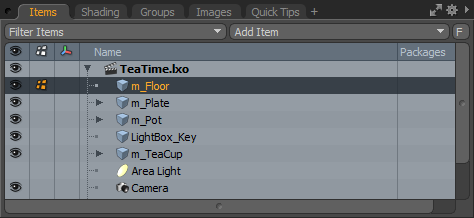
The full view can also be called "tree view" as the layers are displayed in a tree structure from top to bottom. It is called a tree because in this view you can also see the hierarchy of the layers if any has been set. In most cases the mesh layers are in a "flat" hierarchy indicating that there is no parent child relationship between any of the layers. However, if a layer has been parented to another, that child will appear underneath, slightly indented to the right of the parent. The parent layer will then have an expand/contract widget to the left so that users can easily collapse entire hierarchies quickly. To set a layer to be parented to another layer, simply drag the intended child layer on top of the intended parent and drop. The result is that the child layer will show up underneath and indented to the right slightly. To move it back to the same level, simply drag and drop the child layer back into the list and drop it between two layers, rather than on top of one.
Items in the list can only be modified when selected, by LMB+clicking on the name of any layer in the list. Multiple items may be edited at once as well. Non sequential selection can be created by holding down the 'Ctrl' key and LMB+clicking multiple layers. Sequential items can be selected by first LMB+clicking on the top most item and then 'Shift'+LMB clicking the bottom most item, all items in between will be selected automatically.
When selecting layers in this view, notice that there are some combinations of font style and colors that indicate various states of the layer. Any selected layer(s) row will appear darker than the others with the layer name text highlighted in orange. Selected layers are considered foreground layers. Item layers that are visible but not selected are considered background layers, and show their names as plain black text. Mesh items that have been created, but contain no data have their text drawn in light gray.
At the top of the list is the 'Scene' item (![]() ), representing the scene file itself in bold text styling. Below it are the various items layers that make up the scene -mesh items, lights, cameras and so on. Visibility of various layers is controlled via the left most column. LMB-clicking on the eye icon (
), representing the scene file itself in bold text styling. Below it are the various items layers that make up the scene -mesh items, lights, cameras and so on. Visibility of various layers is controlled via the left most column. LMB-clicking on the eye icon (![]() ) will toggle visibility of items in the 3D viewport, as well as when rendered (unless specified differently by the Display viewport or the items properties panel)
) will toggle visibility of items in the 3D viewport, as well as when rendered (unless specified differently by the Display viewport or the items properties panel)
The next column displays icons signifying the current editing mode of a selected layer or layers, this is important because the current mode affect the layer differently. The ![]() icon denotes an 'Item' mode transformations. The
icon denotes an 'Item' mode transformations. The ![]() icon denotes mesh items can be edited directly as components, such as Vertices, Edges or Polygons. Component versus Item transforms are an important concept to understand in modo. If you think of mesh items as containers, item mode transforms are applied to the entire container, while component transforms modify the contents of the container only. Nearly any item can have an item level transform applied - position, scale and rotation. Only mesh items can be edited in component mode, using any of the tools modo provides. Locators, Cameras, Lights and Backdrop items can only be edited in Item mode.
icon denotes mesh items can be edited directly as components, such as Vertices, Edges or Polygons. Component versus Item transforms are an important concept to understand in modo. If you think of mesh items as containers, item mode transforms are applied to the entire container, while component transforms modify the contents of the container only. Nearly any item can have an item level transform applied - position, scale and rotation. Only mesh items can be edited in component mode, using any of the tools modo provides. Locators, Cameras, Lights and Backdrop items can only be edited in Item mode.
The third column, when LMB+clicked will toggle an item between world space and local space, displaying the ![]() icon next to an item layer when in local mode. When in local mode, an items center point temporarily becomes the origin. This can make certain modeling tasks easier. For instance, if one modeled a cars tire by radial sweep around the origin, and then in item mode, the tire is positioned at the axle of the car, when needing to further modify the tire, one could place the item into the 'local' space and re-sweep the tire around the origin. When done, return to world space without ever having to move a single item. This action may also be accomplished by invoking the menu bar command "Item > Set Reference System".
icon next to an item layer when in local mode. When in local mode, an items center point temporarily becomes the origin. This can make certain modeling tasks easier. For instance, if one modeled a cars tire by radial sweep around the origin, and then in item mode, the tire is positioned at the axle of the car, when needing to further modify the tire, one could place the item into the 'local' space and re-sweep the tire around the origin. When done, return to world space without ever having to move a single item. This action may also be accomplished by invoking the menu bar command "Item > Set Reference System".
There are two very different workflows between modeling and layout/rendering processes. When modeling you often want to focus on a single mesh item (often referred to as a layer) whereas the layout process demands a complete view of the project. modo offers a solution for both via 'Auto Visibility'. By default this option is off. The Auto Visibility mode will automatically turn visibility on for the currently selected item and hide all deselected items. In this way you can easily set the focus to a specific mesh item (sort of like a 'solo' layer control). Once the item is visibly isolated you can use the 'Shift' or 'Ctrl' key to add to the selection. If you want to have one layer active but another layer visible and inactive you can 'Ctrl'+LMB click on that Items visibility column to override the Auto Visibility setting at that time. To access the Auto Visibility option you can either RMB click on the viewport tab or header, or you can use the Viewport Widget and navigate to the Viewport Settings.
Creating Parent/Child Hierarchies with the Item List
Parent/Child relationships amongst items have several benefits. If you have experience with animation, you are likely familiar with the power of these types of hierarchies. Since setting them up in modo is so simple this is a first step at rigging your project for animation. Still, even if you have no intention of animating your scene, there are other advantages to creating these hierarchies. The two main areas of advantage are gang-manipulations and organization.
Creating hierarchies in modo is a simple drag and drop operation. In the Item list, drag and drop one item onto another and that item becomes the child item. That's really all there is to it. Well, there are some nuances. The default behavior for parenting in the item list is to parent in place when you drag and drop items. The control key is used to parent without maintaining current transforms of child items. This is the same in the 3D views where the shortcut 'P' will parent in place, 'Ctrl+P' performs normal parenting. Also 'Shift+P' unparents in place, 'Ctrl+Shift+P' unparents. Additional information on these parent/child relationships is available in the animation section of the documentation.
Managing Items in the Item List
As your projects become more complex you may find a long flat list of Items becoming unwieldy. Parenting items to a 'Group Locator' will help organize a project. Different from a 'Group', Group Locators are a special kind of Locator item as they do not draw anything in the 3D views removing additional scene clutter, and can be easily collapsed which keeps the item list clean and manageable. Group locators have an icon that looks like a folder in the Item List to distinguish them from regular Locator items. In all other aspects they act the same as a normal Locator, they can be moved and rotated in the 3D views for example.
To create a Group Locator users can choose "Add Item > Group Locator" from the button atop the Item List viewport. Once created, users can select some items and begin to drag and drop them into a hierarchy to organize the list. If you have several items that you want to quickly parent to a Group Locator, you can select them all by holding down the 'Ctrl' key and LMB clicking on individual items in the list; once selected, press 'Ctrl-G' to automatically create a new Group Locator, with all selected items parented in one step.
Manipulating Items in a Hierarchy
It is important to note that there are some ramifications to editing item layers in 'Items' mode when a hierarchy is established. (The following section is only relevant when the selection mode is set to 'Items'.) For instance, when translating (moving) only the parent item, the children will receive the same amount of translation, remaining in the same relative position to their Parent item as it moves. However, when selecting the parent AND child items, the effect of the transform will be doubled on the child, it will be inheriting the parents transform AND since it is also selected, it will be moving as well. If there are Item level transforms applied to the Parent item before the relationship is defined, the Child will move to match the Parent's transforms, this is called 'Parent in Place'; the transform amount of the child will be adjusted so the Item remains in the same relative position to its parent (it's moving but it won't look like it's moving). If this behavior is undesirable, the solution to maintain the child's current position during parenting or un-parenting the item. Simply hold the 'Ctrl' key down when dragging and dropping the child to or from the parent item. This will retain the child item's Transform values such that the item does not move from its original local positioning, but will move in world space as it has inherited its parents transformation values.

TIP: Often when you have created hierarchies it may be arduous to expand the various parent items to dig down to the level where you can see the item you are looking for. If you change to 'Items' selection mode and click on the item in 3D view (where it is most likely visible in plain site) you can press the 'F' key to find the item in the Items List. The list will auto-expand any necessary group locators or parents to reveal your item. You can also quickly expand/contract an entire hierarchy branch with a single action. Holding 'Shift' when clicking to expand or contract a hierarchy will expand/contract the current item as well as all items down the branch. Fancy.
The Item Context Menu
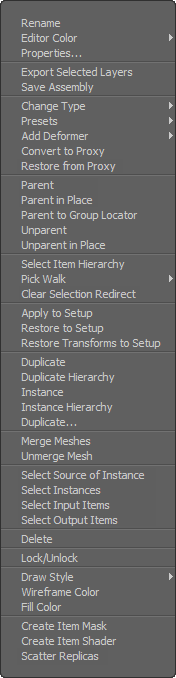 There are several options available via the Item List context menu. Simply RMB click on any item to open the menu.
Rename: Allows users to rename the selected item via a popup dialog.
Editor Color: Provides users the means to colorize item layers to help visually call out a layer, mostly for organizational purposes.
Properties: The 'Properties' command opens a popover viewport panel with the currently selected items available attributes.
Export Selected Layers: The 'Export Selected Layers' command allows users to save out individual layers from a scene to a file on disc. Users will need to first select the target files in the Items list to export and then RMB+click on any of the selected item layers to open the contextual menu and then select the command 'Export Selected Layers', opening the following dialog-
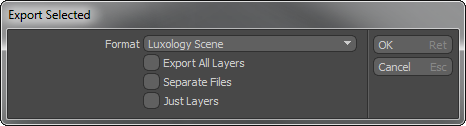
The dialog offers some options for how the selected layers will be exported-
Format: Users can determine the save format of the exported items from the available options.
Export All Layers:
When enabled all layers will be exported regardless of selection, when disabled, only the selected layers will be exported.
Separate Files: When enabled separate layers will be saved as
individual files, when disabled, all layers will be saved as if they were a single combined layer.
Just Layers: When enabled only Mesh item layers will be saved, ignoring Cameras, Lights, Locators and other non-mesh items. When enabled all selected layers will be exported. (Note- What can be exported is highly dependent on the chosen target format.)
Save Assembly: The 'Save Assembly' command allows users to save entire hierarchies of items of various types out to the preset file format (LXP). The resulting preset can be later loaded from the Preset Browser, retaining all the settings of the original hierarchy. This command should always be applied to the top most parent of the hierarchy.
Change Type: With this option you can quickly convert an item into another item type. For instance, you can convert an Instance mesh into a real mesh so that you can edit the item at the component level. Another example is to convert a Directional Light into an Area Light. It should be noted that certain parameters would be lost if you were to switch back to the original item type. Common parameters should be preserved. Also note that not all items can be converted to all other types of items.
Presets: This option will allow you to load, apply and delete preset parameters to your objects.
Add Deformer: This option will allow users to add any of modo's various deformers, covered in the animation section of the documentation.
Convert to Proxy: Proxies are a function that will externalize one or more layers of the Item List and replace them with a simple bounding box. The resulting bounding box will be replaced by the full resolution proxy only at render time. For more in-depth coverage of the Proxy system, please reference that page of the documentation.
Restore from Proxy: Any item that has been converted to an external Proxy can be loaded back in to the originating scene with the 'Restore from Proxy' command.
Parent/Parent In Place: This allows you to easily create a Parent-Child hierarchy of several items. To invoke, select multiple items within the item list and right click on any of them, select 'Parent' from the popup menu and the top most item in the item list will become the 'Parent', while all the subsequent items will become 'Children'. The 'Parent in Place' command will retain an item initial position prior to parenting.
Parent to Group Locator: This creates a Group Locator item and parents all currently selected items to it. The same can also be achieved with 'Control-G' shortcut.
Unparent/Unparent In Place: An easy way to remove Parent/Child relationships of items within any hierarchy. The 'Unparent In Place' command will retain the items position when unparented, relative to its parent.
Select Item Hierarchy: Selects the entire hierarchy down the chain from the current item.
Pick Walk: Pick Walking is used to make it easier to navigate complex hierarchies, as it will allow the user to easily create selection relationships up and down a hierarchy chain. These can be defined in the Assembly viewport.
Clear Selection Redirect: Selection Redirects are useful to aid in selecting specific items in a 3D viewport, as an item is selected in a 3D viewport such as a Locator, that selection can be redirected to another object that would be difficult to individually select otherwise allowing it to be manipulated. The 'Clear Selection Redirect' command is an easy way to remove a selection redirect.
Apply to Setup: When working with animation and/or deformers, the initial state of any item is defined while in 'Setup' mode. This represents the zero position state and everything else is an offset from the 'Setup' value. The 'Apply to Setup' command takes the items current values and pushes them to 'Setup'.
Restore to Setup: The 'Restore to Setup' option removes any modification to the item and restores the values to those of the initial 'Setup' state.
Restore Transforms to Setup: The 'Restore Transforms to Setup' will restore only the transform values (Move, Scale,Rotate) to the 'Setup' state.
Duplicate: This command will create a duplicate of the current item(s).
Duplicate Hierarchy: This command will create a duplicate of the current parent item and all child items while retaining the overall relationships of the hierarchy.
Instance: The Instance command is only relevant for Mesh items. The result is a duplicate of the current mesh that is simply a reference to the original mesh. Instances can be transformed at the item level and can have their own materials and textures applied to them via Item level masks. However, they can not be edited at the mesh level as they derive all mesh information from the original mesh item. The advantage is that all mesh changes made to the original mesh item will propagate to its instances.
Instance Hierarchy: The 'Instance Hierarchy' command will create instanced versions of a parent items and all child items, while retaining the overall relationships of the hierarchy.
Duplicate...: This command opens a popup dialog with a few options allowing users to choose which items to include or exclude from the duplication process.
Merge\Unmerge Meshes: The 'Merge' and 'Unmerge' options will work on separate clusters of polygons only while in Items mode. The 'Merge' command will take all the geometry from multiple layers and combine it into a single mesh item layer, no vertices are merges, and meshes remain separate. The 'Unmerge' command takes all the separate mesh groups within a single layer and makes as many individual layers as necessary. Unmerged mesh layers will still share a single 'Center' location, which can be remedied with the menu bar command "Edit > Center to Bounding Box > Center".
Select Source of Instance: When working with Instanced item, the 'Select Source of Instance' command provides users an easy way to select the source Mesh item layer of any Instance.
Select Instances: The 'Select Instances' command allows users to easily select all related Instances from a single source item.
Select Input/Output Items: When connecting together items, such as for animation rigging, the Select Input or Output Items allows user to automatically select the upstream or downstream items in the flow of the connection layout, as defined in the Schematic viewport.
Delete: This will delete the currently selected item(s) layer.
Lock/Unlock: Users can use these commands to quickly and easily lock and unlock items from accidental manipulation, eliminating the need to do so manually through the Assembly viewport. Once an item is locked, a small padlock icon (![]() ) appears next to the layer name. Once an item is locked, no transformation modifications may be made. To make a change, users much first unlock the item.
) appears next to the layer name. Once an item is locked, no transformation modifications may be made. To make a change, users much first unlock the item.
Draw Style: Will allow you to set a specific draw style for an item regardless of the 3D viewports display setting. Useful for when you have items within a scene that you wish to 'fix' the way they draw in the viewport, essentially mixing view styles within one window; i.e. wireframe mixed with shaded mixed with weight shade.
Wireframe Color: Allows you to change the default display color of an unselected item when displayed as a wireframe. Useful for differentiating multiple items in a complex scene.
Fill Color: Allows you to change the display color of an object in any GL viewport, independent of its surface attributes.
Create Item Mask: This option will create a mask group in the Shader Tree with the current Item as the filter. This allows you to quickly add a material/texture mask at the mesh item level so that you can isolate material changes to that specific item. Especially useful for applying surface attributes to an instanced object. If your original item is, say for instance red, you could change the color of an instance of the item to blue by using an item mask, while adding no additional real geometry to the scene.
Create Item Shader: Item Shaders provide per item overrides of any Shading applied within the Shader tree. The 'Create Item Shader' creates a special kind of Item List 'Shader' item that is not present in the Shader Tree. When selected, the attributes of 'Shader' item appear in the Properties viewport, users can select any of the 'Control...' options. When enabled modo will then use the settings of the Item Shader for the associated item, superseding the evaluation of the Shader Tree for the selected options. This makes it very easy, for instance, to make a single item invisible to the Camera. Create and Item Shader, then select the 'Control Visibility' option and then disable the 'Visible to Camera' option.
Scatter Replicas: The 'Scatter Replicas' command only applies to Replicators and act as an easy way to apply a Surface Generator to an item allowing finer control over duplicated variations through that shader tree.
Project Item Context Menu
 RMB clicking on the file name itself in the Item list will open the file context menu. This is a very convenient place to perform routine tasks.
Save: Saves the scene loaded in memory to disc overwriting the previous saved file
Save As: Save the scene currently loaded in memory to a user specified name and location.
Export As: Exports the entire scene to a variety of different formats.
Close Scene: Removes the scene and all related files, like images, MDD and IES light files from memory. Defaults to a blank new scene if no other scenes are loaded.
Item List versus Shader Tree--
You may have already noticed that some modo items appear in both the Item List and the Shader Tree. The Item List is generally used to select Locator type items. Locator type items are items that can be selected and edited directly in the 3D viewport, i.e. they have a location. There are items that are not Locator type. For instance, materials, shaders and texture layers are also items but are not directly editable in the 3D viewport. These items are accessed via the Shader Tree rather than the Item list. There are some crossover items that appear in both the Item List and the Shader Tree. This is because they may share common linked items such as a texture layer and its associated Locator item (texture positions are set by Texture Locators which can be manipulated in 3D), or items that can be modified by textures (Lights have a material and can be textured within the Shader Tree).

