
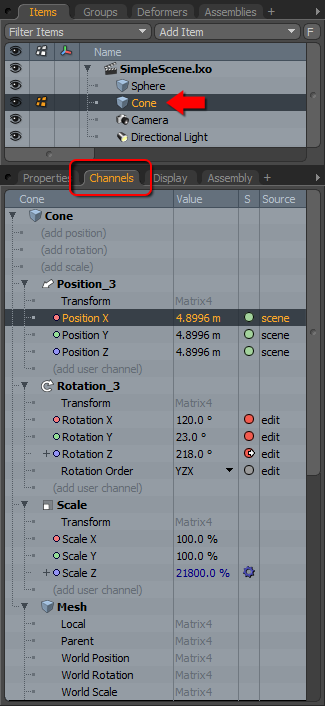
 The Channel viewport provides an exhaustive window into the soul of the modo animation system. All Channels of any item can be viewed in the Channel Viewport. Channels are simply any of the animateable attributes of an item (the identical attributes found in the Properties viewport!). The Channels viewport provides a direct method for selecting channels as well as creating, navigating and managing any keyframes on said channels. There are four columns on the Channel viewport; Channels, Value, Status and Source. Obviously the first column displays the channel names for the currently selected Item, the second column displays the value of the channel at the current scene time. The Status (S) column shows the state of the channel be it animated, static or actually on a keyframe. This is communicated via the same dot method used on the Channel keyframing control. The last column displays the 'Source' of the value, which means where the current value is stored, internally, these will be important to users when defining Render Passes and when using the skeleton tools to define rigs for animation.
Interacting with Channels--
Same as the 'Properties' viewport, the Channels viewport updates to reflect the current item selection. This can be items within the item list, the shader tree, or even the Groups palette. Once selected, all the animateable attributes appear in the Channels viewport. To affect an attributes value, the user simple needs to LMB+click directly over the current value in the 'Value' column. For toggles (boolean values), this will change the value field between true/false. For attributes with various properties, a menu will open presenting all the possible options. For numerical values, users can use the click+pause action to activate the field to enter a new numerical value, pressing enter to set it, or simply clicking away form the field.
Setting Keyframes--
Users can set animation keyframes in all the usual ways using the keyframe buttons, the 'S' keyboard shortcut, in the 'Properties' viewport, or within the 'Graph Editor'. To set a keyframe for a value directly in the Channels viewport, users can RMB+click on the target value and choose the 'Add Key' option from the context menu. Users may also remove keyframes using this methodology. When any attribute has a keyframe, colored circles will appear next to the value in the 'S' (Status) column referencing the attributes current state. The possible states are--
![]() None- Channels is at the default value
None- Channels is at the default value
![]() Constant- Channel has a constant value
Constant- Channel has a constant value
![]() Animated- No keyframe at the current time position
Animated- No keyframe at the current time position
![]() Animated- Keyframe at the current time position
Animated- Keyframe at the current time position
![]() Mixed- Channels have differing values or state
Mixed- Channels have differing values or state
![]() Driven- Channel is driven by an external source
Driven- Channel is driven by an external source
![]() Undefined- Channel is not defined
Undefined- Channel is not defined
An arrow over the dot represents that channel as driving another for a channel link.
![]() Driver- Channel is linked to another
Driver- Channel is linked to another
A gear icon represent a channel that is being controlled by another for a channel link
![]() Driven- Channel is linked to another
Driven- Channel is linked to another
Users can automatically select input/output items by selecting the appropriate channels and pressing ' i '
to select input, and 'o' to select output.
Contextual Menu--
RMB+clicking in the Channels viewport opens up the contextual menu with options for modifying the keyframes of the various channels.
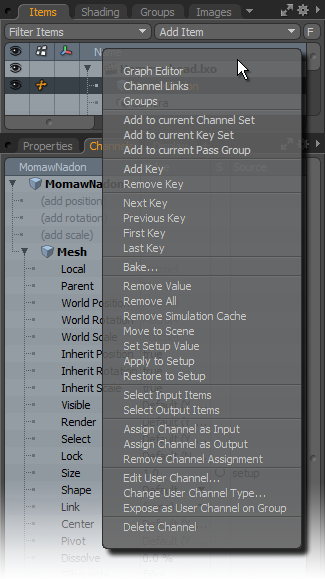 Add Key: Sets a keyframe at the current time with the current value.
Remove Key: Removes the keyframe at the current time.
Graph Editor: Opens the Graph Editor window. The Graph Editor represent the interpolations of keyframes, basically what happens in-between.
Channel Links: Opens the Channels Links palette, useful in having one channel control another automatically, but the functionality has been replaced by the superior Schematic View.
Next/Previous/First/Last Key: Moves the timeline to the appropriate time.
Bake: Bakes, or freezes the current animation to individual keys at every frame. Useful when exporting animations of driven items.
Remove Edits: Removes all keyframes, retaining the value of the initial key.
Remove All: Removes all keyframes and returns to the default value.
Move to Scene: Takes the current channel value and moves it to the 'Scene' level, the default base level value used when working with Render Passes.
Set Setup Value: Used only in Setup mode to tell modo that the values for this channel should be kept separate between 'Setup' and 'Scene' actions. So when the user is editing a channel out of 'Setup' mode it won't affect the setup value (so it has a value in Setup and a different one in the Scene action). This can be used for example to hide certain rig elements when animating but have them visible in setup mode without having to toggle visibility all the time.
Apply to Setup: Takes the current channel value and set it as the default 'Setup' value, essentially the resting value of an item prior to being deformed.
Restore to Setup: Removes the existing value for the channel reverting it back the 'Setup' state.
Select Input Items: For driven channels, this option selects the driver item or channel.
Select Output Items: For driven channels, this option selects any items or channels being driven by the current channel.
The following options are relevant only to User Created Channels.--
Rename: Opens a dialog box to Rename the selected user channel.
Type: Opens a dialog box allowing users to modify the type of user channel.
Default Value: Opens a dialog box allowing users to specify a default value for the user channel.
Set Minimum Value: Opens a dialog box allowing users to set a minimum value for the user channel.
Remove Minimum Value: Removes any minimum value, if specified.
Set Maximum Value: Opens a dialog box allowing users to set a maximum value for the user channel.
Remove Maximum Value: Removes any maximum value, if specified.
Remove Channel: Deletes the selected user channel.
modo offers a very powerful animation feature in its Transform Items. These are nothing more than individual transform operations, such as Move, Rotate and Scale that control the position, orientation and size of the element respectively, packaged into their own container inside its associated Item. Basically this mean each operation, with its three axis coordinates, is its own entity within the item it is controlling. Additionally, users can add multiple Transform Items and change their stacking order, controlling what order they are evaluated (from the bottom up), providing a flexible and powerful means of controlling and animating items.
Some details to note on Transform Items is that the Primary Transform's name will appear in Bold in the Channels list, indicating its Primary status, these are the Transforms that will be directly modified using any Transform tools in the viewport. The first Transform created for any type will be the one designated as Primary.
Users can add Transform Items to any item by way of the 'Add' operations in the Channels display area- 'Add Position', 'Add rotation' and 'Add Scale'. Once added, users can RMB+click on the title of the actual transform operation, opening a contextual menu that allows users to edit Transforms in a variety of ways.
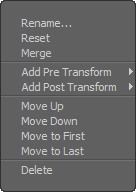 Rename: Opens a dialog that allows the users to define any alternate name for the selected Transform item.
Reset: Resets the selected transform values to zero.
Merge: When two like Transform items are selected, the 'Merge' option evaluates the values and combines them. The source transform will be cleared of channel values and can then be removed without affecting the position, orientation or scale of the item. Merged values are always transferred to the Primary Transform when selected, but when selecting two auxiliary Transforms, the values will merge into the last Item selected. The Merge command is most useful for removing zeroed transforms. Note: It is not intended for combining Transforms containing animation as values are combined at the current time only.
Add Pre/Post Transform: These commands differ from the regular 'Add' option in that they allow the user to define the position of the new Transform Item when added to the stack. Pre Transform will add the item below the selected transform and Post Transform will add it after.
Move Up/Down/First/Last: These commands will change the stack location of the selected Transform Item, 'Up' or 'Down' will move them one position the direction selected, and 'First' or 'Last' will move them to the bottom or top of the stack respectively.
Delete: Removes the selected Transform Item from the layer stack.
Context Menu--
 RMB+clicking on the 'Channels' tab will open the viewport menu. Select the 'Viewport Settings' to open the Channels viewport options menu.
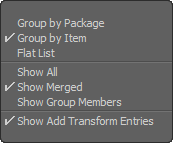
Grouping: The first three options define how channels are grouped in the channel list
Group By Package- Organizes channels by package, sub-groupings of related elements by individual item.
Group By Item- Organizes channels strictly by item.
Flat List- Channels listed as straight list with no grouping.
Show All: When enabled shows all channels on an item, when disabled certain less used channels are hidden such as Matrix channels.
Show Merged: When enabled, combines all the channel values for all selected items, instead of listing each item's channel one after another. Useful when gang editing multiple items at once.
Show Group Members: When enabled, show the members of any selected Group.
Show Add Transform Entries: Displays the 'Add Position/Rotation/Scale' entries to the channel list. These options provide a shortcut to users for adding additional transform channels, but for smaller monitors removing them can save some screen real-estate.

