
The Camera Item is a virtual lens into the 3D world inside modo. Everything rendered is seen from this point of view, as such, these settings determine how your camera sees your 3D world. Much like how a real camera operates, the camera captures your image, and works in conjunction with the 'Render Item' making your virtual snapshot viewable in the 'Render Display'. What is displayed depends on your 'Render Output(s)', which acts as virtual developer determining what actually gets rendered when 'F9' is pressed (or any render command is invoked). While the Camera Item contains the properties related to the projection, frame aspect ratio, DOF, etc., the actual frame resolution is set within the 'Render Item'.
Each new modo scene by default has a single camera item, additional cameras may be added to the scene with the menu bar command 'Item > Create Camera' or within the 'Item List' viewports 'Add Item' function; LMB-click the add item button and select 'Camera' from the popup menu. Additional cameras are helpful in providing alternate views of a scene, easing navigation, or for providing close-up views of a particular area, especially in situations where the hero camera is animated and locked, avoiding accidental changes. Only a single camera may be 'rendered' from at a time, the particular camera used is specified in the 'Render Item's 'Frame' subtab under the 'Render Camera' option. Additionally, alternate camera may be selected within the 'Render Preview' viewport using the select camera option available, without affecting the 'Render Camera' used for final rendering.
Working with the Camera
The cameras attributes, such as Position and Rotation, can be modified in the properties panel whenever the camera item is selected in either the "Item List' or the 'Shader Tree'. By default, the camera icon is only visible in the 'Animate' and 'Render' interface tabs, but by changing the visibility in the viewport options, they can be made viewable in any viewport; hover the mouse pointer over the 3D viewport you wish to modify, and press 'o' on the keyboard to open the visibility options panel.
The camera item may also be interactively modified in the 3D viewport while in 'Items' mode (camera items have no editable components). Use the standard transform tools to move (W) and rotate (E) the camera. When making fine adjustments, users may find it easier to see how the camera is viewing the scene. This can be done by changing the viewport view button in the upper left to 'Camera'. When set as such, black bars may be drawn over the viewport if the aspect ratio of the 'Frame Size' is different from the viewports aspect ratio; the area inside the bars represents the area of the scene that will render when a render command is invoked. To position the camera while in this view mode, various keyboard/mouse options are available--
|
Shift+Alt+LMB Drag |
= |
Move camera item |
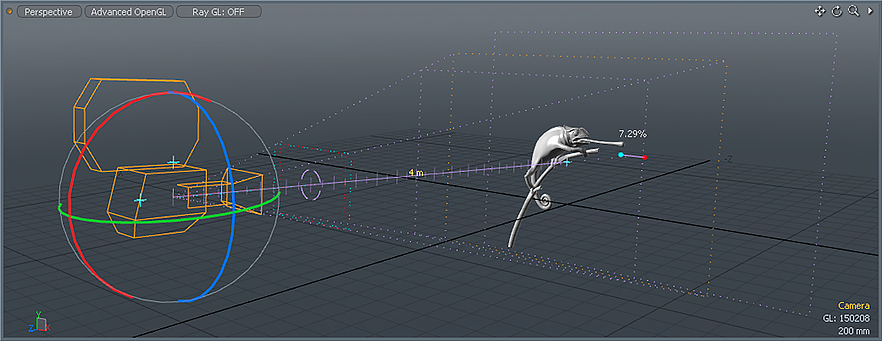
When tool handles are set to 'Advanced' (within the 'Preferences' or 'Tool Pipe'), additional handles become visible allowing users to interactively adjust camera setting in the viewport (mouse over the above image for handle reference). The handles are--
1.) Adjust 'Focal Length'/'Field of View'.
2.) Adjust F-Stop for Depth of Field.
3.) Adjust 'Convergence Distance'.
4.) Adjust 'Focus Distance'.
5.) Parallax Offset Difference value (distance between items for left & right eye in final rendered frame) expressed as percentage of frame width. Users can drag the handle around the scene to get an idea how far apart elements will appear on the screen when rendered as a stereo image. Generally speaking, for comfortable viewing users will want to keep the sum of the values for the closest elements in frame to the farthest elements 5% and under. Adjustments can be made to 'Interoccular Distance' and the 'Convergence Distance' options to help in obtaining this result.

TIP: User will likely find it more intuitive to adjust the camera when the 'Action Center' is set to 'Local', keeping the transform handles aligned to the camera item itself.
On occasion, users may wish to modify the size of the camera icon within the 3D viewport, this can be accomplished with the 'Size' setting in the 'Display' viewport, which offers additional settings for modifying the cameras iconic representation including the ability to label the item. Users may also adjust the 'Scale' option of the cameras in the 'Properties' panel. Note that changing the size of the camera icon in no way affects the rendering outcome or the overall scale of the scene.
The attributes of the Camera item found in the properties panel are documented on the Camera Item page of the Shading Lighting and Rendering section of the documentation, please reference that page for additional information.

