
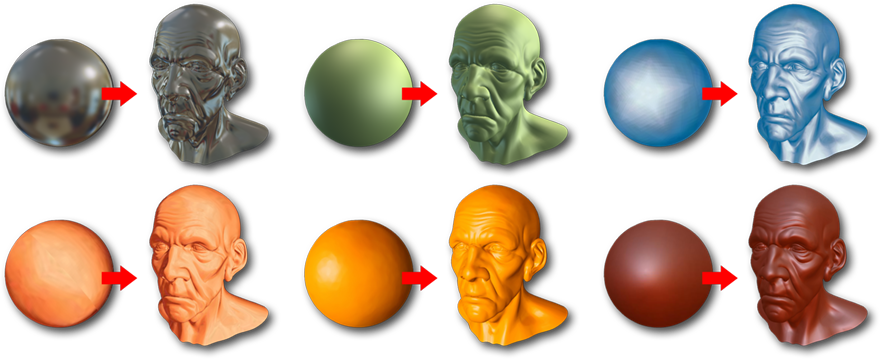
What if you could create a surface material and lighting environment simply by painting an object so that it looks like how you want your surface to appear? MatCaps, or "material captures" can do just that. Basically what happens is the shading of a spherical image is applied to the target surface by mapping corresponding normals from the captured surface onto that of the rendered surface. This opens up all sorts of interesting possibilities for non-photoreal image rendering demonstrated by these examples below; the original 'MatCap' is displayed on the left, with the resulting shaded surface shown on the right--
Creating Custom MatCaps
The 'MatCap' shader requires a spherical image as a source, users can create or photograph any spherical shape for application to the surface. However, make sure the final image is cropped in exactly to the outer edge of the sphere and that the image has the same width and height (square aspect ratio). When creating 'MatCaps' users will want to avoid surfaces with high-frequency details, these don't typically map well to complex surfaces, and they end up looking like the image is a reflection onto the surface instead; soft or subtle transitions work best. Resolution wise, make sure the image itself captures the necessary details for the target output resolution, but for soft, blurry MatCaps, sizes in the 512x512 to 1024x1024 pixel resolution should work just fine for most cases.

Applying MatCaps
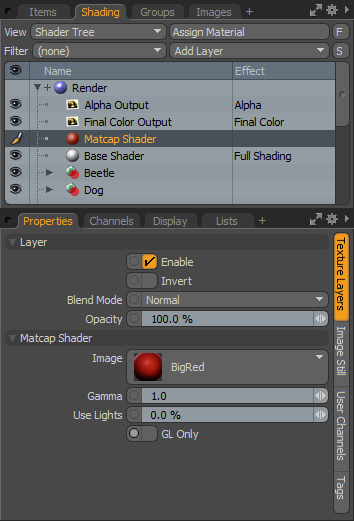
MatCaps are applied with the MatCap shader, and can be added to the Shader Tree by simply selecting the MatCap item found under the Add Layer button- "Add Layer > Special > MatCap". Initially the MatCap will place itself at the top of the Shader Tree affecting all elements in the scene. Users can leave the item in this position and enabled the 'GL Only' option so the surfacing will only show in the 3D viewports, not in rendered images, a great option for sculpting.
The MatCap layer works like a replacement Shader, placing itself above the Base Shader, overwrite the settings of the Base Shader. In order to localize the affects of the MatCap, users must create an appropriate mask for the target item or surface and place that group with the MatCap layer above the Base Shader. For more information on working with Shader Tree layers, please reference that page of the documentation.
 Layer--
Enable: Toggles the effect of the layer on and off, duplicating the functionality of toggling visibility in the Shader Tree. When un-checked (disabled), the layer has no effect on the shading of the scene. However, disabled layers are saved with the scene and are persistent across MODO sessions.
Invert: Inverts the RGB values for the layer producing a negative effect.
Blend Mode: Affects blending between different layers of the same effect type, allowing user the ability to stack several layers for different effects. For more on blending, please reference the 'Blend Modes' page of the documentation.
Opacity: Changes the transparency of the current layer. Reducing this values will increasingly reveal lower layers in the shader tree if present, or dim the effect of the layer itself on the surface.
MatCap Shader--
Image: This is where the users specify the spherical MatCap image that is to be applied to the target surface. If no images are loaded in the scene, a clip browser window will open allowing users to load an image for use, if images are already present in the scene, users can specify any existing images for use. Uses may need to load the image separately using the Clips Browser (image) viewport prior to applying a MatCap shader.
Gamma: The 'Gamma' setting can be used as an image adjustment control to lighten or darken the MatCap image without the need to externally adjust the image in an external bitmap editor. The Gamma adjustment is non-linear and will affect the mid-tones of the image greater than the shadow and highlight areas of the image.
Use Lights: The shading of MatCaps surfaces are controlled directly by the MatCap image itself, and are not affected by scene lighting. The 'Use Lights' option provides users a means to incorporate the lights in the scene, blending them with the texture of the MatCap shader. A value of 0% disables all lights on the scene from having any affect on the surface moving up toward 100% which means the surface is completely controlled by the lights of the scene in effect changing the MatCap shader into a diffuse color channel for the surface.
GL Only: When this toggle is enabled, the MatCap shader will only affect the OpenGL viewport representation of the surface, and the rendered surface will display as normal (as if the MatCap shader were disabled). This is useful for when users wish to use MatCaps as a sculpting or modeling aid, giving users a clearer view of the geometry but still have the surface render normally otherwise.

