
Photometric lights use data provided by lighting manufacturers in the form of IES or EULUMDAT format photometry files. These files contain 'photometric' measurements of a light's intensity in different directions, as well as information about the size of the actual luminous surface. Modo uses this directional intensity information to shape the distribution of light and match real-world "luminaires" (light sources or fixtures). These photometric files also describe a luminaire's real-world intensity, and this value is extracted from the lighting distribution and displayed in the light's Intensity channel, where you can edit it to suit your scene. Keep in mind, editing the intensity means that it is no longer an accurate simulation of real lighting. The photometry files remain external to the MODO scene files, and like images, must be available when loading the scene.
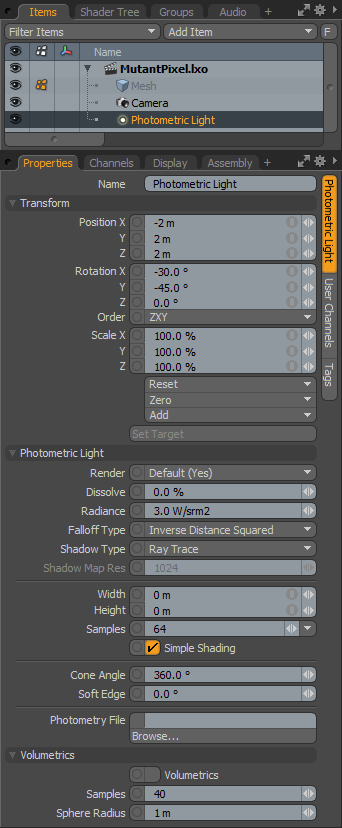
Photometric Light
 Name: This data field displays the current item name. Users may easily change it by LMB-clicking within the field and typing the new name.
Transform--
Position: An Item transform that allows the user to numerically position the light item in XYZ space. By default, Position transforms originates from the items center position.
Rotation: An Item transform that allows the user to numerically set the rotation of the light item. By default, Rotation transforms originates from items center position.
Order: Allows the user to set the order that rotations are applied to the light item. Changing the order that rotations are applied can sometimes help to reduce or eliminate gimbal lock.
Reset: Resets the selected transform values to (0,0,0) returning the items back to the world space center position.
Zero: Returns the light items Center position to the world space center (0,0,0) without changing the position of the light item itself.
Add: Transform Items are the channel groups associated to an item that store its transform values, controlling its position, rotation and/or scale. By default, new items do not have any transform items associated with them (even though they are visible here within the Properties panel). This is useful as an optimization as only the necessary transforms are added on an as-needed basis, reducing scene overhead. There are several ways to add them. One is by simply transforming the target item with one of the various transform tools (or by editing the values input fields). This action will cause the particular transform item to be added automatically to the 'Channels' viewport list. The 'Add' function here can also be used to add the selected set of transforms to the Channel list while keeping the default 0,0,0 values (a necessary step for 'Referencing', in order to override the channels, they must first exist).
Set Target: By selecting the Light item, and a single additional item in the item list, and then pressing 'Set Target', this function allows users the ability to target specific items in a scene, automating the rotation of an item, so that it continuously points toward the targeted item. Once activated, additional option appear--
Remove Target: Removes the target link between the two items.
Enable: Toggling this option off temporarily disables the targeting function while retaining the link between the items.
Set Focus Distance: This option sets the focal distance for DOF when targeting camera items to other item.
Roll: Provides the ability to offset the items rotation angle away from the target.
Time Offset: Provides users the ability to time offset, by a number of frames, how the light follows the target item. It can either be delayed behind it with a negative value, or run ahead of it with a positive value.
Photometric Light--
Render: This drop down menu allows the user to select from 3 choices, when set to 'Default', the user can enable/disable lights using the visibility function "![]() " of the item list. When the light is visible, it contributes to the final rendered scene and when invisible, it will not. On some instances the user may prefer to fix this state, setting the light as 'On' (enabled) or 'Off' (disabled) regardless of visibility. Also useful for workflows that auto toggle visibility, saving the user from manually enabling lights for test renders.
" of the item list. When the light is visible, it contributes to the final rendered scene and when invisible, it will not. On some instances the user may prefer to fix this state, setting the light as 'On' (enabled) or 'Off' (disabled) regardless of visibility. Also useful for workflows that auto toggle visibility, saving the user from manually enabling lights for test renders.
Dissolve: When the 'Dissolve' function is set to any value above 0%, the lights overall affect on the scene will attenuate as the value increases. When set to 100%, the lights effect on the scene is completely disabled. This function providing a convenient way to dim a lights effect within a scene.
Radiance: This value controls the intensity of the light and uses the standard physically based unit of Watts per volumetric meter. The initial value is extracted from the Photometry file, so modifying this 'Radiance' means the light is no longer an accurate simulation of the light. As you would expect, increasing this value will increase the amount of light coming from the light and decreasing the value reduces the lights overall intensity.

TIP: Keep in mind that a Photometric Lights intensities and falloffs adhere to real world scale values, scenes that do not adhere to a real world scale will not provide accurate lighting simulations as specified by the photometric file.
Falloff Type: Light in the real world isn't a uniform brightness, its intensity diminishes with distance. Photographers will be familiar with the concept that a light will be a quarter as bright at twice the distance away, know as the Inverse Square Law. MODO lights default to this setting providing a realistic way to light a scene, however there are times when users may not wish to have this behavior, so MODO provides three falloff type options-
None- No falloff, light is consistently bright across its distance.
Inverse Distance- Light is half as bright at twice the distance.
Inverse Distance Squared- Default behavior, Light will be a quarter as bright at twice the distance.
Shadow Type: This popup offers options between 'Ray Traced', 'None' and 'Deep Shadow Maps'. In situations where users want a light to cast a shadow, Ray Traced will give the most accurate results. Deep Shadow maps are useful for volumetric lights and fur rendering, where a great deal of calculations are required to produce shadows; producing similar results to ray traced shadows while reducing the number of calculations.
Shadow Map Res: The 'Shadow Map Res' Sets the resolution for the calculated deep shadow map in pixels. This option is only available when Deep Shadow Map is selected. Increasing this value will increase the quality and accuracy of the generated map, while increasing renter times as well.
Width/Height: The 'Width/Height' setting defines the size of the illumination area for the Photometric light, much like it does for an area light. Larger values produce more light while smaller values produce less. The size value are extracted from the photometry file, modifications to this value would no longer produce an accurate simulation of the light.
Samples: As the 'Width/Height' increases, additional samples are required to smooth out the resulting soft edge shadow. If the shadow appears grainy, increasing this sample setting is the most likely solution. The default value of 16 is a good starting point for balancing speed and quality. As the size increases or the resolution of the image increases you can drive this number higher to account for any grain that appears. Keep in mind that increasing the number of samples will also increase render times.
Simple Shading: When generating soft shadows with a width/height greater than 0m, MODO calculates the shadow as if sampled from an array of lights, these samples are blended together to produce the smooth result. With the 'Simple Shading' checkbox enabled, MODO will calculate the specular and diffuse values for a surface as if the light were a single point, regardless of the lights width and height. However, with 'Simple Shading' disabled, MODO uses the same light array as the shadow to calculate the specular and diffuse values. This results in diffuse and specular shading that is 'soft', like the shadow but can also become increasingly grainy with a greater total area. Increasing the number of 'Samples' will reduce grain in the diffuse and specular shading as well as the shadows at the expense of longer render times.
Cone Angle: In a way, Photometric Lights are like a combination of area lights and spot lights where light is emitted in a cone shape within a defined area (width/height). The 'Cone Angle' defines the shape of the cone that is generated; larger values produce wider conical shapes and therefore larger areas of illumination, while smaller values produce tighter cones with smaller areas of illumination. A setting of 360° produces light similar to a point light radiating in all directions equally. The cone angle value is extracted from the photometry file, modifications to this value would no longer produce an accurate simulation of the light.
Soft Edge: The soft edge defines an illumination falloff inside the edge of the spot lights cone producing a more natural look. The soft edge is contained within the 'Cone Angle', and attenuates illumination at the edges; a 40° Cone Angle with a 10° falloff would really be a 20° cone angle of full illumination that would falloff 10° across the outer edges of the cone. The soft edge value is extracted from the photometry file, modifications to this value would no longer produce an accurate simulation of the light.
Photometry File: The browse function opens a file dialog window that allows you to locate and load a Photometry File in '.LDT' or '.IES' formats. Like image maps, Photometry files are external need to be available to MODO each time a scene is loaded. When moving files, make sure to include the Photometric files as well.
Volumetrics--
When light shines on particular matter suspended in the air, such as water vapor, smoke or even pollution, the light rays become visible. In computer graphics this effect is known as volumetric lights, their affect can be subtle or pronounced, either way it can add a good amount of believability and atmosphere to renders. Additional Settings related to volumetrics can be found in the Light Material item.
Volumetrics Checkbox: The 'Volumetrics' checkbox toggles the effect on or off. When enabled, the sample, height, and radius options become available.
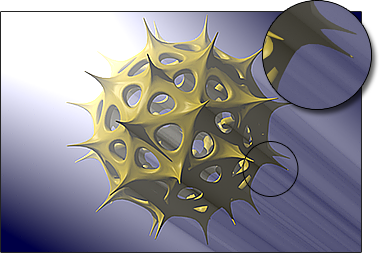
Samples: Any objects that intersect the light beam volume will cast shadows through it. You may have witnessed this when sunlight shining through the clouds creates streaks of light sometimes referred to as 'god rays'. The 'Sample' setting defines the degree of accuracy that MODO uses to calculate these shadows through the volume, higher numbers of samples will give smoother and more accurate results, while lower values will render more quickly but become increasingly grainy. The sample below demonstrates the difference between 32 samples on the left and 256 samples on the right.

| 
|
Sphere Radius: This is the size of the volume overall as measured from the lights center positions extending out in all directions around the source. A setting of 10m will produce a sphere with an overall radius of 20m including falloff. The actual falloff within the spheres volume will be dictated by the supplied photometric information.
Photometric Light Shape Preview
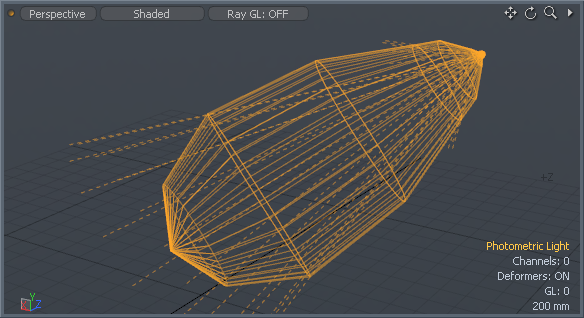
Photometric lights display a displaced wireframe sphere at the lights position with the displacement radius based on the intensity of the photometric data file (IES or EULUMDAT). You can adjust the size of the preview by adjusting the light's display size.

