
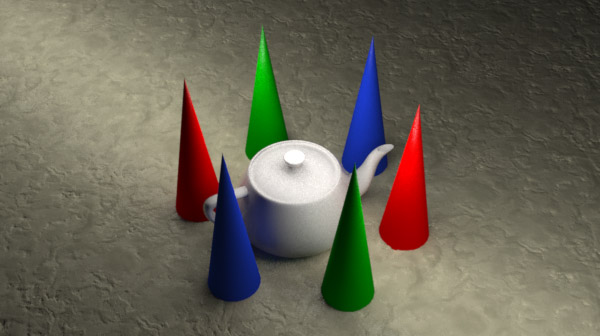
The Cylinder light is similar to a common fluorescent tube in that it emits light in a radial fashion outward from a cylindrical shape. Cylinder Lights use a physically accurate light model so the intensity of the light falls off with the inverse square of the distance to the light, for example a surface will be half as bright when the light is twice as far away. As a physically based light, the intensity is also increased as the volume (size) of the light increases. Increasing the size of the light relative to the models it affects will also increase the amount of shadow spread. The light has Position and Rotation controls as well as Radiance, Shadow Type, Samples, Cylinder Radius and Length. When adjusting the Cylinder light in the 3D view be sure to use the Item Transform tool. This will provide additional handles so you can adjust the length and diameter of the Cylinder light directly in the 3D viewport. To control the lights color, shadow color and other material related properties, refer to the Light Material page of the documentation.
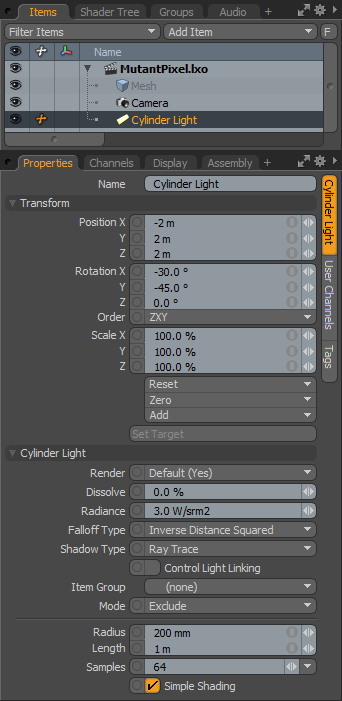
Cylinder Light
 Name: This data field displays the current item name. Users may easily change it by LMB-clicking within the field and typing the new name.
Transform--
Position: An Item transform that allows the user to numerically position the light item in XYZ space. By default, Position transforms originates from the items center position.
Rotation: An Item transform that allows the user to numerically set the rotation of the light item. By default, Rotation transforms originates from items center position.
Order: Allows the user to set the order that rotations are applied to the light item. Changing the order that rotations are applied can sometimes help to reduce or eliminate gimbal lock.
Reset: Resets the selected transform values to (0,0,0) returning the items back to the world space center position.
Zero: Returns the light items Center position to the world space center (0,0,0) without changing the position of the light item itself.
Add: Transform Items are the channel groups associated to an item that store its transform values, controlling its position, rotation and/or scale. By default, new items do not have any transform items associated with them (even though they are visible here within the Properties panel). This is useful as an optimization as only the necessary transforms are added on an as-needed basis, reducing scene overhead. There are several ways to add them. One is by simply transforming the target item with one of the various transform tools (or by editing the values input fields). This action will cause the particular transform item to be added automatically to the 'Channels' viewport list. The 'Add' function here can also be used to add the selected set of transforms to the Channel list while keeping the default 0,0,0 values (a necessary step for 'Referencing', in order to override the channels, they must first exist).
Set Target: By selecting the Light item, and a single additional item in the item list, and then pressing 'Set Target', this function allows users the ability to target specific items in a scene, automating the rotation of an item, so that it continuously points toward the targeted item. Once activated, additional option appear--
Remove Target: Removes the target link between the two items.
Enable: Toggling this option off temporarily disables the targeting function while retaining the link between the items.
Set Focus Distance: This option sets the focal distance for DOF when targeting camera items to other item.
Roll: Provides the ability to offset the items rotation angle away from the target.
Time Offset: Provides users the ability to time offset, by a number of frames, how the light follows the target item. It can either be delayed behind it with a negative value, or run ahead of it with a positive value.
Cylinder Light--
Render: This drop down menu allows the user to select from 3 choices, when set to 'Default', the user can enable/disable lights using the visibility function "![]() " of the item list. When the light is visible, it contributes to the final rendered scene and when invisible, it will not. On some instances the user may prefer to fix this state, setting the light as 'On' (enabled) or 'Off' (disabled) regardless of visibility. Also useful for workflows that auto toggle visibility, saving the user from manually enabling lights for test renders.
" of the item list. When the light is visible, it contributes to the final rendered scene and when invisible, it will not. On some instances the user may prefer to fix this state, setting the light as 'On' (enabled) or 'Off' (disabled) regardless of visibility. Also useful for workflows that auto toggle visibility, saving the user from manually enabling lights for test renders.
Dissolve: When the 'Dissolve' function is set to any value above 0%, the lights overall affect on the scene will attenuate as the value increases. When set to 100%, the lights effect on the scene is completely disabled. This function providing a convenient way to dim a lights effect on your scene.
Radiance: This value controls the intensity of the light and uses the standard physically based unit of Watts per volumetric meter. As you would expect, increasing this value will increase the apparent brightness of the Cylinder Light and decreasing the value reduces the lights intensity. Keep in mind larger lights will appear brighter in the scene because of the increased surface area. When scaling lights, 'Radiance' will need to be adjusted appropriately.
Falloff Type: Light in the real world isn't a uniform brightness, its intensity diminishes with distance. Photographers will be familiar with the concept that a light will be a quarter as bright at twice the distance away, know as the Inverse Square Law. MODO lights default to this setting providing a realistic way to light a scene, however there are times when users may not wish to have this behavior, so MODO provides three falloff type options-
None- No falloff, light is consistently bright across its distance.
Inverse Distance- Light is half as bright at twice the distance.
Inverse Distance Squared- Default behavior, Light will be a quarter as bright at twice the distance.
Shadow Type: This popup offers options between 'Ray Traced' , 'None' and 'Deep Shadow Maps'. In situations where users want a light to cast a shadow, Ray Traced will give the most accurate results. Deep Shadow maps are useful for fur rendering, where a great deal of calculations are required to produce shadows; producing similar results to ray traced shadows while reducing the number of calculations.
Control Light Linking: Illumination on a surface is generally controlled by the 'Shader' item in the Shader Tree. Within the Shader it is possible to control a lights affect on a surface with Light Linking. As its name describes, it links the illumination affects of a Group of Lights to specific Items or Material Groups. When the 'Control Light Linking' option is enabled on a Light item, it will act as an individual Light Specific override to the Shader, allowing users to 'Include' or 'Exclude' a specific lights illumination on a group of items.
Item Group: The 'Item Group' option determines the specific Group of item layers in the scene that will be affected by the Light Linking. The Group needs to be defined in the Groups viewport panel. This can be done easily by selecting the target items while in 'Items' mode and then in the Groups palette LMB+click the 'New Group' button. Define a name for the group in the pop-up dialogue and choose the 'From Selected Items' option and click 'OK' to accept. Once the Group is defined, select the named group here.
Mode: The 'Mode' option determines whether the light will be 'Included' meaning it will only affect the Items in the specified Item Group, and 'Excluded' by all other surfaces, meaning it will be ignored by any items in the specified Item Group.
Radius/Length: These values set the size for the light as an absolute value for 'Radius' and 'Length' and is based on the current units. By default the unit system is Metric so the radius and length would be set directly as meters. The size of the light affects the apparent intensity as mentioned above.
Samples: As the size for the cylinder light increases, the shading produced from the light may appear grainy and additional will likely be required to produce a smooth result. Keep in mind that increasing the number of samples will also increase render times.
Simple Shading: With the 'Simple Shading' checkbox enabled, MODO will calculate the specular and diffuse values for a surface as if the area light were a single point, regardless of the width and height. However, with 'Simple Shading' disabled, MODO uses the same light array as the shadow to calculate the specular and diffuse values. This results in diffuse and specular shading that is 'soft', like the shadow but can also become increasingly grainy with a lower number of samples. Increasing the number of 'Samples' will reduce grain in the diffuse and specular shading as well as the shadows at the expense of longer render times.

