
The Clay tool works by raising the surface along the normal of the underlying polygons, up to the desired 'Level'. Once that level is reached, the surface will not raise any further, remaining at that fixed height. By default the normal is calculated from the center position of the brush, so as long as the center itself doesn't overlap any previous strokes, the offset amount will be the same.
The amount of surface offset is adjusted with the 'Level' option. As an example- with a level set to 0%, nothing will happen when sculpting because all the points lie on the brush plane but if the level is changed to 50% it means that the plane is raised by 50% of the brush radius and the effect will now be apparent, increasing the level even more increases the offset effect. Note that the plane orientation depends on the 'Normal Mode', different effects can be achieved depending on the 'Normal Mode' selected; it's a also a good idea to use a fine interpolation step.
The 'Clay' tool can be found within the 'Paint' layout in the 'Sculpt' submenu of the toolbox. The tool can also be called from the menu bar under the "Texture > Sculpt Tools" menu. When using the tool pressing 'Shift' will enable the temporary 'Smooth' function. Additionally, the tool can be combined with the various 'Tips' as well as the 'Inks' and 'Nozzle' to further customize the way the brush affects the surface. When activated the following attributes are displayed in the Properties panel.
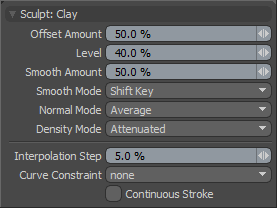 Sculpt: Clay--
Offset Amount: The offset of the surface for a stroke is attenuated as it reaches the maximum level. The 'Offset Amount' controls the attenuation strength, meaning it basically controls how quickly the stroke will reach the maximum level. Low values will allow users to slowly build up to the maximum level and high values will reach the maximum value much more quickly.
Level: Defines the maximum amount of offset any stroke can reach as percentage of the Brush's radius, so increasing the brush size will also affect the offset amount.
Smooth Amount: The Smooth tool is such a useful method for controlling sculpt detail it is available with almost every sculpting tool in MODO and can be accessed by simply holding the Shift key down while sculpting. (This default behavior can be changed with the 'Smooth Mode' option) The Smooth amount attribute allows you to control the amount of smoothing applied when using the Shift qualifier with that specific tool. This is a convenience feature implemented specifically to enhance the sculpting workflow.
Smooth Mode: MODO provides alternate methods for applying smoothing while sculpting-
Shift Key-- The smooth mode is enabled when the 'Shift' key is depressed.
Low Pressure-- When using a pressure sensitive tablet, users may apply the 'Low Pressure' option, where light sculpting strokes will have a smoothing affect on the surface. Once the pressure threshold is exceeded, the smoothing effect will attenuate toward the full pressure effect where the brush will work normally as defined by the tools settings providing a dual function to the brush.
Uniform-- When set to 'Uniform', smoothing is always on while sculpting, thus making softer strokes.
Normal Mode: This option controls the method used for displacing the sculpted vertices. The various options include:
Brush Center-- uses the geometry at the very center of the brush to calculate the direction along which to displace the mesh.
Vertex-- displaces each vertex along its own normal.
Average-- calculates an average normal for all the vertices inside the brush.
Screen-- displaces the vertices directly towards the active viewport.
Mouse Down-- uses the normal of the mesh surface directly under the mouse when the LMB is clicked. All displacement is then carried out according to that vector.
X,Y,Z-- allows you to pick a world axis along which to displace the vertices.
Density Mode: This control determines how the sculpt stroke affects areas of the mesh that it has already covered. For instance, brushing back and forth will cause the sculpt tool to run back over itself which can have a number of different effects. This controls the sculpt during a single stroke. Once the stylus comes off the tablet or you release the LMB the density control is reset.
Additive-- continues to add to the displacement each time the brush crosses over its own path with no maximum cap to govern the sculpt.
Attenuate-- continues to add to the displacement as the brush crosses over its own stroke until the displacement reaches the Offset Distance or Amount value.
Max Stroke-- enforces a maximum offset based on the largest displacement value of the current stroke.
Max Map-- caps the sculpt effect at the maximum amount in the current displacement image.
Interpolation Step: Generally, paint strokes are not a continuous lines, but a series of dots or dabs placed on the canvas. This option defines the distance between each dab as a percentage of the brush size. By default, this value is set to 8%. So for an 64 pixel sized brush, dabs would be placed approx every 7 pixels. Users can increase or reduce this value for a variety of effects. Increasing it toward 100% will produce individual dots, rather than what looks like a stroked line.
Curve Constraint: The 'Curve Constraint' option allows users to use pre-drawn curves, either Spline or Bezier, and then constrain the brush strokes to the curve when painting, producing a very smooth, controlled and repeatable result. It works by having the curve element in the background layer (visible, but not selected). Then the 'Curve Constraint' option is set to either 'Background 2D' or 'Background 3D' mode. Once set any paint strokes into the canvas near the curve will constrain to the nearest curve position.
The 'None' option disables the constraining, the 'Background 2D' projects the curve from any orientation onto the surface through the viewport and the 'Background 3D' option constrains the stroke to the curves position in 3D space, only affecting surfaces that are within close proximity (defined by the brushes size).
Continuous Stroke: When this option is enabled, MODO will continuously draw a stroke like a line, instead of as individual dabs. MODO will draw the stroke as a linear segments between each interpolation step dab so increasing the scale of the interpolation steps will reveal the linear nature of the continuous stroke option.
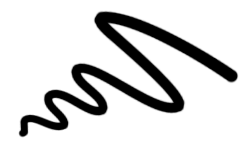 Default 10% 'Interpolation Step' produces smooth stroke | 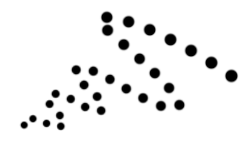 Interpolation Step set to 200% reveals individual dabs | 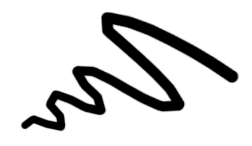 200% Interpolation Step with Continuous Stroke enabled |

