
The 'Create UV' tool is used to generate UV maps and provides several methods and options for generating them. If there are no polygons selected in your mesh, the tool will use all visible foreground polygons to create the UV map. To isolate certain areas of your model simply select the desired polygons prior to using the tool. The Create UV tool works by projecting the polygons from 3D space into the 2D (UV) space. As such, it is very important to choose the most appropriate Projection Type; MODO offers several. It should be noted that the 'Create UV' tools is often only a half step to a completed UV map as using this tool will generally result in UVs that need additional manual editing to complete.
UV Maps are stored as discontinuous 2D vertex maps for 0-1 UV coordinate data. UV maps are used to explicitly link vertices in the 3D mesh to locations on a 2D image for high accuracy texture mapping. The UV map can be though of as a method to lay out the 3D mesh so that it lays flat, allowing the 2D image to be applied to the mesh accurately. A UV View is provided to help visualize the UV's over a bitmap image. You can use the UV tab of the default layout to see mesh geometry in the viewport, and the UV map as well.
To use the 'Create UV' tool to generate UV's do the following:
1) Create some geometry, and select some polygons in the 3D Model View.
2) Change to the UV view layout.
3) On the UV menu, select the 'UV Projection' tool.
4) Click in the 3D Model View. The selected geometry will generate a UV map which will appear in the UV Texture View.
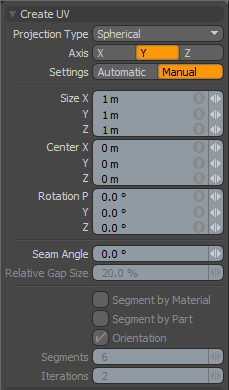 Create UV
Projection Type
Planar- The Planar mode projects the selected polygons from an orthogonal view determined by the Axis setting. The resulting UV map will actually look quite similar to viewing the model in a 3D viewport set to Top, Front or Side. This mode is very good for quickly assigning areas of a mesh that are all facing the same direction. For more complicated geometry such as a head, Planar will result in a significant amount of UV overlap as the projection will place polygons on both side of the head into the same UV coordinates. Planar Projection would be good for landscapes and some architectural or hard surface models.
Cylindrical- This mode projects the polygons into the UV map based on a virtual cylinder that surrounds the mesh. If you think of the cylinder as a soda can, setting the Axis to Y results in the can sitting on a table whereas setting it to X or Z will lay it on its side. Cylinder can be very useful for mapping specific areas of a model such as arms for organic meshes or tubes and pipe segments for hard surface meshes.
Spherical- Projects the UVs from a virtual sphere that surrounds the mesh. The poles of the sphere are placed based on the Axis setting. The Y axis setting will place the poles up and down where as X or Z puts them side to side or front to back.
Atlas- The Atlas setting uses an multi-faceted projection method to place all polygons into the UV map while maintaining relative scale based on the 3D volume of the polygons. This is designed to minimize any texture distortion from non-uniform UV data. However, the Atlas projection will result in a highly discontinuous UV map which may only be useful for certain algorithmic uses such as texture baking.
Barycentric- This mode forces each individual polygon to fill the 0 to 1 UV space. In the case of quadrangular polys they will fit perfectly to the outer bounds of the UV area. Triangles and ngons are placed within the UV space as best they can. This is a very useful mode if you have a texture that you want to tile across every polygon in the mesh.
Atlas 2- Similar to Atlas mode Atlas 2 attempts to fill the UV space with all selected polygons in the most efficient way without distorting the relative scale of each polygon from 3D to 2D space.
Cubic- Projects the UVs from the polygons depending on their normal direction segmented by the 6 planar directions -Top,Bottom, Left, Right,Front,Back. Similar in a way to planar, however, it will avoid the common backwards texture errors that can result from planar projections.
Axis: Sets the main axis direction for generating the UV projection.
Automatic/Manual: When set to 'Automatic', MODO will set the desired scale of the UV projection in order to best fill the total available UV space based on the selected mesh's bounding box. When set to manual, users can use the Size/Center/Rotation settings to define a specific projection that affects the overall size of the final UV map.
Seam Angle: For the Cylindrical and Spherical projections which have a seam, the seam angle specifies at what angle the seam appear in the UV map. This way if your face happens to be facing the direction that creates a seam across the face, you can adjust the seam angle to place in the back of the head without changing the geometry.
Relative Gap Size: For the Atlas mapping types that generate multiple pieces or islands, the relative gap size will produce greater distance between individual UV islands
Segment By Material: For the Atlas projection types, enabling 'Segment by Material' will create additional island segments so that individual islands never contain polygons from more than one 'Material' tag.
Segment By Part: For the Atlas projection types, enabling 'Segment by Part' will create additional island segments so that individual islands never contain polygons from more than one 'Part' tag.
Orientation: When used with the Atlas projection type, enabling the 'Orientation' setting will force UV islands to flip based on their axial direction, so for instance if you use this setting on a head, mapping for one side of the head will mirror the other side, making it easier to distinguish one side from the other. For 'Atlas 2', this setting is fixed in the enabled state.
Segments: This setting can roughly control the number of generated UV islands when using the 'Atlas 2' projection type.
Iterations: When using the 'Atlas 2' projection type, it generates UV islands by grouping together polygons with similar normals to reduce overall distortion. Increasing the 'Iterations' value will increase MODO's sensitivity to the normal direction to a finer degree generating less distortion, with more UV islands.

