Emitters are the elements that actually generate the particles in a simulation based on the settings of each individual Emitter item. For the simplest simulation, a radial emitter and a Particle Simulation item are needed. While this creates particles, in order for the particles to actually render, users will need to then create and additional renderable item that uses the particles as a source- such as a Volumes, Blobs or Sprites. Geometry can also be applied to particles when utilizing a Replicator, providing for a lot of interesting effects. Select from one of the Emitter types below for documentation on its use-
Radial Emitter
The Radial Emitter is the go-to particle generator for many different types of simulations. It is a single point, defined by the emitters position, that emits the particles outward based on the emission option settings. It can act like a point emitter, radiating particles in all directions randomly, or act like a cone emitter with ordered particles streaming in a single direction. Using the Offset options will allow for spherical area and disc shaped emitters. Additional Forces and Modifiers can applied to further affect and control the particles.
Usage
The main Particle controls are found in the 'Particles' subtab of the 'Setup' interface toolbox. Users can add a 'Radial Emitter' item by pressing the 'Radial Emitter' button. Users may also use the 'Add Items' button of the Items List, under the menu- "Particles > Simulation > Radial Emitter". At minimum a single Emitter and a Particle Simulation item are required for a basic particle simulation. Adding any emitter item to a scene when a Particle Simulation item is not present will add one automatically and associate them together. While different Particle Simulation elements and controls can be connected together manually in the Schematic viewport, selecting the Simulation item when adding items will automatically connect the elements, in a basic simulations, providing the associations necessary for proper evaluation. Pressing the Live Simulation playback button in the Setup interface will allow users to modify and tweak the values of the simulation prior to actually caching the evaluation for rendering and playback. For more information on using the particle simulation tools, please reference the Particles and Simulation Overview page of the documentation. When the 'Radial Emitter' item is selected the following attributes can be edited in the Properties viewport-
 Name: This data field displays the current items name. Users may easily change it by LMB-clicking within the field and typing the new name.
Transform--
Position: An Item transform that allows the user to numerically position the emitter item in XYZ space.
Rotation: An Item transform that allows the user to numerically set the rotation of the emitter item. Rotation transforms originate from the Position value. Changing the angle of rotation won't produce noticeable results unless the 'Cone' angle of the emitter is below 180°.
Order: Allows the user to set the order that rotations are applied to the emitter item. Changing the order that rotations are applied can sometimes help to reduce or eliminate gimbal lock.
Scale: An Item transform that allows the user to numerically set the size of the emitter item. Scale transforms originate from the Position value. Since particles themselves have no inherent size, the scale transform acts to scale the emission values, acting as a multiplier on the Particle Attributes.
Reset: Resets the selected transform values to (0,0,0) returning the items back to their default state.
Zero: Resets the chosen transform property values to '0', leaving the 'Center' position intact. This is done by adding a negative transform item to the Mesh items channels.
Add: Transform Items are the channel groups associated to an item that store its transform values, controlling its position, rotation and/or scale. By default, new items do not have any transform items associated with them (even though they are visible here within the Properties panel). This is useful as an optimization as only the necessary transforms are added on an as-needed basis, reducing scene overhead. There are several ways to add them. One is by simply transforming the target item with one of the various transform tools (or by editing the values input fields). This action will cause the particular transform item to be added automatically to the 'Channels' viewport list. The 'Add' function here can also be used to add the selected set of transforms to the Channel list while keeping the default 0,0,0 values (a necessary step for 'Referencing', in order to override the channels, they must first exist).
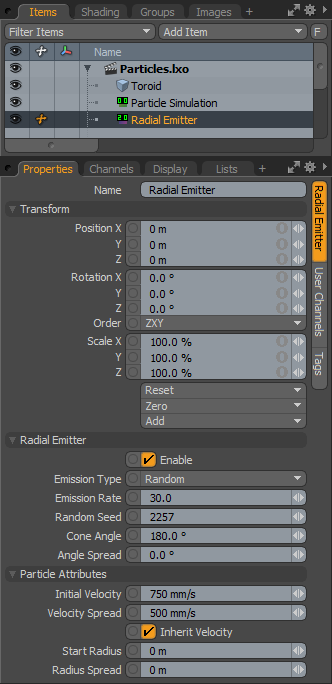
Radial Emitter--
Enable: The 'Enable' toggle option effectively turns on or off the generation of particles from the emitter. When the emitter is disabled, it's settings wont produce any results.
Emission Type: The 'Emission Type' control determines how the particles themselves are emitted over time- 'Random' means that statistically the emission rate will be accurate, but the time between individual particle emissions will be irregular, 'Uniform' will produce regular evenly-spaced individual particle emissions.
Emission Rate: The 'Emission Rate' controls the number of particles emitted per second.
Random Seed: The 'Random Seed' value is the initial number used when generating the random emission values. Each Seed will produce different random results. This will be necessary to change when there are multiple emitters in a scene with identical settings.
Cone Angle: The 'Cone Angle' value determines the overall emission range outward from the central point, generating a particle and emitting it in a random directing within the specified range. When set at 180° the particles will radiate outward equally in all directions, like a point emitter. When set to less that 180° the particles will radiate only within the specified range. Setting the value to less than 90° will produce a cone shaped emission, sort of like a water hose.
Angle Spread: The 'Angle Spread' option allows users to define a soft falloff range on the outside edge of the defined 'Cone Angle' where the probability of emission is reduced, attenuating over the specified range.
Particle Attributes--
Initial Velocity: The 'Initial Velocity' value determines the speed the particle is traveling at birth. Particles will remain the same speed until affected by a 'Force' (or a collision). 'Gravity' and 'Drag' are two Forces that can be generated by the 'Particle Simulation' item automatically, if desired by the user.
Velocity Spread: The 'Velocity Spread' value will randomly vary the speed of individual particle within the specified value, making the particles appear more varied and natural.
Inherit Velocity: When the 'Inherit Velocity' toggle is enabled, the individual Particles will inherit the speed of the emitter item, if it is motion, adding its speed to the 'Initial Velocity'. When disabled, the particles will ignore the movement of the emitter item.
Start Radius: The 'Start Radius' will offset the location where the particles generate from, producing a larger area of emission. When the Start Radius is '0', all particles will originate from the same location. When the 'Start Radius' is greater than zero, particles will originate randomly across the disc created from the offset.
Radius Spread: The 'Radius Spread' value will vary the 'Start Radius' value randomly within this range, plus or minus, producing a volume that the particles will be generated randomly within.
Surface Emitter
The Surface Emitter generates particles outward from any polygonal surface. Individual particle are emitted randomly from anywhere over the defined surface, perpendicular to the normal facing direction at the location of emission. Additional Forces and Modifiers can applied to further affect and control the particles.
Usage
The main Particle controls are found in the 'Particles' subtab of the 'Setup' interface's toolbox. Prior to adding a Surface Emitter, users will need to create a polygonal Mesh item to act as the emission Source. Users can then add a 'Surface Emitter' item by pressing the 'Surface Emitter' button. Users may also use the 'Add Items' button of the Items List, under the menu- "Particles > Simulation > Surface Emitter". At minimum a single Emitter and a Particle Simulation item are required for a basic particle simulation. Adding any emitter item to a scene when a Particle Simulation item is not present will add one automatically and associate them together. While different Particle Simulation elements and controls can be connected together manually in the Schematic viewport, selecting the Simulation item when adding items will automatically connect the elements, in a basic simulations, providing the associations necessary for proper evaluation. Once the 'Surface Emitter' item is defined, users will need to specify the 'Source'; any Mesh item layer that contains at least one polygon. Once defined, pressing the Live Simulation playback button in the Setup interface will allow users to modify and tweak the values of the simulation prior to actually caching the evaluation for rendering and playback. For more information on using the particle simulation tools, please reference the Particles and Simulation Overview page of the documentation. When the 'Surface Emitter' item is selected the following attributes can be edited in the Properties viewport-
 Name: This data field displays the current items name. Users may easily change it by LMB-clicking within the field and typing the new name.
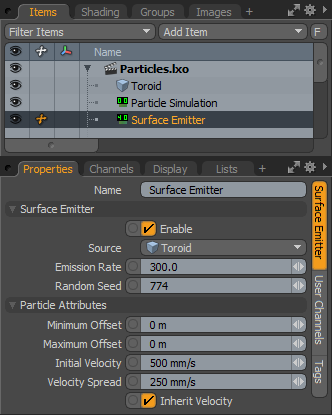
Surface Emitter--
Enable: The 'Enable' toggle option effectively turns on or off the generation of particles from the emitter. When the emitter is disabled, it's settings wont produce any results.
Source: The 'Source' option allows users to define the specific layer that contains the polygons for particle emission. 'Source' item can be standard polygons, or either type of Subdivision Surface geometry.
Emission Rate: The 'Emission Rate' controls the number of particles emitted per second.
Random Seed: The 'Random Seed' value is the initial number used when generating the random emission values. Each Seed will produce different random results. This will be necessary to change when there are multiple emitters in a scene with identical settings and sources.
Particle Attributes--
Minimum Offset: The 'Minimum Offset' option allows users to define an offset distance away form the surface, essentially a volume area where particles will generate from.
Maximum Offset: The 'Maximum Offset' option should always be larger than the 'Minimum Offset' allowing users to define a larger volume where particles will be less likely to generate, attenuating from the 'Minimum Offset' to the defined 'Maximum Offset'.
Initial Velocity: The 'Initial Velocity' value determines the speed the particle is traveling at birth. Particles will remain the same speed until affected by a 'Force' (or a collision). 'Gravity' and 'Drag' are two Forces that can be generated by the 'Particle Simulation' item automatically, if desired by the user.
Velocity Spread: The 'Velocity Spread' value will randomly vary the speed of individual particle within the specified value, making the particles appear more varied and natural.
Inherit Velocity: When the 'Inherit Velocity' toggle is enabled, the individual Particles will inherit the speed of the emitter item, if it is motion or being deformed, adding its speed to the 'Initial Velocity'. When disabled, the particles will ignore the movement of the emitter item.
Curve Emitter
The Curve Emitter generates particles outward from any Spline or Bezier curve element. Individual particle are emitted randomly along the length outward from the curve itself, perpendicular to the location of emission, By default the particle emission strength will be statistically even along the curve, based on the Emission Rate, unless the distribution value is modified, varying the emission amounts. Additional Forces and Modifiers can applied to further affect and control the particles.
Usage
The main Particle controls are found in the 'Particles' subtab of the 'Setup' interface's toolbox. Prior to adding a Curve Emitter, users will need to create a Spline or Bezier type curve to act as the emission Source. Users can then add a 'Curve Emitter' item by pressing the 'Curve Emitter' button. Users may also use the 'Add Items' button of the Items List, under the menu- "Particles > Simulation > Curve Emitter". At minimum a single Emitter and a Particle Simulation item are required for a basic particle simulation. Adding any emitter item to a scene when a Particle Simulation item is not present will add one automatically and associate them together. While different Particle Simulation elements and controls can be connected together manually in the Schematic viewport, selecting the Simulation item when adding items will automatically connect the elements, in a basic simulations, providing the associations necessary for proper evaluation. Once the 'Curve Emitter' item is defined, users will need to specify the 'Source'; any Mesh item layer that contains one or more curves. Once defined, pressing the Live Simulation playback button in the Setup interface will allow users to modify and tweak the values of the simulation prior to actually caching the evaluation for rendering and playback. For more information on using the particle simulation tools, please reference the Particles and Simulation Overview page of the documentation. When the 'Curve Emitter' item is selected the following attributes can be edited in the Properties viewport-
 Name: This data field displays the current items name. Users may easily change it by LMB-clicking within the field and typing the new name.
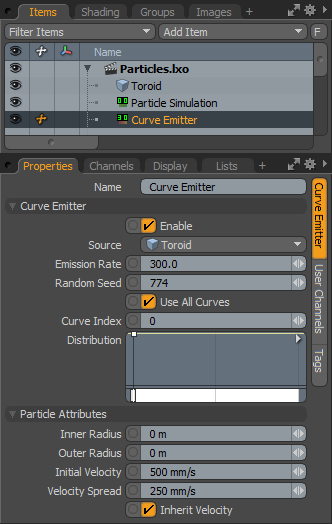
Curve Emitter--
Enable: The 'Enable' toggle option effectively turns on or off the generation of particles from the emitter. When the emitter is disabled, it's settings wont produce any results.
Source: The 'Source' option allows users to define the specific layer that contains the curves for particle emission. The target layer can contain only a single curve, multiple curves, or both curve and polygonal data; only the curves themselves will act as emitters in that case.
Emission Rate: The 'Emission Rate' controls the number of particles emitted per second.
Random Seed: The 'Random Seed' value is the initial number used when generating the random emission values. Each Seed will produce different random results. This will be necessary to change when there are multiple emitters in a scene with identical settings and sources.
Use All Curves: When the 'Use All Curves' option is enabled, all the curves within the specified 'Source' item will act as emission sources, either Spline or Bezier. When disabled, users can specify a specific curve within the layer to act as the emission Source with the 'Curve' index value.
Curve Index: The 'Curve Index' allows users to specify a particular Curve within a layer with more than one curve element (Spline or Bezier) based on it Index value, a numeric assignment generate in the order the curves were originally drawn in the layer.
Distribution: The 'Distribution' control allows users to modify the emission strength of the particles along the curves length. Using a mini-gradient input, the emission is modified with gradient keys that represent the statistical likelihood that a particle will be generated at any location along the curve. Much like how a keyframe defines a value in time, these keys represent a value along the length allowing for the variation of emission strength. The gradient input's width represent the individual Curve Emitters overall length, with the base on the left side. Keys can be added by MMB+clicking along the length of the gradient input and then LMB+click and drag the key icon up or down adjusting the value. The grayscale bar directly below gives visual feedback as to how the values fade from one key to the next, black will produce no particle emission and white will produce 100% emission strength, with the shades of gray attenuating the strength in between.
Particle Attributes--
Inner Radius: The 'Inner Radius' option allows users to define a cylindrical volume around the curve from where particles will generate from.
Outer Radius: The 'Outer Radius' option should always be larger than the 'Inner Radius' allowing users to define a larger volume where particles will be less likely to generate, attenuating from the 'Inner Region' to the defined 'Outer Region'.
Initial Velocity: The 'Initial Velocity' value determines the speed the particle is traveling at birth. Particles will remain the same speed until affected by a 'Force' (or a collision). 'Gravity' and 'Drag' are two Forces that can be generated by the 'Particle Simulation' item automatically, if desired by the user.
Velocity Spread: The 'Velocity Spread' value will randomly vary the speed of individual particle within the specified value, making the particles appear more varied and natural.
Inherit Velocity: When the 'Inherit Velocity' toggle is enabled, the individual Particles will inherit the speed of the emitter item, if it is motion or being deformed, adding its speed to the 'Initial Velocity'. When disabled, the particles will ignore the movement of the emitter item.
Source Emitter
The Source Emitter generates particles outward from other particles, these can be active Particle Simulations, static Particle Clouds or even the vertices of a standard Mesh item. This makes it easy to create Fireworks for instance, where one particle is spawning more particles, leaving a trail behind. Additional Forces and Modifiers can be applied to further affect and control the particles.
Usage
The main Particle controls are found in the 'Particles' subtab of the 'Setup' interface's toolbox. Prior to adding a Source Emitter, users will want to create some type of a Particle item, typically this will be another Particle Simulation and Emitter combo. Next users will want to add an additional 'Particle Simulation' item, separating the settings of the two simulations. With the new 'Particle Simulation' item selected, users can then add a 'Source Emitter' item by pressing the 'Source Emitter' button. This ensures the 'Source Emitter' is connected to the proper 'Particle Simulation' item. Users may also use the 'Add Items' button of the Items List, under the menu- "Particles > Simulation > Source Emitter" to add items to the scene. Once the 'Source Emitter' item is defined, users will need to specify the 'Source'; this can be any Particle item- static or dynamic, or if polygonal data is specified, the vertices of the target geometry will act as the emission points. Once defined, pressing the Live Simulation playback button in the Setup interface will allow users to modify and tweak the values of the simulation prior to actually caching the evaluation for rendering and playback. For more information on using the particle simulation tools, please reference the Particles and Simulation Overview page of the documentation. When the 'Source Emitter' item is selected the following attributes can be edited in the Properties viewport-
 Name: This data field displays the current items name. Users may easily change it by LMB-clicking within the field and typing the new name.
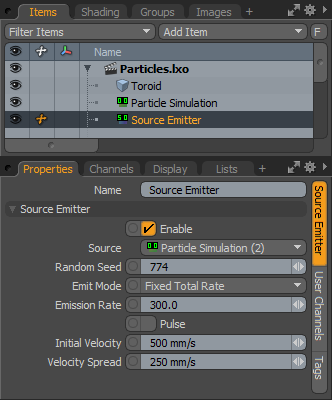
Source Emitter--
Enable: The 'Enable' toggle option effectively turns on or off the generation of particles from the emitter. When the emitter is disabled, it's settings wont produce any results.
Source: The 'Source' option allows users to define the specific source target item. The Source will most often be another 'Particle Simulation' item, where the positions of its particles will spawn the particles in the new simulation. It can also be a static particle object, such as a 'Particle Cloud' or it can simply be a Mesh item, where the vertices of the geometry will act as emission sources.
Random Seed: The 'Random Seed' value is the initial number used when generating the random emission values. Each Seed will produce different random results. This will be necessary to change when there are multiple emitters in a scene with identical settings and sources.
Emit Mode: The 'Emit Mode' controls how the particles are emitted-
Fixed Total Rate- Uses a single combined Emission Rate for all Sources.
Fixed Average Rate- Uses a single Emission Rate for Source particles individually.
Per Particle Rate- Reads the particle creation from the 'Rate' particle feature.
Pulse- Emits one particle for every Source particle when the 'Pulse' option is toggled from disabled to enabled via a keyframe or trigger.
Emission Rate: The 'Emission Rate' controls the number of particles emitted per second.
Pulse: When the 'Emit Mode' is set to the 'Pulse' option, enabling this 'Pulse' toggle by way of a trigger or a keyframe will cause the emitter to emit the particles.
Initial Velocity: The 'Initial Velocity' value determines the speed the particle is traveling at birth. Particles will remain the same speed until affected by a 'Force' (or a collision). 'Gravity' and 'Drag' are two Forces that can be generated by the 'Particle Simulation' item automatically, if desired by the user.
Velocity Spread: The 'Velocity Spread' value will randomly vary the speed of individual particle within the specified value, making the particles appear more varied and natural.
Top


