
The Ground Plane is a procedurally created item that generates a flat plane based on a user defined size. In order to apply surfacing to a ground plane (since there is no actual geometry that users can select and tag), users will need to employ an 'Item' mask. Users should note that since the Ground Plane is a volumetric effect, it will not render as quickly as geometry would.
Adding a Ground Plane
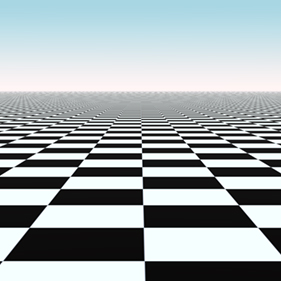
Users can add a Ground Plane item simply by using the 'Add Item' function of the Items List. LMB+click on the button to open the menu, then select the "Volumes > Ground Plane" option. In order to apply any surfacing to the plane, it will be necessary to create an item mask. This can be done by RMB+clicking on the item layer in the Items List, opening the contextual menu, and then selecting the 'Create Item Mask' option. This creates a 'Material Group' item with the 'Ground Plane' item specified in its Grouping options. Now any textures added into this group will apply exclusively to the Ground Plane (the sample above has a checkerboard texture applied). For more information on adding and working with Shader Tree layers, please reference that page of the documentation.
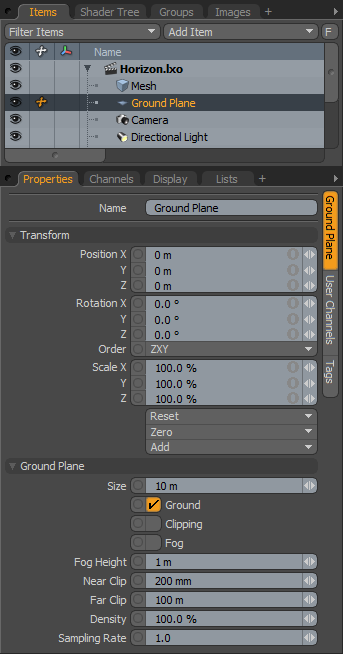 Name: This data field displays the current item name. Users may easily change it by LMB-clicking within the field and typing the new name.
Transform--
Position: An Item transform that allows the user to numerically position the item in XYZ space. Since the plane is infinite, only changes in the 'Y' position will be noticeable.
Rotation: An Item transform that allows the user to numerically set the rotation of the item. The rotation originates form the 'Position' value.
Order: Allows the user to set the order that rotations are applied to the camera item. Changing the order that rotations are applied can sometimes help to reduce or eliminate gimbal lock.
Scale: An Item transform that allows the user to numerically set the size of the item. Since the plane is infinite, scale values will not produce noticeable results.
Reset: Resets the selected transform values to (0,0,0) returning the items back to their default state.
Zero: Resets the chosen transform property values to '0', leaving the current position intact. This is done by adding a secondary transform item with negative values. Users can modify these values directly in the Channels list.
Add: Transform Items are the channel groups associated to an item that store its transform values, controlling its position, rotation and/or scale. By default, new items do not have any transform items associated with them (even though they are visible here within the Properties panel). This is useful as an optimization as only the necessary transforms are added on an as-needed basis, reducing scene overhead. There are several ways to add them. One is by simply transforming the target item with one of the various transform tools (or by editing the values input fields). This action will cause the particular transform item to be added automatically to the 'Channels' viewport list. The 'Add' function here can also be used to add the selected set of transforms to the Channel list while keeping the default 0,0,0 values (a necessary step for 'Referencing', in order to override the channels, they must first exist).
Ground Plane--
Size: Determines the overall dimensions of the plane as a square (width and depth are the same).
Ground: This option toggles the rendering of the Ground Plane itself, enabled draws the plane, disabled does not.
Clipping: When this option is enabled, any geometry above the plane will be clipped (won't render). The clipped areas will take on the surfacing of the plane itself.
Fog: The 'Fog' option renders a Ground Fog effect when enabled.
Fog Height: The 'Fog Height' option determines the maximum level for the Fog effect offset the height distance from the plane. The Fog will be thickest at the ground level, based on the 'Density' value, attenuating up to the 'Fog Height' value.
Near Clip: The 'Near Clip' option determines the closest point to the camera that the fog effect will render.
Far Clip: The 'Far Clip' option determines the furthest point from the camera that the fog effect will render.
Density: The 'Density' option determines the overall thickness or opacity of the Fog effect.
Sample Rate: The 'Sample Rate' option determines the quality of the sampling of the Fog effect, high values will produce cleaner results at the expense of longer render times.

TIP: Because of its procedural nature, neither Bump Maps or Displacement Maps will render properly on a Ground Plane. If either of those effects are required, then an actual geometry plane will need to be used.

