
Like with modeling, a Falloff is used to attenuate the affect any deformer has on a target item, providing additional control how deformers influence a mesh.
Usage
To add a Spline Falloff to a scene users must first add a Spline Deformer. The falloff item uses this deformer and its resulting curve to produce the falloff. The deformer itself does not have to be active for the falloff to function, but the falloff needs it to be present as a container for the Locators. This also makes it easier to use both the Spline Deformer and Spline Falloff together without duplicating the spline.
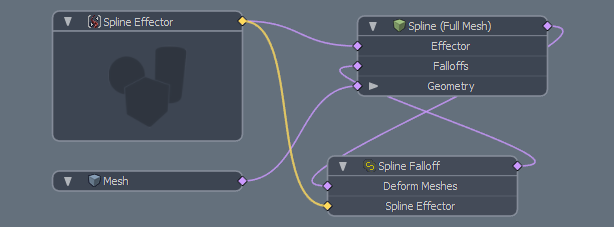
Once a Spline Deformer is defined, the Spline Falloff is added to it with the RMB context menu option "Add Override->Falloffs-> Spline Falloff" (RMB+click over the 'Spline (Full Mesh)' layer within the Deformers viewport or the Items List). Once created, the resulting Spline Effector needs to be manually connected to the the Spline Falloff's "Spline Effector" connector, this part requires familiarity with the Schematic viewport. The link is created by dragging a connector between the 'Spline Effectors' relationship output and connect the link to the 'Spline Effector' input of the 'Spline Falloff' (highlighted below). In order for the falloff to adjust the range of the deformation rather than its shift along the length of the spline, the 'Spline (Full Mesh)' item must have its 'Interpolation' mode set to 'Linear'. Once defined, the Falloff will then properly attenuate the affects of the Spline Deformer.
It is also possible at this point to select the 'Spline Effector' item and then disable it and then add an additional Deformer to the Item and linking the Spline Falloff output to the resulting Items 'Falloffs' input will have the falloff attenuate the influence of the new deformer. Note that the Falloffs position relative the the undeformed item represents what parts of the target item will be affected. For more information on adding Items to the Schematic viewport and linking them together please reference that page of the documentation.
 Name: This data field displays the current item name. Users may easily change it by LMB-clicking within the field and typing the new name.
Transform--
Position: An Item transform that allows the user to numerically position the item in XYZ space. Position transforms originates from the Center position.
Rotation: An Item transform that allows the user to numerically set the rotation of the item. Rotation transforms originate from the Center position.
Order: Allows the user to set the order that rotations are applied to the Falloff item. Changing the order that rotations are applied can sometimes help to reduce or eliminate gimbal lock.
Scale: An Item transform that allows the user to numerically set the size of the item. Scale transforms originate from the Center position.
Reset: Resets the selected transform values to (0,0,0) returning the items back to their default state.
Zero: Resets the chosen transform property values to '0', leaving the 'Center' position and Item position intact.
Add: Transform Items are the channel groups associated to an item that store its transform values, controlling its position, rotation and/or scale. By default, new items do not have any transform items associated with them (even though they are visible here within the Properties panel). This is useful as an optimization as only the necessary transforms are added on an as-needed basis, reducing scene overhead. There are several ways to add them. One is by simply transforming the target item with one of the various transform tools (or by editing the values input fields). This action will cause the particular transform item to be added automatically to the 'Channels' viewport list. The 'Add' function here can also be used to add the selected set of transforms to the Channel list while keeping the default 0,0,0 values (a necessary step for 'Referencing', in order to override the channels, they must first exist).
Spline Falloff--
Enable: Toggles the Falloff on or off. When unchecked (disabled), the Falloff has no influence. However, disabled layers are still saved with the scene and its values are persistent across MODO sessions.
Range: Defines the distance away from the Spline that the falloff will influence its target.
Falloff Shape: The Decay shape controls the rate of attenuation across the falloff with three possible choices-
Linear- A straight attenuation of the falloff influence across its total range.
Ease In- A smooth attenuation with greater influence toward the Start of the falloff range.
Ease Out- A smooth attenuation with greater influence toward the End of the falloff range.
Smooth- A smooth attenuation with a slightly stronger influence in the middle of the falloffs range.
Use Setup Spline: This option should be used when the Spline is both a Deformer and a Falloff. The 'Use Setup Spline' option uses the setup spline shape (How the Spline looks in its 'Setup' state) to compute distances between the vertices and spline. When the Spline is being used as both a deformer and a falloff, the falloff is computed on the undeformed vertex positions, allowing the deformer to pull the mesh out reach of the falloff, causing deformation artifacts. The solution then is to enable the 'Use Setup Spline' option to compute the distance between the vertices and the falloff using the undeformed, setup shape of the curve, producing a more desirable result.
Axial Falloff: The 'Axial Falloff' amount controls the strength of the Falloff along the length of the curve. A value of 0% would generate no axial falloff, a value of 100% would attenuate the falloffs strength along the curve with maximum influence at the base of the curve and no influence at its termination point. A -100% would produce the inverse with no influence at the base and maximum strength at the terminator. (Interesting results can also be achieved by driving this value beyond 100%)
Axial Shape: The 'Axial Shape' option controls the attenuation amount along the length of the curve when the 'Axial Falloff' is set to a value above 0%. Duplicating the functionality of the 'Falloff Shape' option (above) but applied along the length instead of outward from the Spline Falloffs core.
Use Node Scale: When this option is enabled, users can scale the Locator(s) that make up the Spline Falloffs curve that in-turn will scale the 'Range' value, acting as a multiplier on a per node basis. When disabled (the default state) node scaling will have no affect on the falloffs 'Range'.

