
Channel Handles provide a means of driving numeric channel values by dragging directly on controls in the 3D viewport. A single handle can drive any number of channels, and a single channel can be driven by any number of handles. These handles are always active and can be used in conjunction with the normal transform tools. Channel Handles are derived from standard Locator items so they have their own transform channels, allowing them to be positioned and orientated as needed, and parented to other items.
Usage
Channel Handles are added to a scene as an Item from the Items list's 'Add Items' button, found under "Other > Channel Handle". This action creates a Channel Handle item at the origin with the default circle shape. Once added, users can position the item using the standard transform tools, though keep in mind since it is meant as a control (it's always active), LMB+click can't be used to select the item in the 3D viewport, users must RMB lasso to select the item and transform it.
To assign a channel to the handle, select the target item that will be controlled by the handle and in the 'Properties' viewport, RMB+click to the left of any attribute (channel, actually), opening the contextual menu and select the option "Assign Handle", this opens a dialog where the Handle item is specified-

Under the 'Handle Item' options, users should specify the desired handle (It might be helpful to 'Rename' the handle item prior to assigning the channel). Also make sure the 'Mode' is set to 'Assign' and press 'OK' to create the association. A handle can be un-assigned from a channel by the same course of action; RMB+clicking over the target channel to open the contextual menu, selecting the 'Assign Channel Handle' option and again choosing the handle and then setting the 'Mode' to 'Remove'. Channels may also be removed from a handle via the channel control's context menu. Users can also simply delete the Channel Handle Item itself from the scene using the 'Delete' key or the 'Delete' option from the same RMB contextual menu.
Once any channel is assigned, users can LMB+click and drag over the handle representation in the 3D viewport to control the numeric value of the associated channel. The handles themselves are always active in the 3D views, the channels they're linked to can be edited by clicking and dragging in the direction of their "Move Axis" with the left mouse button(other tools, such as the Transform tool, may be active at the same time). Holding down the 'Ctrl' key as a modifier while dragging allows finer adjustments to be made, halving the amount of value change, holding down the 'Shift' key doubles the value change. Dragging with the right mouse button shows the name and value of the first linked channel in the 3D views. If the handle is linked to more than one channel then the value that the handle is adding to each channel is shown instead.
Handle Links
When a Channel Handle is selected, by lasso selection in the 3D viewport or clicking on it in the Item List, the channels it is linked to are shown in the 'Properties' viewport under the standard transform channel controls. These channels are also accessible in the 3D views by middle mouse clicking on the handle, where a popover form is displayed with the handle's name and sensitivity control followed by controls for each of the channel it is linked to. This allows easy numeric editing of the channel values along with their keyframe state etc.
Handle Display Properties
There are a number of controls available to customize the on-screen look of the viewport handle widget. Found in the 'Display' viewport tab when the Channel Handle Item is selected-
 Visible: Sets visibility for the item itself in the 3D viewport, 'Default' respects viewport settings, 'Yes' set the item as visible always, 'No' disables visibility entirely.
Pivot: Sets visibility for the 3D item pivot, 'Default' respects viewport settings, 'Yes' set the pivot as always visible, 'No' disables pivot visibility entirely.
Center: Sets visibility for the 3D item center, 'Default' respects viewport settings, 'Yes' set the center as always visible, 'No' disables center visibility entirely.
Size: Multiplier that adjust the display size of the items representations.
Label: Typing in text for the Label will display the text positioned next to the 3D item in the viewport for easy identification. It will also add two additional properties to control the display of the label in the viewport -'Show Label' and 'Label Offset'.
Show Label: This toggle will temporarily enable/disable the display of the label in the viewport without losing settings, only available when a label is specified.
Label Offset: This value specifies the distance away from the Locator where the label will appear, only available when a label is specified.
Handle Type: This option controls the widget display in the 3D viewport, users can choose from multiple different elements- Disc, Square, Rectangle Triangle, Arrow, Curved Arrow, Spin. These can be used as visual indicators of what the handle action is modifying (demonstrated below).
Handle Draw Axis: This option controls the axis orientation of the 3D viewport widget display, users can choose from the three cardinal axes or two screen axis, vertical and horizontal.
Handle Move Axis: This option controls the direction the mouse should be dragged in order to modify the associated value. Directions are relative to the three cardinal axes in the scene. The thin yellow indicator line through the middle of the widget indicates this drag direction. The Z axis cannot be used for view orientated handles.
Handle Sensitivity: This control can be used to adjust how much the mouse movement while dragging on the handle affects the driven channel's values. Increasing the value results in smaller drags creating larger value changes while decreasing it means you have to drag further to make the same change.
Invert Handle Direction: Dragging a handle in the positive direction of the "Move Axis" will by default increase the driven channel's value and dragging in the negative direction will decrease it. This control can be used to invert this behavior.
Handle Transparency: Channels handles can be made transparent with this control, however they cannot be made completely transparent. If you wish to hide a Channel Handle then the standard visibility options can be used.
Add Draw Options: When this button is clicked it opens the Draw Options for the Display viewport. Of note is the uses can use the 'Wireframe Color' and 'Fill Color' options to control the coloring of the 3D viewport widget.
The rest of the the controls are identical to those found in a regular Locator item and aren't really relevant to the Channel Handle item. These settings are covered on the 'Display' viewport page of the documentation.
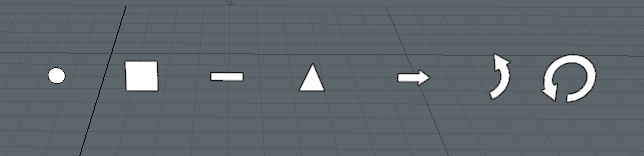
'Handle Type' Samples

