
Ever since the release of Steamboat Willie, the first animated film to include synchronized sound and music, audio has been an important part of animation. For a modern CG character animation workflow it is truly essential. MODO supports the playback of a variety of audio formats directly from the timeline allowing users to easily synchronize animated actions with audio events. Audio can also be used as a channel modifier, allowing the waveform itself to modulate specific item attributes. Multiple audio files can be loaded at once, but only one file can be played back at a time. Audio files, once imported, are accessed from the 'Audio List' palette.
Loading Audio
Users have a few ways they can load audio files into a scene for playback. The most direct is through the menu bar under "File > Load Audio to Timeline", this command loads the audio file to the 'Audio List' palette and also places it on the timeline, so when the timeline is subsequently played, the audio will play back in sync with the scene. Users can also simply load audio into the scene using the menu bar command "File > Load Audio". This adds the audio to the 'Audio' list where it can then be utilized for other purposes. Lastly, users can go to any of the 'Layout', 'Setup', 'Animate' or 'Render' interfaces and access the 'Audio' button (it has the musical note icon). LMB+clicking the button will open the popup with the Audio options (covered further below). Within the popup is the 'Audio List' button. LMB+clicking this button will open the 'Audio' palette. From here users can load additional audio files with the 'Add Audio' button and select specific Audio items, allowing users to further adjust the associated Attributes of the audio file as it relates to the scene.
Audio Popup
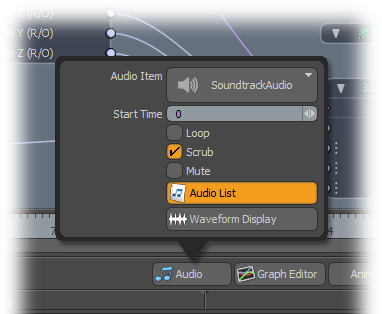
The 'Audio' button is found in several of the default interfaces- 'Layout, Setup', 'Animate' and 'Render'. A LMB+click on it will open the Audio popup which allows users to define a specific Audio file used for timeline playback as well as controls several aspects of how it plays-
Audio Item: The 'Audio Item' button opens a 'Audio List' window allowing users to load and/or select a specific audio file that will play back from the timeline.
Start Time: The 'Start Time' determines the frame on the timeline where the audio file will begin to play back.
Loop: If the specified audio file is shorter than the Scene Start and End time, then enabling the 'Loop' option will consecutively play the audio file until the End time is reached.
Scrub: To scrub the timeline means that the user is dragging the time slider backwards and forwards, manually controlling the rate of playback by the drag speed. When the 'Scrub' option is enabled, the audio will play back when users scrub the timeline. When disabled audio will only play back when the 'Play' button is pressed.
Mute: When the 'Mute' option is enabled, the audio playback will be temporarily suspended until the mute option is disabled.
Audio List: The 'Audio List' button will open the Audio List palette (documented below).
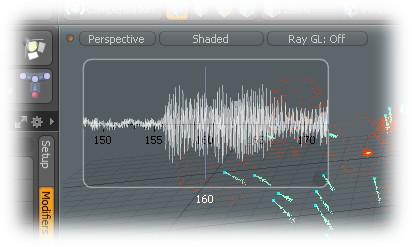
Waveform Display: The 'Waveform Display' option is a toggle button that enables or disables the display of the audio waveform overlay directly in the 3D GL viewport. The overlay displays a 60 frames section of the waveform, 30 frames on either side of the current frame allowing users to better see the amplitude variations in the file in a resizable transparent window.

The 'Audio' list palette is where all associated audio files in a given scene live. Any audio file that is loaded will be accessible from here. Users can easily access the palette from the menu bar under "Layout > Palettes > Audio". From the palette, users can LMB+click and drag an audio track and drop it directly on the timeline. This will add the audio to the timeline and when users press 'Play' the audio will play as well. When an Audio item is selected (signified by its coloration, shown above) the following attributes are available, controlling the playback of the audio file-
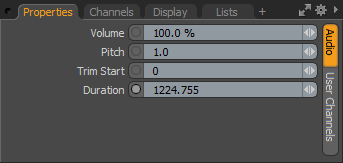 Volume: The 'Volume' option controls the loudness of the audio playback. The default '100%' value plays the file back at the recorded volume level.
Pitch: Pitch is a term used to describe how high or low a sound is. The 'Pitch' value controls the frequency of the audio file, which is essentially its rate of playback, speeding the audio file up or down. When an audio file plays faster, its 'Pitch' will get higher, and at slower speeds its 'Pitch' gets lower.
Trim Start: The 'Trim Start' option allows users to crop out the start of an audio file. Based on number of frames, the defined value acts as the new start of the file when placed on the timeline.
Duration: The 'Duration' option determines how long the audio file playback is. By default the value is the actual length of the imported clip in frames. Users can shorten the clip, essentially cropping out the end of the audio file.
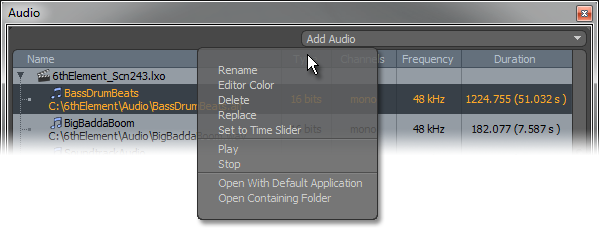
When RMB+clicking on any of the Audio list entries, the contextual menu opens offering some additional options when working with audio.
Rename: The 'Rename' option allows users to change the name that MODO uses to represent the file without changing the actual file name itself.
Editor Color: The 'Editor Color' allows users to assign a color to the Audio item that will be visible as an outline in the Schematic View.
Delete: The 'Delete' option removes the file from the Audio list and scene. Any place where the audio file was in use will have no longer have audio associated to it.
Replace: The 'Replace' option allows users to insert a new file in place of the selected file, replacing it in all instances where it was used.
Set to Time Slider: The 'Set to Time Slider' will add the audio file to the timeline for playback.
Play: The 'Play' option will play the audio file, allowing users to audition the file without adding it to the timeline.
Stop: The 'Stop' option controls the playback of the audio file.
Open with Default Application: The ' Open with Default Application' option will automatically open the selected audio file in the default editing application as specified by the system, allowing for editing of the audio file.
Open Containing Folder: The 'Open Containing Folder' will open an OS system folder at the location of the selected audio file.

TIP: Users should note that the audio file itself is not embedded in the scene but is only linked to it and needs to remain in its position relative to the file, otherwise it will need to re-imported.
Supported Audio Formats
| Format Name | Extension | Note |
| Waveform Audio File | .WAV | |
| Audio Interchange File Format (AIFF) | .AIF | |
| MPEG-2 Audio Layer III | .MP3 | |
| Core Audio Format | .CAF | Mac only |
| MPEG-4 | .MP4 | Mac only |
| Dolby Digital | .AC3 | Mac only |
| Windows Media Audio | .WMA | Windows only |
| Audio File Format | .AU | Windows only |
| Digital Sound File Format | .SND | Windows only |

INFO: Timeline audio is only exported when saving to a Quicktime video file format.

