
Replicators are a means of generating render time duplicates of geometry in a scene allowing users the ability to render literally billions of polygons with full support for all of modo's shading and rendering capabilities -global illumination, soft shadows, refractions, reflections, caustics ...well you get the idea. Replicators are similar in concept to modo's Instances, they derive all their shape and shading information from a base mesh, but unlike an instance, replicas can't be manipulated directly --i.e. users cannot position, rotate or scale individual replicas with the usual transform tools. Replicators generate positions using a mesh item as a 'Point Source' utilizing the vertex positions to place the individual replicas. Their positioning can also be further manipulated by adding a 'Surface Particle Generator' item allowing for a greater degree of randomization and overall control.
Replicators require two Mesh items, the first being a 'Point Source' item, and the other the acting 'Prototype'. The Point Source object acts as the surface determining the position of the replicated objects, and the prototype is the object that will be duplicated. Consider the example of a dry creek bed littered with river stones, the creek bed is the point source determining the placement of the stones, and the stones themselves are the prototypes. Users can add variety to a Replicator by adding multiple Mesh items to a 'Group' defined in the Groups palette and assigning that as the Prototype instead of the single mesh item. When specified as such, modo will randomly grab a member of the group to replicate, providing additional variety to the cloned objects.
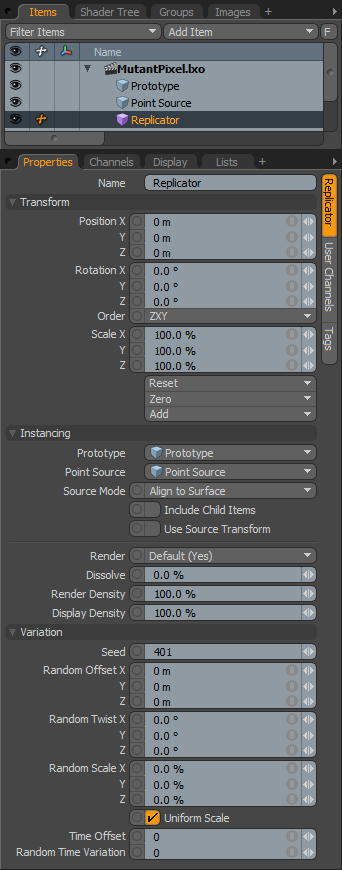
The easiest way to add a replicator to a scene would be to select first the 'Point Source Item' in the 'Item List' by LMB+clicking on the desired layer (selection order is important), and second, hold down the 'Ctrl' key and LMB+click the Prototype item (so both items are highlighted). Next, invoke the menu bar command 'Item > Replicators > Add Replicator' and that's it. You will now see a 'Replicator' item added to the Items list and a series of bounding boxes positioned over the surface of your point source geometry. Each bounding box represents the individual replicas. If you'd prefer to set up your Replicator manually, or just wish to understand what the 'Add Replicator' function is doing, you can add a new item to the Item List by clicking the 'Add Item' button in the upper right corner of the viewport and choosing the option "Particles > Replicator" from the popup list. Selecting the Replicator item itself will display its attributes in the Property panel. In the Instancing section of the Replicators properties you can choose the appropriate geometry in the 'Point Source' and 'Prototype' selectors. There are also a number of settings allowing the ability to add some random variations to the replicas. Further randomization is possible through the use of a 'Surface Particle Generator', users can RMB+click on the Replicator item and choose the 'Scatter Replicas' option from the popup menu to assign one, adding the particle layer to the Items list. Additional options and details related to Replicator usage is available in the Replicators page of the documentation.
 Transform--
Position: An Item transform that allows the user to numerically position the item in XYZ space. By default, Position transforms originates from the Center position (Modifications to the position of the Replicator itself acts as an offset from the original Point Source defined positions, allowing users to transform the entire array).
Rotation: An Item transform that allows the user to numerically set the rotation of the item. By default, Rotation transforms originate from the Center position (Modifications to the rotation of the Replicator itself acts as an offset from the original Point Source defined positions, allowing users to transform the entire array).
Order: Allows the user to set the order that rotations are applied to the camera item. Changing the order that rotations are applied can sometimes help to reduce or eliminate gimbal lock.
Scale: An Item transform that allows the user to numerically set the size of the item. By default, Scale transforms originate from the Center position (Modifications to the position of the Replicator itself acts as an offset from the original Point Source defined positions, allowing users to transform the entire array).
Reset: Resets the selected transform values to (0,0,0) returning the items back to their default state.
Zero: Resets the chosen transform property values to '0', leaving the 'Center' position and Item position intact.
Add: The 'Add' function will add the selected set of transforms to the channel list. Useful when animating complex motions, providing a layered approach to the transforms.
Instancing--
Prototype: The 'Prototype' object will be the mesh item that is duplicated over the point source. This can be something as simple as a single polygon or cube, or something as complex as a tree or hi-rise office building. If your object is made up of multiple mesh item layers, make sure to parent the items together in a hierarchy and select the 'Include Child Items' toggle (This also works for animated items).
Point Source: The "Point Source' geometry will be the surface that controls the positioning of 'Prototype' items. The default behavior is a replica generated for each vertex of the 'Point Source' geometry. Each 'Prototype' to be aligned with each 'Point Source' vertex, based on the point of origin for the prototype (not the pivot) and the positive-Y of the prototype will be aligned with the vertex normal direction.
Source Mode: There are 3 different source modes modo can use to generate replicas -- 'Point Data' will use the position of each vertex in a mesh, but the prototype will retain its original orientation. 'Align to Surface' will use the vertex position as well as the normal direction to align each replica, also taking into account subdivision surface smoothing. 'Use Polygons' will generate a replica for each polygon, positioned at the center of each poly and aligned with the polygons normal direction. If you need to generate replicas over a surface with a displacement map, a 'Surface Generator' will be necessary.
Include Child Items: This toggle, when enabled, will tell modo to replicate a parent/child hierarchy. When disabled, only the parent item is replicated. If your 'Prototype' geometry consists of only a single mesh item layer, users can leave this setting disabled.
Use Source Transform: By default, Replicated elements are not affected by item transforms of the source Prototype, their positions are strictly defined by the vertex positions of the Point Source relative to the sources Center position. What this means is that any Position, Rotation and Scale changes applied to the base item don't translate to the Replicated elements. When the 'Use Source Transforms' option is enabled, then the source item transforms will affect the replicated elements, each offset the same value from their initial Point Source positions.
Render: This drop down menu allows the user to select from 3 items, when set to 'Default', the user can enable/disable an item layer using the visibility column (eyeball icon) of the item window. When the item layer is visible, it contributes to the final rendered scene and when invisible, it will not. On some instances the user may prefer to fix this state, setting an item layer as 'On' (enabled) or 'Off' (disabled) regardless of visibility. Also useful for workflows that auto toggle visibility, saving the user from manually enabling item layer for test renders.
Dissolve: The 'Dissolve' function is a convenient way to fade all replicated items from view. At 100%, the item will render normally, while values lower than 100% will fade all replicas ramping toward 0% where the replicated items would be come completely invisible.
Render Density: The "Render Density' function provides a degree of control over the number of generated replicas. Normally, an item is generated at each vertex position, so for a 10x10 grid, you would end up with 121 vertices, therefore 121 replicas. Setting the 'Render Density' to 50%, the replicator would randomly generate replicas reducing the overall number by the approximate Density value. Values below 100% will reduce the number or replicas, however, values above 100% will not generate additional replicas. You may wish to use a 'Surface Generator' to provide better control over the number of generated items.
Display Density: Only the bounding box of replicated items is displayed in the 3D viewport. If the number of instanced items becomes too great, you may wish to reduce the number of bounding boxes displayed by adjusting the 'Display Density' value. A setting of 0% would disable the bounding box's display without affecting the final rendered image.
Variation--
Seed: The 'Seed' value is an initial setting used when random numbers are generated. Different 'Seed' values will produce different random variations, however you will want to use the same 'Seed' value when it is necessary that items retain the same variations.
Random Offset: The 'Random Offset' value when set to any number above 0 for X, Y or Z, will provide a range from where random values can be generated. With an offset value of say 1m, the replicated item will be randomly offset up to 1 meter from its initial position. Values of 0 disable this functionality.
Random Twist: The 'Random Twist' when set to any number above 0 degrees for X, Y or Z, will provide a range from where random values can be generated. For example, with an twist value of 90 degrees, the replicated items would be randomly rotate 90 degrees in either direction from initial position. Values of 0 disable this functionality.
Random Scale: The 'Random Scale' when set to any amount above 0% would produce a random scaling amount anywhere within the range for the value specified. For example, with a setting of 50%, replicated items would vary anywhere between 50% to 150% of the items original size. Values of 0 disable this functionality.
Uniform Scale: When using 'Random Scale' values, all 3 axis are generated independently. When 'Uniform Scale' is enabled, random scaling of generated replicas would be uniform across all axes eliminating squashing or stretching.
Time Offset: The 'Time Offset' option will offset the playback of an animation applied to replicated objects. It can also be used to move the random span of time when combined with 'Random Time Variation'. For example if this is set to 5 seconds and the variation is set to 1 second, then the replicas will get their motion from the animation of the prototype between 5 and 6 seconds into the future.
Random Time Variation: The 'Random Time Variation' option selects a span of time for replicas to vary their animation within from their current time. So if this is set to 1 (second) then the replicas will play their animations on a random start frame between the current time and one second in the future.

