Point cloud are procedurally created groups of particles that can be assigned as Point Sources in the same way any Particle Simulation can be. They are differentiated from Particle Simulations in that any animation assigned or applied is either pre-generated as is the case with the RealFlow particle importer, or kinematic in nature (meaning is is assigned with keyframes, not through an evaluated simulation). The 'Particle Generator' allows users to easily create ordered arrays of particles, while the 'Point Cloud' generates a volume of random particles. The 'Surface Particle Generator' is used to create randomly placed particles over a geometric surface. Once created users can assign these items as Point Sources for 'Replicators', 'Blobs', 'Sprites' or 'Volumes'. Select from any of the Point Clouds items below to view the appropriate documentation-
Particle Generator
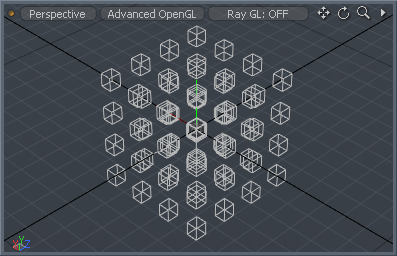
The 'Particle Generator' produces arrays of particles that can then be used as a point source for Replicators. They can also be used with Blobs, Sprites and Volumes (though the results may not be quite as interesting). These arrays can be further modified with the 'Particle Modifiers' that apply further transformations upon the cloned elements.
Adding a Particle Generator
Users can add a Particle Generator item simply by using the 'Add Item' function of the Items List. LMB+click on the button to open the menu, then select the "Particles > Point Clouds > Particle Generator" option. Once added, users can then specify the type of particle array to generate and using the additional options determine the layout and density of the array. The resulting points wont be visible to the user in the 3D viewport or the render output until a Replicator is applied and a Source mesh is specified (or another effect that requires a point source is applied). Please reference the 'Replicator' page of the documentation for more information on defining Point Sources.
 Type: This option determines the style of array that is generated-
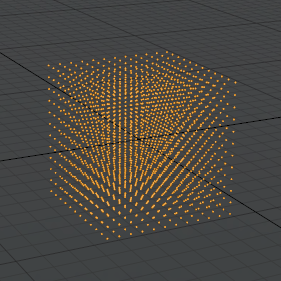
Array- produces a 3-D grid of evenly spaced particles.
Radial- produces a circular array of evenly spaced particles.
Linear- produces a straight line of evenly spaced particles.
These option appear when the Type is set as 'Array'.
Count X/Y/Z: Determines the number of elements generated along each axis.
Length X/Y/Z: The three values determine the overall size of the volume where the particles will be evenly spaced within.
These option appear when the Type is set as 'Radial'.
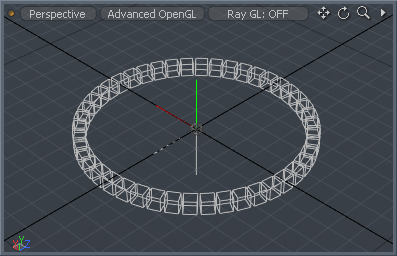
Count: Determines the number of elements generated around the perimeter.
Align: When enabled, the subsequent cloned elements will be rotated to align along the rotation of the circle. When disabled, the elements will retain their initial world axis rotation.
Radius: Determines the outside diameter of the circle of particles, calculated as the radius (length from the center to the edge).
Angle Start/End: Instead of having the generated elements evenly spaced around the entire our length of the circle, users can limit the distribution to a specific arc segment by defining an 'Angle Start' and 'Angle End' value.
Offset: This value will offset the initial clone (and all subsequent clones) from the 'Angle Start' position the specified amount. Animate this value to get the elements to travel around the circle.
These option appear when the type is set as 'Linear'.
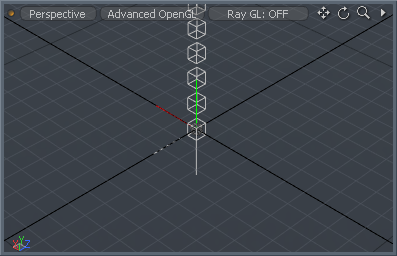
Count X/Y/Z: Determines the number of elements generated along the length of the line.
Length X/Y/Z: Determines the distance between each individual element for each individual axis.
Scale X/Y/Z: Determines a scale value for each individual axis. Assigned as a step, where each subsequent particle will inherit the scale of the previous element, producing a slowing scaling up/down across the total length.
Rotate X/Y/Z: Determines a rotation value for each individual axis. Assigned as a step, where each subsequent particle will inherit the rotation of the previous element, producing a twisting of the elements across the total length.
Step Rotate X/Y/Z: Different from the 'Rotate' value which rotates individual elements from their center positions, the 'Step Rotate' will offset the rotation of each element producing a corkscrew/spring effect.

TIP: Keep in mind that all the various channel values can be animated over time. When combined with multiple instances of particle arrays, all animating in sync to one another, very interesting and unique effects can be achieved.
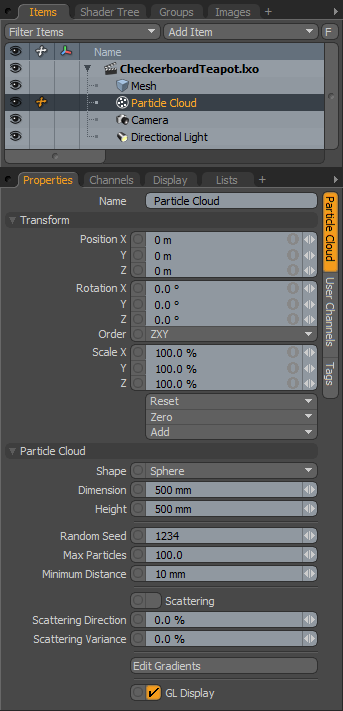
Particle Cloud
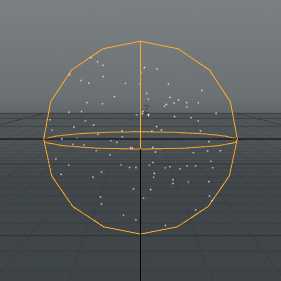
The Particle Cloud item generates a randomized array of single vertices. Points won't render by themselves, however, they can be used as a point source for a variety of items, such as for Blobs, Sprites and Volumes, or when working with Replicators. Animation can be added to the particles within the cloud by adding gradient controls over times (keyframes) with the 'Scattering' function.
Adding a Particle Cloud
Users can add a Particle Cloud item simply by using the 'Add Item' function of the Items List. LMB+click on the button to open the menu, then select the "Particles > Point Clouds > Particle Cloud" option. Once added, users can then specify the item from the 'Point Source', or 'Particle Source' options from within the appropriate properties panel of the related function.
 Name: This data field displays the current item name. Users may easily change it by LMB-clicking within the field and typing the new name.
Transform--
Position: An Item transform that allows the user to numerically position the item in XYZ space.
Rotation: An Item transform that allows the user to numerically set the rotation of the item. Rotation transforms originate from the Position value.
Order: Allows the user to set the order that rotations are applied to the camera item. Changing the order that rotations are applied can sometimes help to reduce or eliminate gimbal lock.
Scale: An Item transform that allows the user to numerically set the size of the item. Scale transforms originate from the Position value.
Reset: Resets the selected transform values to (0,0,0) returning the items back to their default state.
Zero: Resets the chosen transform property values to '0', leaving the 'Center' position and Mesh position intact. This is done by adding a negative transform item to the Mesh items channels.
Add: The 'Add' function will add the selected set of transforms to the channel list. Useful when animating complex motions, providing a layered approach to the transforms.
Particle Cloud--
Shape: Determines the overall shape of the containing volume for the particles, either a 'Sphere', 'Cube' or 'Cylinder'.
Dimension: Determines the size of the volume as a radius, so a 500mm Dimension would produce a 1m wide container volume for the particles.
Height: When the 'Cylinder' option is selected, the 'Height' value determines the overall length of the cylinder shape.
Random Seed: The 'Random Seed' value is the initial number used when generating the random procedural values. Each Seed will produce different random results.
Max Particles: Determines the maximum number of total particles generated within the volume.
Minimum Distance: Determines the minimum amount of distance between two particles within the volume.
Scattering: The 'Scattering' option is provided to allow for simple animation of the particles. When enabled each individual particle is scattered in a random direction, based on the 'Scattering Direction' and 'Scattering Variance' values. In order to see any changes in the 3D viewports, it will be necessary to keyframe some values using the 'Edit Gradients' option.
Scattering Direction: The 'Scattering Direction' option provides some additional control of the overall random distribution of the particles.
Scattering Variance: The 'Scattering Variance' option controls how much variation there is in distance when the particles are scattered. Higher values will move some particles further from the volume than others, while smaller values will tend to scatter particles in more uniform distances.
Edit Gradients: Pressing the Edit Gradients button will open a Gradient Editor window, allowing users to set up gradient controllers for Particle density within the cloud as well as the Scattering Distance.
GL Display: Toggles the visibility of the 3D viewport proxy representation. Enabled (visible) by default.
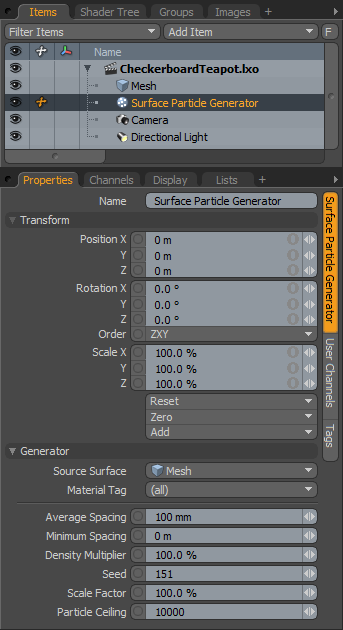
Surface Particle Generator
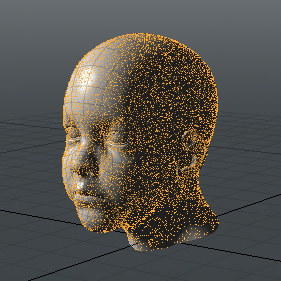
The 'Surface Particle Generator' produces similar results to the Shader Tree 'Surface Generator', in that it is used to scatter vertices (particles) across a specific item or surface. However, the Particle Generator is evaluated at the scene level making it more flexible and faster. The resulting particles can then be used as a point source for Blobs, Sprites, Volumes, Replicators and when working with Texture Replicators. One thing to keep in mind though, that since it is scene evaluated, it wont take in to consideration rendering effects such as Displacements applied to the surface; in that case users should apply the Surface Generator.
Adding a Particle Generator
Users can add a Surface Particle Generator item simply by using the 'Add Item' function of the Items List. LMB+click on the button to open the menu, then select the "Particles > Surface Particle Generator" option. Once added, users can then specify the target geometry using the 'Source Surface' option. The 'Material Tag' option further limits the particles to specific areas of a Mesh item.
 Name: This data field displays the current items name. Users may easily change it by LMB-clicking within the field and typing the new name.
Transform--
Position: An Item transform that allows the user to numerically position the item in XYZ space.
Rotation: An Item transform that allows the user to numerically set the rotation of the item. Rotation transforms originate from the Position value.
Order: Allows the user to set the order that rotations are applied to the item. Changing the order that rotations are applied can sometimes help to reduce or eliminate gimbal lock.
Scale: An Item transform that allows the user to numerically set the size of the item. Scale transforms originate from the Position value.
Reset: Resets the selected transform values to (0,0,0) returning the items back to their default state.
Zero: Resets the chosen transform property values to '0', leaving the 'Center' position and Mesh position intact. This is done by adding a negative transform item to the Mesh items channels.
Add: The 'Add' function will add the selected set of transforms to the channel list. Useful when animating complex motions, providing a layered approach to the transforms.
Generator--
Source Surface: This dropdown menu can be used to specify an item within the scene to apply the particles over its surface. This is the equivalent of an 'Item' mask in the Shader Tree.
Material Tag: The 'Material Tag' option allows users to further limit the application of the Particles by specifying a surface definition from the dropdown menu. This is the equivalent of an 'Material' mask in the Shader Tree.
Average Spacing: Precisely as the name implies, the 'Average Spacing' value specifies the average distance between particles.
Minimum Spacing: Where the 'Average Spacing value only specifies an average, the 'Minimum Spacing' value allows one to specify the minimum amount of space between replicated items, especially useful in eliminating overlaps for neighboring replicas when used as a Replicator source.
Density Multiplier: The 'Density Multiplier' offers simplified control over the overall density of replicated items. Lower values will reduce the overall number of replicas while higher values will increase the overall number of replicas up to the 'Particle Ceiling' value.
Seed: The 'Seed' value is an initial setting used when random numbers are generated. Different 'Seed' values will produce different random variations, in this case, initial particle positions. However you will want to use the same 'Seed' value when it is necessary that items retain the same variations.
Scale Factor: The 'Scale Factor' acts to control the scale of replicated objects, eliminating the need to manually scale the base 'Prototype' item. With a value of 100%, replicated items would be generated at the identical size of the prototype, smaller values would decrease each replicas size, while larger value would increase each replicas size.
Particle Ceiling: The 'Particle Ceiling' is a maximum for the total number of generated particles.
RealFlow Particles
RealFlow is a software tool created and sold by NextLimit Technologies that produces realistic liquid simulations, that include physical interactions with scene elements as well as soft and hard body collisions. The calculated simulations can be saved as binary files that store the motion information for each individual particle within the simulation with additional information related to speed, age, etc. When properly exported, these BIN files can be read into modo, producing animated particles that can be used as point sources for Blobs, Sprites and Volumes, or when working with Replicators.
Adding the RealFlow Particles
Users can add a RealFlow Particles item simply by using the 'Add Item' function of the Items List. LMB+click on the button to open the menu, then select the "Particles > RealFlow Particles" option. Once added, users can then specify the BIN files name and location using the 'Browse' option found in the items properties panel. Users should note that the RealFlow BIN file is not saved internally to the modo scene and the external file will need to remain in its same relative relative location to when it was loaded in order to render properly.
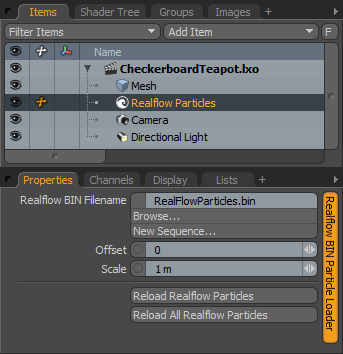 RealFlow BIN Filename: This option displays the Name of the file loaded via the 'Browse' button. Pressing the button will open an OS specific file open window, where users will specify the name and location of the saved RealFlow cache.
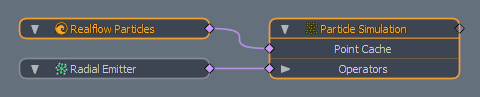
New Sequence: Using the 'New Sequence' option, users can define a new, empty BIN file that can be used to store the values from a modo Particle Simulation. Once the file Name and Location have been defined, this is done by connecting the 'Realflow' item into the 'Point Cache' of the Particle Simulation in the Schematic View.
Offset: The 'Offset' option moves the simulation time forward or backward, depending on value, allowing users to compensate or adjust the resulting simulation.
Scale: The 'Scale' option allows users to re-size the simulation results. The default '1m' value plays the imported solution at the same scale that it was simulated at.
Reload RealFlow Particles: Useful for when adjustments made in RealFlow are exported over the existing file, pressing this button will trigger a reload of the RealFlow simulation, updating the results in modo.
Reload All RealFlow Particles: Pressing this button will trigger a reload of all imported RealFlow particle simulations.
Top