
Since MODO is a 3D program, the way in which users interact with the interface and the elements within is important to understand. Beyond the standard ways users interact with any software program, such as selecting menu items or entering text, MODO uses a series of universal functions when modifying and manipulating elements within a scene.
Selections
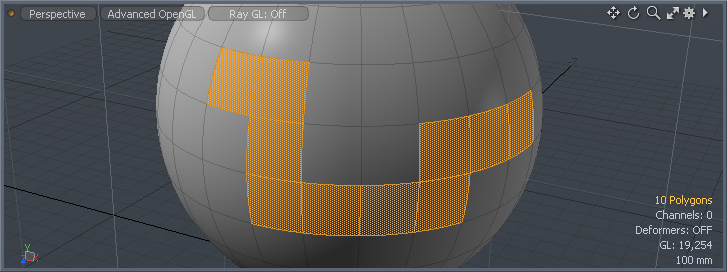
Before manipulating any element, users need to tell MODO specifically what particular element they wish to manipulate by way of a selection. Selections are made in several ways, but most often it is via the left mouse button ('LMB' as it is referred to within this documentation). MODO uses a technique called pre-highliting to cue users what element will be selected when the user clicks the mouse. By default this pre-highlighting is a light blue color. Once the user clicks on an element, it changes to an orange color to signify its selected state. Clicking and dragging will continue to select any elements the mouse is dragged over, this is known as a paint selection. MODO provides a number of function to aid in making selecting easier, found on the 'Selection Modifiers' page of the documentation. One important note to mention when in a component mode (vertex, edge, polygon), is that when no elements are selected, MODO considers everything selected, this is an implied selection that has no hilighting. Note that this is not the case for other modes, where elements need to be explicitly selected in order to modify them.
Multiple Selections can be created through a variety of means. If users LMB+click to select something, then press and hold down the "Shift" key and click on additional components to add them to the selection. To remove a element (a vertex,edge,polygon or item) from a selection, press and hold down the "Ctrl" key and click on the selected element to remove it from the selection. Users can assign selection sets to recall a selection at a later time. Use the menu bar command "Select > Assign Selection Set" to set the set. Use the command "Select > Use Selection Set" to load the saved selection. Even better, users can use the Statistics tab on the Info & Statistics toolbar. LMB+click the plus button next to the named selection to activate the selection, or the minus button to subtract it from the viewport selection.
Tool Handles
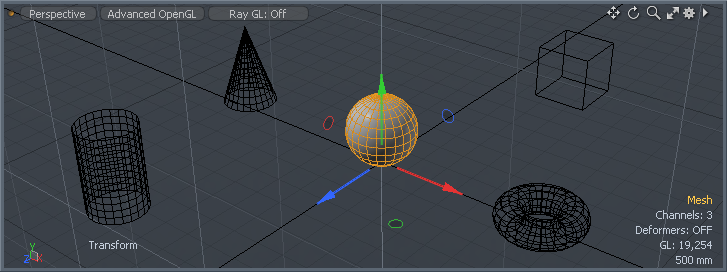
In MODO, viewport manipulators or gizmos are referred to as 'Tool Handles'. They are used to interactively control modeling operations in the viewport similar to the way an artist works with sculpting or drawing tools. Handles have consistent color coding that acts as a quick indicator of the value that they will edit and/or the context in which they are going to perform. In the default color scheme, tools handles use red, green and blue when editing in 3D model space. When working in UV space the handles are drawn as mustard yellow and teal (blue-green). The colors are used to represent the major axes when applicable (such as with the Move or Scale tools).
In 3D space: Red = X, Green = Y, Blue = Z
In UV space: Teal = U, Yellow = V
Users can access different tool handle styles by going to the menu bar and choosing "View > Tool Handles > Draw Style". Here you will find options for 'Invisible', 'Basic', 'Advanced', and 'Default'. Use Invisible when you want to hide the Tool Handle entirely. Use Basic when you want the minimum viewport display for the handles. Use Advanced when you want more precision using the tool handles. Use Default to return to the factory preset. Use the minus "-" or equals "=" keys to make the tool handles larger or smaller while working.
Key Toggles (aka Sticky Keys)
Hotkeys can be used as "soft toggles" to speed up workflow. For instance, if users wish to move vertices in a mesh, invoking the menu bar command "Edit > Transform > Move" choice, users may find it cumbersome to constantly drop the active tool, select new vertices, and reselect the tool. Instead, can use the 'Key Toggles' functionality. For any tool that has a keyboard shortcut, such as the 'W' key used to activate the 'Move' tool, users can press and hold down the key, temporarily activating the tool, then use the mouse (or tablet Pen) in the 3D viewport to apply the adjustment (all while continuing to hold down the appropriate key). Once the adjustments are made, users can release the key, deactivating the tool without further mouse click or keypress necessary, making it very easy to make further selections.
Input Mapping
In MODO, the primary input device is the mouse. To optimize the use of this wonderful device, and to create a consistent workflow, there are a number of rules for using the mouse depending on the action that one is working with. Let's begin by looking at the mouse behaviors when using a primitive tool.
LMB+click and drag = adjust handles (continue)
Shift+LMB+click and drag = adjust handles (reset)
RMB+click and drag = haul alternate parameters
MMB+haul = adjust handles (clone previous)
Transform tools adjust existing mesh elements, and typically have parameters that are hauled (clicking and dragging away from the tool handles with the tool active), or optionally set with handles. This includes all the basic transforms, most point pushers, and many vertex map tools.
LMB+click and drag = haul parameters (reset)
Shift+LMB+click and drag = haul parameters (continue)
RMB+haul = falloff setup parameters (if any)
MMB+click drag = adjust parameters (clone previous)
Non-transform edit tools adjust existing mesh elements, but they typically don't want to reset as their default mouse-down behavior. These may still work with falloffs. An important exception is when a tool of this type is used with the screen falloff, in which case they act like transforms with reset as the default.
LMB+haul = parameters & handles (continue)
Shift+LMB+click and drag = haul parameters (reset)
RMB+haul = falloff setup parameters (or alt parameters)
MMB+click drag = adjust parameters (clone previous)
The airbrush falloff tool is a special case when used with any other tool, transform or otherwise.
LMB+click and drag = paint weights (continue)
Shift+LMB+click and drag = paint inverse weights
Ctrl+LMB+click and drag = erase weights
RMB+haul = adjust airbrush size
MMB+haul = parameters of action tool
When the Tool pipe is inactive, an Apply button can be pressed to perform the action of the tool pipe with its current settings. This does not activate the pipe, and the Apply button is disabled when the pipe is active. The Apply Button, when available, will appear on the Tool Properties form. You can also right-click on the Tool Pipe entry and choose Apply Tool.
Reset Tool Attributes
When using a tool interactively or when using the numeric input fields for a tool, users can reset the values that have changed to defaults by choosing "Edit > Reset Tool Attributes", or press CTRL+D with the tool active for quick keyboard access.
Keyboard access
Press 'K' to open tool properties popover form.

