
MODO supports the use of project directories, a hierarchical arrangement of folders for related files, meant to ease the management and transfer of complex projects. By using the Project Directory commands in MODO, users who strictly adhere to the generated directory structure will be able to move projects freely from system to system, and platform to platform without fear of missing files or lost link associations. The setup and use of Project directories has been designed to be as transparent and intuitive as possible within MODO. The basic methodology for Project Directories, is to first define the project and its folder structure (via the 'New Project' command) prior to saving a scene. Then when saving the scene, MODO will default to the 'Scenes' folder within the project, images will save to the 'Images' folder, and so forth. To load a previously saved project, user need only to specify the project directory using the 'Choose Project' command, and then open (with the normal 'Open' command) any files requiring further editing or rendering; MODO bases the default paths off those specified by the project file (saved into the project folder when created).
To work with a project directory, user first need to generate the directory structure, this is done with the "New Project' command found in the menu bar under "File > New Project...". Invoking this command opens an operating system specific file browsing window. Within the window, users can browse to any directory available to the system. LMB+click 'OK" once the appropriate directory is selected and MODO opens a MODO specific dialog box.
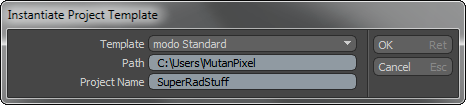
Within this window, users can modify the 'Path' if necessary (this is the path as specified in the previous window) and set the 'Project Name'. The project name becomes the root project directory folder. LMB+clicking 'OK' generates the default folders within the specified location, and sets MODO to use the new created structure. Once a Project is specified as such, MODO's 'Save As' dialogues will all default to the appropriate project directory folder.
In order to open or utilize a previous or transferred MODO project, users need only to place the files into the appropriate location on their hard drive. In MODO, users can use the menu bar command "File > Choose Project". This opens an operating system specific file browser, where users can navigate to the saved project, and select the root folder (the folder based on the originally specified 'Project Name'). LMB+click 'OK' to set the project, now when opening any project files, MODO will adhere to the paths specified in the luxproject config file automatically saved into the project directory.

