
The 'Import Reference' option works similar to a regular 'Import' action, in that elements from a saved scene file are brought into an a new scene. However with referencing, a link is created between the two scenes. If the referenced scene is modified in any way, such as an item being added or its surfacing changed, the next time the 'master scene' is opened (the scene containing the references), those referenced elements automatically update reflecting the changes made. Users, of course, don't have to close and open a scene to update a reference, the action can be initiated from a menu command, the important aspect is that the updating can happen without user intervention.
There are a number of reasons where this type of workflow is advantageous, such as building up complex scenes from many simple elements, making it easier to update individual elements without the overhead of the entire scene. Referencing also simplifies the updating process, as one reference scene can be placed into many master scenes; updates then only need to be applied to the single file. It is also beneficial when working with groups, where each users has a specific task that they work on, and a technical director combines final elements for rendering. Keeping elements as separate scene files also allows flexibility for later asset reuse. However it is used, referencing is sure to save time and make using modo easier.
UsageAny saved scene file can be imported as a reference, including other formats, such as OBJ and FBX. Files are loaded through the 'Import Reference' command found in the menu bar under "File >Import Reference...". Invoking the command opens an OS specific file requester where the saved scene file is located, once selected LMB+clicking on the 'Open' button then opens a dialog box with some additional options-
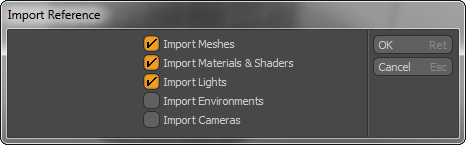
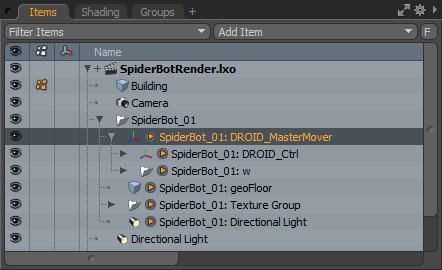
In this dialog box users specify which main elements of the reference scene should be imported into the master scene. By default, only the 'Meshes', 'Materials' and 'Lights' are enabled, but users can toggle any of the available Items individually. Once selected, LMB+click the 'OK' button to actually import the selected elements in to the master scene. Aside from the designated elements, all associated scene items will also be imported (if present), including (but not limited to) Locators, all necessary Shader Tree settings including, materials, shaders, light settings and environment settings, Library items, Deformers, Assemblies, bitmap images, sound files, Dynamic items and Particle Simulations. All of the imported elements will be visible in the 3D viewports as first class citizens of the scene and appear in their designated lists, placed under an appropriate Grouping element (which is named after the referenced scene). Users can toggle open these grouping elements to access and select the referenced items. References will be clearly identified in these lists by their preceding small arrow "![]() " icon and the referenced scene's name appended to the item layer name.
" icon and the referenced scene's name appended to the item layer name.
Updates and Overrides
Once a scene is imported as a reference, users can select, transform and render any of the imported elements normally, all referenced items will appear as regular items within the master scene. When it is necessary to modify the referenced elements outside of standard transforms (position, rotate and scale), there are two ways to go about making the edits that depend on the type of editing needed and the desired results.
For edits that should specifically remain an integral part of the referenced scene (if necessary, so they can be propagated to other master scenes) or for edits to the geometry or surfacing boundary changes, these types of edits should always be made in the original source scene file. Simply locate and open the original referenced file, make the desired edits and save the file as normal. The next time any master scene that contains that reference (also referred to as a sub-scene) is opened, the changes will be automatically reflected in the referenced items. To manually update referenced elements within an open scene, use the command in the menu bar under "Item > References > Reload Imported References".
The second way to update a referenced item is by way of an 'Override'. An override is simply any edit that is assigned to a referenced item within the master scene. Overrides are saved as part of the master scene itself and can't be pushed downstream to the original source reference file. These types of edits include specifically channel value changes, structure changes, such as hierarchy and parenting changes, item deletions and item name changes. Before applying any overrides though, users should first understand how to control them. The ability to override channel values is governed by the 'Reference Overrides' preference settings, which are scene specific. The panel can be opened in the menu bar under "Item > References > Edit Item Overrides", opening the following dialog box-
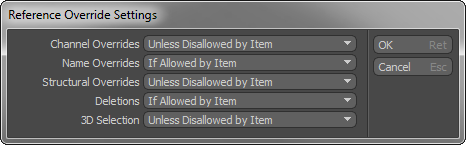
The panel (shown here in its default state) lists the types of override operations, with a control to determined whether or not the operation is allowed. The operations include--
Channel Overrides: Changes made to any of the associated attributes of the item itself, such as changes to the transform values or item specific changes such as changing a mesh items subdivision level.
Name Overrides: Changes to the referenced items names (overrides are tracked by an internal ID assigned when the items are imported).
Structural Overrides: Changes to the hierarchies of the referenced elements, meaning their ordering in parent child relationships can be changed and/or their positions within the Items lists.
Deletions: Control whether or not referenced Items can be removed from the master scene.
3D Selections: Controls the selectability of the referenced elements in the 3D viewports.
Each of these operations have four possible states governing it-
Always Allowed: Override changes can always be made of the designated type.
Never Allowed: Overrides cannot be assigned, editing of the referenced items is locked.
If Allowed by Item: Overrides cannot be applied unless explicitly set as 'Enabled' by the reference item setting.
Unless Disallowed by Item: Overrides can always be applied unless explicitly set as 'Disabled' by the reference item setting.
The latter two settings are defined directly on the items, either within their source scenes, or as referenced items within the master scene. This is assigned by selecting the target element to control, and then selecting the menu bar command "Items > References > Item Override Settings", which opens the following dialog box-
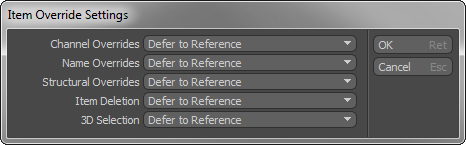
The 'Item Override Settings' are defined per-item and will apply to any selected items when the menu is invoked (and saved with the item, until explicitly changed). These settings provide a finer degree of control over the editability of the Items when referenced in another scene (based on the operation types, explained above). The control states are-
Enabled: Overrides can always be made unless set otherwise in the master scene.
Disabled: Overrides cannot be made unless the setting allowing it is explicitly set in the master scene.
Defer to Reference: Override assignments are controlled exclusively by the 'Reference Override Settings' in the master scene.

TIP: If different default Reference Override settings are desired, users can modify the Reference Preference settings to control the initial state of overrides in a scene.
Now with the settings that govern how overrides are controlled, its nice to know that applying overrides is a rather simple process, as a matter of fact, overrides are just normal edits made when the item is selected, either by modifying an attribute in the 'Properties' panel, or by modifying any values in the 'Channels' viewport, if allowed, of course. When not allowed, the edit fields will show up as dimmed input fields that cannot be selected. Name and Structure overrides are assigned normally when changing the layer order of the referenced elements or by renaming the item in the normal way.
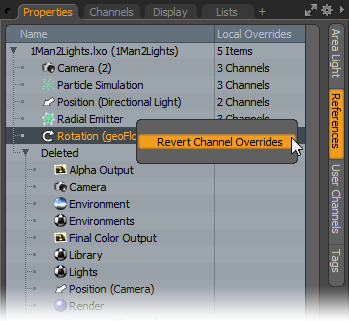 All these overridden values are stored in a separate action state within the master scene. If for some reason it would be necessary to remove an override, reverting the settings back to those of the source file, this is done in the 'References' section of the Properties panel, appearing as a subtab whenever any referenced item is selected in the 'Items' list (it doesn't matter which item is selected, as long as it is a reference). The panel itself displays a list of all the referenced elements within the scene and denoted how many modifications have been assigned and of which type.
Within the panel users can RMB+click over a selected element to open a contextual menu that allows them to 'Revert Channel Overrides". Selecting the option will remove the edits. (Structure and Name overrides cannot be restored this way).
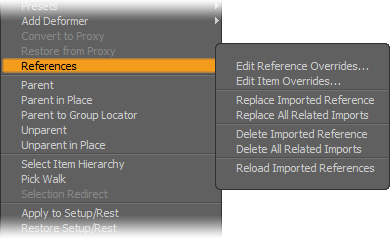
There are several options related to References, that can be accessed from the menu bar under "Item > References". These same options can also be accessed in the Item contextual menu by RMB+clicking over the target element in the Items list and selecting The 'References' section from the popup menu. The commands available are-
Edit Reference Overrides: Opens the scene-wide Reference Override settings panel (explained above).
Edit Item Overrides: Opens the item specific Reference Override settings panel (explained above).
Replace Imported Reference/Replace All Related Imports: These two options allow users to easily replace a referenced scene while retaining any override settings, if possible. Selecting either option opens an OS specific dialog that allows users to select an alternate file that will be imported to replace the desired element(s). Once selected, pressing 'Open' will popup a dialog box allowing users to suppress different items from the new reference source scene.
The difference between the two commands is the 'All Related' option of this panel, when enabled, all the associated items within the same sub-scene will be replaced by the new import, when disabled, only the selected elements will be replaced. If overrides have been applied to the referenced items in the scene, when the new item(s) are loaded, modo will try apply the same settings to the corresponding items, resolved by item name. If matching names cannot be found, the overrides will be discarded.
Delete Imported Reference/Delete All Related Imports: These options allow users to remove referenced items singly, or by all associated items within the same sub-scene.
Reload Imported References: This option forces MODO to reload the sub-scene into an open Master Scene, based on the sub-scene associated to the selected referenced item when the command is invoked. This will pick up any changes made to the referenced sub-scene, if they were make externally while the master scene was opened. Users should note that referenced sub-scenes cannot be loaded while a master scene that contains that reference is open.

INFO: Referenced items cannot be duplicated or instanced by standard means in the master scene. If there is a need to have more than a single item from any referenced scenes, then it will be best to simply use the 'Import Reference' option again to create the additional copy.
General Notes for Working with References
A referenced source scene cannot be opened at the same time as its master scene. Users must first close any master scenes that contain the reference before opening them for editing. However, in a workgroup situation it is possible for a referenced scene, saved to a network, to be edited on another machine and then saved back to the network. The 'Reload Imported References' command will trigger the update to the Master file.
Items in MODO do not have transform channels by default (position, rotate, scale), they are added automatically when a transform is applied or the channels are explicitly added to the item. In order for referenced item transforms to be overridden in a master scene, the channels must first be present on the item when referenced, otherwise any animation on the item in the master scene will simply be treated as a local transform.
Geometry component edits such as adding new polygons to an object cannot be assigned as an override. Geometry changes must be applied in the original source scene.
When overrides are applied to an item in the Master scene, that is then deleted in the source scene, the override values will be discarded, and will no longer be saved with the Master scene.
Due to the way that MODO searches for links when loading files (using relative paths, e.g. relative to their save location), referenced files with identical names, but in different folders may load incorrectly. To avoid issues it is highly recommended to give all files unique names.
Note that certain global settings cannot be imported when files are referenced, such as 'Preference' settings, Scene specific settings, such as FPS and scene length, Color Management (though setting on individual items will be retained), render outputs, or the settings of the render item itself, such as the frame size and resolution.

