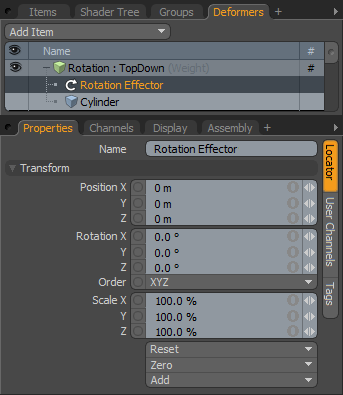
Effectors are a means to affect a target item, specifically a Mesh layer, deforming it in specific ways. The 'Rotation Effector' when assigned to an item will Rotate the target item, same as a regular item transform would, but can be linked up to rigging and be controlled via the schematic view links when combined with the various modifiers as it is an item with channels, as opposed to a regular tool that can only be controlled when active.
Applying an Effector
While simply adding an Effectors with the 'Add Items' option is possible, placing the appropriate Effector in the Items list, it won't produce the expected results, as the Effector, being a separate item, need to be connected to the Mesh layer by way of a 'General Influence'. The General Influence acts upon the mesh, while the Effector itself produces the instructions on how the Influence should modify its target. This connection can be made automatically (while in 'Items' mode) by first selecting the target item(s) either in the Items list or any 3D viewport, and then RMB+clicking on the item, opening the contextual menu and selecting the menu option "Add Deformer > Effectors > Choose Type". Additionally, users can select the target item(s) and press the Effector button in 'Deformers' toolbox subtab of the 'Layout' interfaces and produce the same result. Once the Effector is created, users can position the Effector and modify its values to produce the deformed results. When applied to multiple items, each item will be deformed by the single Effector based on its relative position to the mesh.
 Name: This data field displays the current item name. Users may easily change it by LMB-clicking within the field and typing the new name.
Transform--
Position: An Item transform that allows the user to numerically position the item in XYZ space. These values defines the origin of influence for the Effector.
Rotation: An Item transform that allows the user to numerically rotate the item in XYZ space, changes in these values from the rest position would transform the deformed target that amount (the rest position is determined by the items position in the 'Setup' action state) .
Order: Allows the user to set the order that rotations are applied to the Effector item. Changing the order that rotations are applied can sometimes help to reduce or eliminate gimbal lock.
Scale: An Item transform that allows the user to numerically set the size of the item representation in the 3D viewport (does not transform the target item).
Reset: Resets the selected transform values to (0,0,0) returning the item back to their default state.
Zero: Resets the chosen transform property values to '0', leaving the 'Center' position and Mesh position intact. This is done by adding a negative transform item to the Mesh items channels.
Add: Transform Items are the channel groups associated to an item that store its transform values, controlling its position, rotation and/or scale. By default, new items do not have any transform items associated with them (even though they are visible here within the Properties panel). This is useful as an optimization as only the necessary transforms are added on an as-needed basis, reducing scene overhead. There are several ways to add them. One is by simply transforming the target item with one of the various transform tools (or by editing the values input fields). This action will cause the particular transform item to be added automatically to the 'Channels' viewport list. The 'Add' function here can also be used to add the selected set of transforms to the Channel list while keeping the default 0,0,0 values (a necessary step for 'Referencing', in order to override the channels, they must first exist).


