
What is a Particle Simulation?
Particles are essentially single vertices or points that can have dynamics and forces applied to them generating movements that produce a desired outcome. Each individual particle represents a location in 3D space, but simulations can also calculate additional information per-particle such as speed and the age of the particle, which can be applied in shading to produce a more dynamic result. A single moving particle doesn't offer any really compelling benefits but since particle are so simple, thousands or even millions of them can be used in a simulation producing effects that would be difficult, if not impossible to generate any other way.
modo provides a robust and flexible node based particle simulation platform that can be used to simulate a huge range of phenomena. Fire effects, smoke and fluid simulations are all possible. And while the underlying framework relies on nodes, for most basic simulations, nodes will auto connect when added to the scene requiring little, if any intervention from the user. When users doing more advanced setups do need to use the schematic view, items are easily added using drag and drop from the Items list to the Schematic viewport. From there all items will have outputs for their major functions and inputs if applicable. Users can connect items in a left to right fashion representing the flow of the simulation evaluation, inputs on the left and outputs on the right. For information or working with the Schematic viewport please reference that page of the documentation.
Simulation Basics
Particle simulations can contain any number of items in its evaluations, such as forces, modifiers and operators, but the most basic type of simulation requires only two items, an emitter and a 'Particle Simulator'. Emitters generate the actual Particles, defining the location of emission, how many particles are emitted and their initial speed and direction. Users control the emission point and inital direction by the position of the actual emitter item in the 3D scene, combined with the attribute settings in the Properties panel.
The Particle Simulator defines the global options for the overall simulation, such as controlling the particles lifespan (if desired) and assigning the Gravity force. It is also responsible for the storage of the cached values for later rendering. Users can add any number of particle emitters to a single 'Particle Simulation' item. When adding any of the emitter types first a 'Particle Simulation' item is added automatically. In advanced setups, it may be desirable to use multiple Particle Simulators. All will evaluate simultaneously when a simulation is run. The addition of subsequent emitters will be connected automatically to the most recently selected 'Particle Simulation' item.
Running a Simulation
In order to actually see the movements of the particles in the OpenGL viewport, users will need to run a simulation. This is similar to playing the timeline in an animation, but uses a different set of controls. modo's simulation playback modes allow the user to make adjustments to the properties and then see the results of those changes in real-time directly in the 3D viewports while the simulation is running.
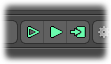
The three controls are found below the timeline and each has a specific purpose. The first button on the left plays the simulation continuously from the current time on the timeline. With an emitter present, the emitter will begin to spawn particles when the button is pressed, taking in to account the current values for any animated channels and continue playing forward with those values infinitely until the simulation is stopped by pressing the button again. The second button will play the simulation and any animated elements the length of the current Scene time, which by default is 120 frames. It is basically playing the timeline, but producing the simulated particle values, resetting itself when Scene End is reached, continuously looping until the user stops the simulation. The third button on the left will evaluate the simulation for the entire timeline, including any animated channels, and cache the values for regular timeline playback and rendering of the particles. Particles values won't exist for rendered frames until they have been cached. Each time the button is pressed the previous cache values are removed from the scene and reevaluated, replacing the former values. The cache values are persistent and wil be saved with the scene, so keep in mind complex simulations can increase scene file size significantly.
Rendering Particles
While particle are visible as points in the 3D viewports, by themselves they won't directly render. In order to actually see particles in a render, users will need to assign them as point sources to an appropriate effect, such as 'Replicators' , 'Blobs', 'Volumes' and 'Sprites'. The effect chosen will depend greatly on the desired result. 'Replicators' can be used to assign geometry to the particles for effects like bullets firing and shell casings flying. 'Blobs' can be applied to particles with 'Dynamic Fluids' for liquid type effects. Fire and smoke are perfect candidates for 'Volumes', especially when combined with Shader Tree textures controlling the color and density. 'Sprites' are useful for image based particles effects, such as adding falling ashes after an explosion. Each effect type has a 'Particle Source' option where the 'Particle Simulation item can be assigned. Remember that the simualtion must be cached using the apppropriate simulation control for the render to actually see the particle.

