
Accessible from the menu bar under "System > Preferences...", the modo preferences define the default behavior for a variety of options and functions in modo, further customizing the application to suit users particular tastes and needs. The Preferences are categorized into four main functions- 'Input' deals with ways users interact with the application, 'Display' controls the various way viewports display geometry and information. The 'Data' section controls default behaviors for data created in modo and finally 'File I/O' controls how scenes are imported and exported when dealing with external applications.

Defaults--
Initial Selection Type: This option determines the selection mode state default when modo is first opened.
Default Material: This option determines the name used for new material tags in the shader tree. Name appears in the 'Polygon Set Material' dialog box.
Default Part: This option determines the name used for new part tags. Name appears in the 'Polygon Set Part' dialog box.
Default Texture Map: This option determines the name used for new UV maps. Name appears in the 'VMap List' viewport.
Auto Create Item Masks: When enabled, this option automatically creates an 'Item Mask' for each new item layer created.
Auto Create Preset Item Masks: When enabled, this option automatically creates an 'Item Mask' for each new preset item layer created. This can be especially helpful to limit shader tree layers to the preset, should there be material tag naming collisions (i.e. identical named material tags between existing layers and the preset)
Auto Create Item Transforms: When new items are created in the item list, by default, they do not have specific transform channels in the channels viewport ('Position', 'Scale' and 'Rotate'). Enabling this option instructs modo to create the 3 basic transform channels for all new items.
Auto Hide Child Items: Users can create hierarchies of elements in a scene, and relate elements with Groups locators for organization. The 'Auto Hide Child' option, when enabled will allow users to toggle visibility of all related child layers when any parent layer is toggled. When disabled, layer visibility in a hierarchy is toggled individually.
Create Instances as Bounding Boxes: By default, modo displays instanced items as full wireframe representations of the parent item. When this option is enabled, modo will instead display only bounding box representations of instanced items. This can improve display performance for heavily instanced scenes.
New Patch Display Level: Determines the default Patch level for Subdivision Surfaces items. Higher values produce smoother results but generate more geometry. Users can manually adjust the Patch display level for each Item in the Items Properties.
New Curve Display Level: Determines how smoothly Curves are displayed in the 3D viewports. Users can choose between 'Course', 'Medium' and 'Fine'.
New Curve Display Angle: Curve Display Angle controls how curves are quantized for display and freezing. This is analogous to the patch resolution for subdivision surfaces. This value determines the default Angle for new Curves,
New Spline Patch Display Level: This option determines the default 'Spline Patch Level' for Subdivision Surface items. Users can manually adjust this value in the Item properties.
Default Image Format: Users can use this option to determine the default format when saving modo generated bitmap images. Users can select alternate format types in the file save dialog, this option only determines the default when users enter the 'Save as' dialog.
Enable Image Antialiasing by Default: modo provides an image antialiasing function to smooth the rendered result of bitmap images. In certain instances, especially with lower resolution images, images may appear soft of fuzzy when rendered. By default, modo always enables this option found in the Image Map properties. Users can modify this behavior with this option having antialiasing always disabled by default. Of course users may also override the default value on a per image basis in the image map properties itself.
Item Index Style: Scene cannot have multiple items with identical names, when this occurs, modo will automatically rename the item, be it a shader tree layer, item layer or vertex map, appending a numeral to the end in a style determined by this option.
Threaded Painting: This option, enabled by default, threads the painting and sculpting tool into multiple processes, providing better performance. It is possible in some dual or single core systems this setting should be disabled.
Tidy Layouts: modo's interface is made up from a collection of viewports. Viewports always have a frame users can use to resize the window. When multiple viewports are nested within each other, multiple viewport frame borders become unnecessary, the 'Tidy Layouts' option, enabled by default removes these subsequent viewport frames providing a few pixels of additional screen real-estate as well as a cleaner UI. However, user may wish to disable the setting to better see how viewports relate to one another for the purposes of interface customization.
Use OS Color picker: When enabled, modo will default to using the operating system specific color picker, duplicating the behavior of pre-501 versions. When disabled, modo will use its own internal color picker.
Max Recents in Categorized Lists: Many 'Add' menus, such as 'Add Layer' in the Shader Tree or 'Add Item' in the Item list have a 'Recent' menu at the top of the list to hold the most recent items added during the present modo session. Users can adjust this setting to determining the maximum number of recent entries in the menu.
Reset "In the Future...": Messages: Many pop-up dialog boxes in modo provide a function to dismiss them in the future. For example, when welding pairs of points consecutively, users can dismiss future popups of the same dialog box using the 'In the Future' setting in the pop-up itself. Users can use this button to reset all these types of pop-ups to their factory installed state (meaning, if they have been dismissed permanently, this will bring them back).
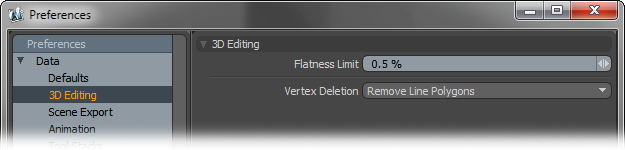
3D Editing--
Flatness Limit:
Vertex Deletion:
Remove Line Polygons-
Keep All Polygons-
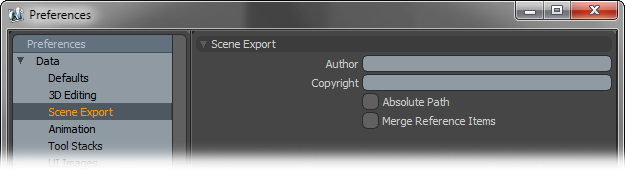
Scene Export--
Author/Copyright: These values, when defined, are embedded within saved and exported files.
Absolute Path: When this option is enabled, modo will write all link references (such as those to images, MDDs and IES files) as Absolute Paths referencing their location to specific areas of a drive when saving files. When disabled, modo uses relative paths to locate linked files.
Merge Reference Items: When utilizing Scene Reference items, users can enable this option to embed the referenced items into the scene file when saving, instead of having them remain external entities.
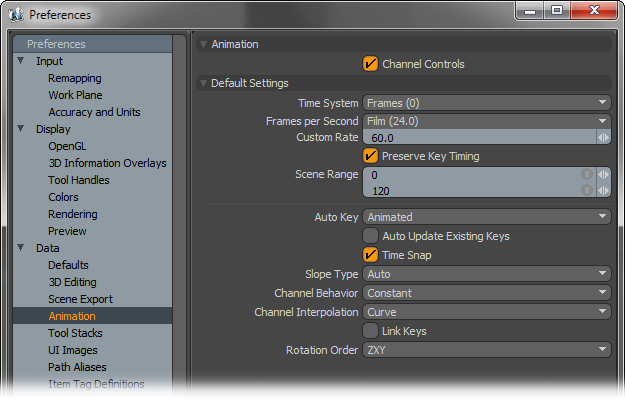
Animation--
Channel Controls: This option toggles modo's ability to set keyframes on specific attributes within the viewport forms. When disabled it removes the keying fields, the default enabled state allows users the ability to set a keyframe directly next to the attribute (using the small circle control preceding each input field).
Default Settings--
Time System: The Time System determines how modo displays time. This option determines the default 'Time Systems' for any new scenes. Users may modify these settings independently for each scene in the Scene item.
Frames- Indicates frames as sequential numbers, using standard numbering format.
Seconds- Indicates frames as a passage of time, using the "0.0s" format.
SMPTE- SMPTE time code specifies frames utilizing a shorthand method "00:00:00:00"; representing hours:minutes:seconds:frames
Film Code- Specifies frames by the length of the film in feet (linear measurement) using "0.0 + 0" format.
Frames per Second: Frames Per Second, usually referred to as FPS, is the number of still images that playback in sequence in one second of time. Users can specify a frame rate by standard definitions, such as Film (24 fps), PAL (25 FPS), and NTSC (29.97 fps). This option determines the default FPS value for new scenes. Users may modify these settings independently for each scene in the Scene item.
Custom Rate: If 'Custom' is selected as the default 'FPS', users can define the custom value in this field.
Preserve Key Timing:
Scene Range: This value specifies the default length for new scenes.
Auto Key: When items are moved in a scene, the auto key function can automatically create keyframes eliminating the need to manually create them. The different settings specify how keyframes are created, 'All' will generate keyframe data for all channels associated with the modified item, 'Animated' will only keyframe those values that have been edited or modified and 'None' disabled the auto keyframe functionality.This option determines the default Auto Key behavior for new scenes. Users may modify these settings independently for each scene in the Scene item.
Auto Update Existing Keys:
Time Snap: The time snap toggle will 'snap' the current time indicator as well as keyframes to whole frame values.
Slope Type: This option determines the default 'Slope Type' applied to new keyframes. See the Graph Editor for Slope definitions.
Channel Behavior: This option determines the default 'Channel Behavior' which specifies how a channel will act outside of the keyframed range. See the Graph Editor for information on Pre and Post Channel Behaviors.
Channel Interpolation: This option determines the default 'Channel Interpolation' method. See the Graph Editor for information on 'Curve' interpolation behavior.
Link Keys: When the 'Link Keys' button is active in the Graph Editor (its background will change to orange), associated keyframes will remain linked together in time, meaning that, for properties like Position, Rotation and Scale that each have associated X,Y and Z values, editing a single axis value, by moving it forward or backwards in time, will keep all the keyframe positions linked together as if all 3 were selected. When inactive, only the selected channels will be modified. This option determines the default 'Link Keys' behavior.
Rotation Order: Changing the order that rotations are applied can sometimes help to reduce or eliminate gimbal lock. This option determines the default Rotation Order for all new items.
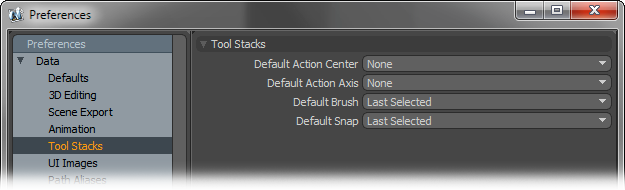
Tool Stacks--
Default Action Center: Users can use this option to determine the default Action Center.
Default Action Axis: Users can use this option to determine the default Action Axis.
Default Brush: Users can use this option to determine the default Brush Tip that will auto select when utilizing any sculpting or painting brush. 'Last Selected' will obviously return the Brush to its prior state.
Default Snap: Users can use this option to determine the default Snap state. This is especially useful when utilizing the 'X' snap toggle keyboard shortcut. Users can define their default state and whenever pressing 'X' during a modeling operation, this will be the state modo enters into for snapping.
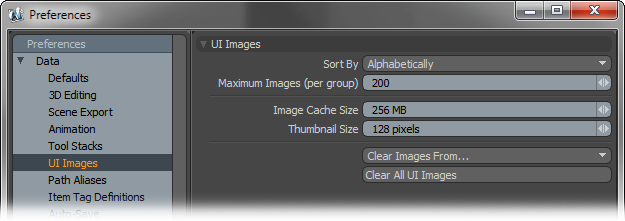
UI Images--
Sort By: This option determines how images are sorted in UI viewports such as the Clip Browser function. Images are sorted 'Alphabetically' or they are sorted by age with the most recently imported images appearing at the top of the list.
Maximum Images (per group): Determines the maximum number of clips (stills or animations) that can be loaded into a Clip Browser.
Image Cache Size: Determines the maximum amount of RAM dedicated to holding all user interface thumbnails.
Thumbnail Size: Determines the pixel resolution for user interface thumbnails.
Clear Images From...: Users can open this menu to choose from multiple options to remove images in the user interface. Once a particular command is invoked, images in the functions 'Clips Browser' will be removed from display.
Clear All UI Images: This option will clear all latent images from the various Clip Browsers for the tools, i.e. the Image Ink browser, Brush Tip Browser, etc.
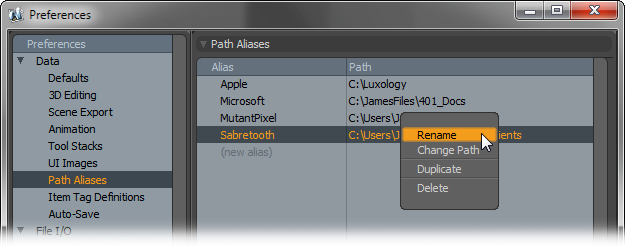
Path Aliases provide users a means to easily move modo scenes between disparate computer hardware. Users can define an Alias that represents an absolute path on the local system. Any files within a scene that contain the defined path will use the Alias instead. When the scene file is moved to the next system, if the same Aliases are defined with appropriate paths, when modo comes across any Alias in the scene the provided path is used. For example--
Machine 1 path = "C:\Animations\LostSkeleton\Scenes\" This path is defined as an alias called 'LostSkeleton'. When any files are loaded into the scene from this directory, their path will simply be called 'LostSkeleton' internally.
Machine 2 path = "/Users/Lighting/Scenes/LostSkeleton" this path is also defined with the alias 'LostSkeleton'. Users can copy the files from Machine 1 into this directory. When modo opens the scene, when it comes across images saved in the folder 'LostSkeleton' the path alias defined on machine 2 is used to search for the images for loading. Only the Alias itself needs to be identical, the paths do not. Of course the content will need to exist within each locale as well.
There are also options available by RMB+clicking on the Alias and Path to 'Rename' an alias, to 'Change Path'. Users can also 'Duplicate' and 'Delete' aliases.
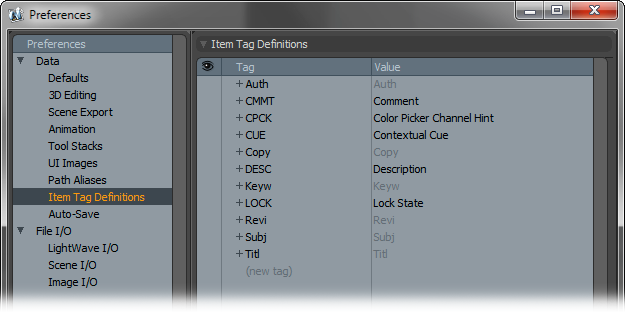
Item Tag Definitions--
The 'Item Tag Definitions' editor is used to provide usernames, descriptions and tooltips for items, which show up in the 'Tags' subtab in the Item Properties viewport.  The 'Tags' themselves are four-character identifiers associating arbitrary strings.  Each item can have any number of tags, although only one of each type of tag.  The editor also allows the number of lines to be set (for a multi line tags like "Comment") and allows tags to be hidden from the user (for internal tags used by scripts/plug-ins).  The 'Item Tag' Editor (which is actually a viewport embedded into the prefs form) is intended for use mostly by scripting and plug-in developers. They can be helpful to users in that they allow arbitrary information to be associated to specific items layers, such as adding instructions within a scene that applies to a certain item.
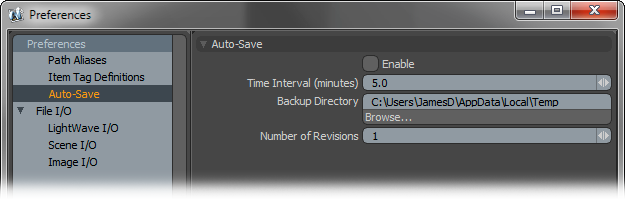
Auto-Save--
Users can use the 'Auto Save' option to systematically save an alternate file at specific time intervals, with options to save multiple versions. This can be a helpful option for users who tend to forget to save their files regularly and want some insurance against system crashes. modo may 'hiccup' slightly as the file is being saved, which some users find undesirable. It can also take some time to save very large files which may cause a slowdown?
Enable: When this option is enabled, modo will automatically save a backup scene file and associated texture maps that have changes, such as images for sculpting or painting, at the specified location and interval.
Time Interval: This option determines the length of time in minutes between each auto-save operation.
Backup Directory: Users can use this option to set the directory location for auto-save files. This location can be different from where users save files using the menu bar command "File > Save/Save As"
Number of Revisions: With this setting, users can define the number of revisions they with to auto-save. Having multiple versions can be useful in reviewing how a file progresses or as insurance against file corruption.

