
The timeline is the chief function for controlling time in modo. Users can modify the 'current' time position, represented by the white highlighting line and frame number, by LMB-click dragging left and right within the numbered area. There is only one current time in modo, modifying it in one viewport, changes it in all viewports, so there can be no confusion. To animate any item over time, one need only to set a specific value at a point in time, known as a keyframe, move to a different point in time, set a new keyframe and modo will smoothly interpolate the in-between values.
Keyframes can be set many ways. Within a properties viewport, each item property is preceded by a ![]() dot that users can LMB+click, setting a keyframe. When set, the dot will turn red, signifying the presence of the keyframe. Users can also set keyframes by clicking any of the various keyframing buttons under the timeline. Users may also enable the 'Auto Key' feature setting keys automatically whenever an attribute is modified. Additionally, users can set keyframes by clicking in the far right column of the 'Channels' viewport or, finally, by selecting one or more channels in the 'Channels' viewport and simply pressing 'S' on the keyboard. Keyframe positions are indicated as white dots on the timeline, with in-between interpolated areas indicated by a green line connecting the various keys.
dot that users can LMB+click, setting a keyframe. When set, the dot will turn red, signifying the presence of the keyframe. Users can also set keyframes by clicking any of the various keyframing buttons under the timeline. Users may also enable the 'Auto Key' feature setting keys automatically whenever an attribute is modified. Additionally, users can set keyframes by clicking in the far right column of the 'Channels' viewport or, finally, by selecting one or more channels in the 'Channels' viewport and simply pressing 'S' on the keyboard. Keyframe positions are indicated as white dots on the timeline, with in-between interpolated areas indicated by a green line connecting the various keys.
The timeline itself represents a specified length of time, which is a product of the number of frames divided by the frame rate. By default*, modo displays 120 frames; divided by the default frame rate of 24 'Frames Per Second' (FPS) this represents a total of 5 seconds of time. For longer or shorter sequences, one can adjust the length several ways. A 12 second sequence would require 288 frames (12 sec. x 24 fps = 288 frames). This value can now be entered into the 'Scene' items properties panel under 'Scene Range', or in the timeline 'Options' popup, centered below the timeline, and also directly in the interface below the timeline, to the far left and right sides. The two left most values, left to right, are the the scene start frame and current start frame, and on the right it is, left to right, the current end frame followed by the scene end frame. The scenes frame range represents the total sequence length. A fractions of this length is specified using the 'Current' frame range, allowing users the ability to concentrate on a specific interval without needing to preview the entire sequence. Directly below the timeline itself, is a gray bar with two handles, one on each end. Dragging either of those handles will adjust the current frame range interactively.

Further below the timeline is a series of buttons. First are the time control buttons.
![]() > Sets the current time position to the first frame of the 'Current' frame range. (Keyboard shortcut - 'Shift+Up Arrow')
> Sets the current time position to the first frame of the 'Current' frame range. (Keyboard shortcut - 'Shift+Up Arrow')
![]() > Sets the current time position to the first keyframe of the currently selected item. For multiple items, first item selected will be used. ('Ctrl+Up')
> Sets the current time position to the first keyframe of the currently selected item. For multiple items, first item selected will be used. ('Ctrl+Up')
![]() > Moves the current time position to the nearest previous keyframe. (Keyboard shortcut - 'Ctrl+Left Arrow')
> Moves the current time position to the nearest previous keyframe. (Keyboard shortcut - 'Ctrl+Left Arrow')
![]() > Moves the Current time position backwards one frame. (Keyboard shortcut - 'Shift+Left Arrow')
> Moves the Current time position backwards one frame. (Keyboard shortcut - 'Shift+Left Arrow')
![]() > Plays the animation sequence backwards based on the 'Current' frame range.
> Plays the animation sequence backwards based on the 'Current' frame range.
![]() > Plays the animation sequence forward based on the 'Current' frame range. (Keyboard Shortcut - '/')
> Plays the animation sequence forward based on the 'Current' frame range. (Keyboard Shortcut - '/')
![]() > Stops sequence playback. (Keyboard Shortcut - '/')
> Stops sequence playback. (Keyboard Shortcut - '/')
![]() > Moves the Current time position forwards one frame. (Keyboard shortcut - 'Shift+Right Arrow')
> Moves the Current time position forwards one frame. (Keyboard shortcut - 'Shift+Right Arrow')
![]() > Moves the current time position to the nearest next keyframe. (Keyboard shortcut - 'Ctrl+Right Arrow')
> Moves the current time position to the nearest next keyframe. (Keyboard shortcut - 'Ctrl+Right Arrow')
![]() > Sets the current time position to the last keyframe of the currently selected item. For multiple items, first item selected will be used. ('Ctrl+Down')
> Sets the current time position to the last keyframe of the currently selected item. For multiple items, first item selected will be used. ('Ctrl+Down')
![]() > Sets the current time position to the last frame of the 'Current' frame range. (Keyboard shortcut - 'Shift+Down Arrow')
> Sets the current time position to the last frame of the 'Current' frame range. (Keyboard shortcut - 'Shift+Down Arrow')
IMPORTANT! These keyboard shortcuts are part of the "Item mode" keymap. When modo is in one of the component selection modes such as Vertex, Edge or Polygon many of these keys will perform important modeling tasks. This allows modo to provide an efficient workflow for both processes.
![]() > Displays current time position. Users can manually specify the current time by editing this field.
> Displays current time position. Users can manually specify the current time by editing this field.
Opens the Options popup window with setting similar to those found in the Scene item properties.
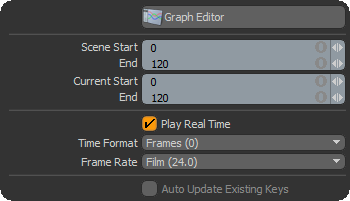
Graph Editor: User can access the Graph Editor window by using the 'Graph Editor' button. The graph editor allows the user to adjust how modo interpolates values between keyframes.
Scene Start/End: Sets the sequence length using the Start and End frame numbers.
Current Start/End: Sets the current length using the Start and End frame. When animating, users may wish to concentrate on a single area of a scene for fine tuning, the current range setting allows the users to essentially temporarily crop out the rest of the scene so they can concentrate on the one section.
Play Real Time: When enabled, the sequence will play back an OpenGL viewport using the 'Frame Rate' setting to the best of the host systems abilities, skipping frames if necessary. When disabled, modo will play every frame in the sequence, making its best attempt to maintain the specified frame rate.
Time Format: Allows the user to specify which standard is used when displaying individual frame numbers
Frames- Indicates frames as sequential numbers, using standard numbering format.
Seconds- Indicates frames as a passage of time, using the "0.0s" format.
SMPTE- SMPTE time code specifies frames utilizing a shorthand method "00:00:00:00"; representing hours:minutes:seconds:frames
Film Code- Specifies frames by the length of the film in feet (linear measurement) using "0.0 + 0" format.
Frame Rate: Users can specify a frame rate by standard definitions, such as Film (24 fps), PAL (25 FPS), and NTSC (29.97 fps). Frames Per Second, usually referred to as FPS, is the number of still images that playback in sequence in one second of time.
Auto Update Existing Keys:
![]() > Opens modo's graph editor.
> Opens modo's graph editor.
![]() > Drops any selected channels.
> Drops any selected channels.
![]() > (Press Shift) Drop Item Selection
> (Press Shift) Drop Item Selection
![]() > Sets a keyframe for all currently selected channels.
> Sets a keyframe for all currently selected channels.
![]() > (Press Shift) Sets a keyframe for all currently selected Items.
> (Press Shift) Sets a keyframe for all currently selected Items.
![]() > Sets a keyframe for an items position channels.
> Sets a keyframe for an items position channels.
![]() > (Press Ctrl) Sets a keyframe for an items pivot position channels.
> (Press Ctrl) Sets a keyframe for an items pivot position channels.
![]() > (Press Shift)
> (Press Shift)
![]() > (Press Ctrl+Shift)
> (Press Ctrl+Shift)
![]() > Sets a keyframe for an items rotational channels.
> Sets a keyframe for an items rotational channels.
![]() > (Press Shift)
> (Press Shift)
![]() > Sets a keyframe for an items scale channels.
> Sets a keyframe for an items scale channels.
![]() > (Press Shift)
> (Press Shift)
Auto Key: As an items position, rotation and scale are changed, using modo's 'Auto Key' function users can avoid setting keyframes manually. When enabled, modo will generate a keyframe for any modification made to an item at the currently selected time. It can be a great time saver, though some users dislike auto keyframing as it can make it possible to inadvertently modify an item, overwriting previous values. The three settings are:
All- Sets a keyframe for any and all changes made to an item. In this mode, users should be careful as it can be very easy to introduce keyframes for settings that were not intended to be animated.
Animated- Sets a keyframe only for channels that have existing keyframes values. Example- If there is a keyframe for the position channel only on an item, moving the time slider and changing the position and rotation will only set a position keyframe. Users will need to first explicitly set a key for a channel to activate auto keying.
Off- Turns off the Automatic keyframing function.
Keyframing Shortcuts
To aide users in setting keyframes while working with the time line in the Animation view, modo provides a number of keyboard shortcuts, in addition to the interface buttons. This group allows you to quickly set keyframes on an entire item or specifically on the various transform elements or selected channels. When using the Key Selected Items command, keys will be created on any channels for that item that already contain at least one keyframe. Other channels for that item will not be keyed.
Shift-Y = Key transforms
Shift-E = Key Rotations
Shift-W = Key Positions
Shift-R = Key Scale
S = Key Selected Channels
Shift-S =Key Selected Items
These two commands quickly "slide" any keyframes forward or backwards that are after the current time. This is incredibly useful for quickly retiming portions of your animation.
, (comma)= Time Offset Forward
. (period)= Time Offset Backward

