
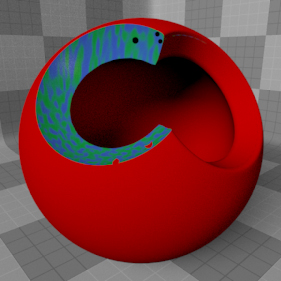
Booleans, as they relate to 3D computer graphics, are a technique of using geometry from one mesh item to modify the geometry of another; where they intersect produces a subtractive trimmed surface that would be difficult to create otherwise. The 'Render Boolean' item provides users a means to trim away areas of an object or surface at render time without needing to physically modify the mesh itself. The benefits are that the mesh remains fully intact, the results are fully animateable and it produces a texturable surface where the Render Boolean intersects with the trimmed mesh. Also, since the boolean is generated at render time on the final subdivided geometry, there is a less likely chance of producing the errors generally associated with boolean trimming of Subdivision Surfaces.
Adding Render Booleans
A Render Boolean item can be added to a scene by utilizing the 'Add Item' function found in the 'Items List'. Users can LMB+click the button itself, opening the popup menu and select the "Volumes > Render Boolean" option. Once added, the item will appear at the bottom of the Items list viewport. When selected, a number of attributes controlling the Booleans functions appear in the 'Properties' viewport.
Applying Materials
When utilizing the procedural geometry options of the Render Boolean, users can texture the resulting boolean surface with the use of an item mask. By RMB+clicking on the 'Render Boolean' item in the 'Items List' and selection the 'Create Item Mask' option, a new Material Group is added to the Shader Tree. Users can then use the 'Add Layer' option of the Shader Tree to add 'Materials' and 'Texture' layers that will then be confined only to the areas where the booleans intersect with the target mesh. For more on working with layers in the 'Shader Tree', please reference that page of the documentation. The 'Render Boolean' item will trim all items/surfaces in the scene unless the user explicitly disables the 'Enable Surface Clipping' option of the Material Item on a per surface basis (This option is enabled by default for all surfaces). When the 'Use Surface' option is enabled for custom Boolean meshes, the intersecting surface will get its surface shading from the Mesh Item itself. If this is not desired, the 'Local Shader' option can be disabled to have the target surface retain its own material attributes.
Animated Booleans
Users can animate the Render Boolean operation by creating keyframes on the Render Boolean item when using the procedural shape option, or when a 'Surface as Volume' mesh layer is specified, animating the target mesh layer will produce the animated boolean operation. For more on setting keyframes and animating in MODO, please reference the 'Rigging and Animation' section of the documentation.
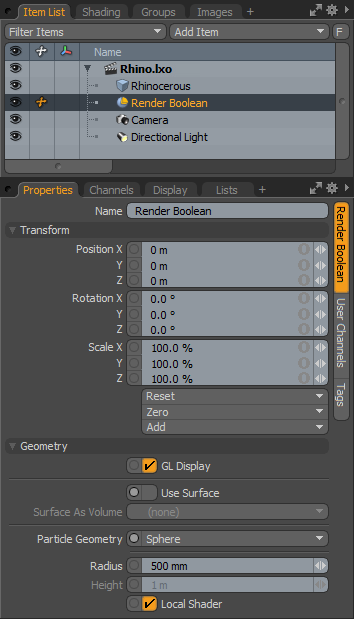 Name: This data field displays the current item name. Users may easily change it by LMB-clicking within the field and typing the new name.
Transform--
Position: An Item transform that allows the user to numerically position the item in XYZ space. By default, Position transforms originates from the Center position.
Rotation: An Item transform that allows the user to numerically set the rotation of the item. By default, Rotation transforms originate from the Center position.
Order: Allows the user to set the order that rotations are applied to the camera item. Changing the order that rotations are applied can sometimes help to reduce or eliminate gimbal lock.
Scale: An Item transform that allows the user to numerically set the size of the item. By default, Scale transforms originate from the Center position.
Reset: Resets the selected transform values to (0,0,0) returning the items back to their default state.
Zero: Resets the chosen transform property values to '0', leaving the 'Center' position and Mesh position intact.
Add: Transform Items are the channel groups associated to an item that store its transform values, controlling its position, rotation and/or scale. By default, new items do not have any transform items associated with them (even though they are visible here within the Properties panel). This is useful as an optimization as only the necessary transforms are added on an as-needed basis, reducing scene overhead. There are several ways to add them. One is by simply transforming the target item with one of the various transform tools (or by editing the values input fields). This action will cause the particular transform item to be added automatically to the 'Channels' viewport list. The 'Add' function here can also be used to add the selected set of transforms to the Channel list while keeping the default 0,0,0 values (a necessary step for 'Referencing', in order to override the channels, they must first exist).
Geometry--
GL Display: This option toggles the display of the Particle Geometry proxy in the 3D OpenGL viewport, generally user will want this enabled to get an approximation of how the boolean item will render (the default state), but in certain instances it may be useful to disable this option.
Use Surface: When this option is enabled, users can select any arbitrary mesh layer from the scene and use it as a boolean volume. While Render Booleans work for nearly any geometry type, for best results both should be fully closed watertight models, meaning they could virtually hold water without leaking.
Surface As Volume: This option determines the mesh layer that will be used for the boolean operation, only when 'Use Surface' is enabled.
Particle Geometry: The Render Boolean item also generates procedural geometry, users can choose between a 'Cube', a 'Sphere' and a 'Cylinder'.
Radius/Height: Defines the outside dimensions of the Particle Geometry object. 'Radius' refers to the overall dimensions of the 'Sphere' and 'Cube' shapes, and 'Radius' and 'Height' work together to define the dimensions of a 'Cylinder'.
Local Shader: The 'Local Shader' option is applied when using the procedural geometry of the Render Boolean. Users can create an 'Item Mask' for the 'Render Boolean' item itself in the Shader Tree and assign materials and shading to it. Enabling the 'Local Shader' option will then use the defined Shading of the item mask on the cut away portions. When disabled, the shading for the item being trimmed is applied to the cut away portions.

TIP: Render Booleans aren't strictly for trimming geometry, they can also affect volume items such as 'Blobs', 'Sprites' and 'Volumes'.

