
The Radial Array tool recursively clones any selected geometry into a circular or helical pattern. There are a variety of controls that allow precise control over the count, placement, angles and spiral offset distance.
Usage
Prior to creating the array, the user will need to select the target geometry for duplication. Component selection, such as vertices, edges or polygons will clone into their own respective layers, while Item selections will generate multiple additional items layers with their transform values set appropriately.
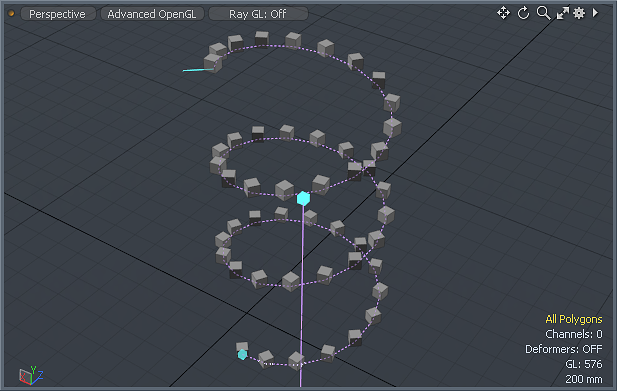
With the item selected, LMB+click the 'Radial Array' button in the Modeling layout toolbox, found under the 'Duplication' subtab; this activates the tool. In this state, users can simply enter numeric values to the tools properties and press 'Apply' to generate the array. Additionally, when the tool is active, users can LMB+click in the 3D viewport to interactively adjust the values. The first click will define the center of rotation, located at the intersection of the mouse click and the current Work Plane.
Surrounding the Center line that defines the Axis angle is the helix angle control. LMB+click and drag over the blue cube handle adjusts the 'Start Angle' and LMB+click and drag adjusts the 'End Angle'. The blue cubes at the end of the line can be use to adjust the axis angle, for arrays that dont align with any of the three axes. Users can also LMB+click again away from the handles to reposition the center location. While the tool is active, users can manually enter numerical values for the attributes in the Properties panel and see them reflected in real-time in the 3D veiwport. When active, the following controls are available--
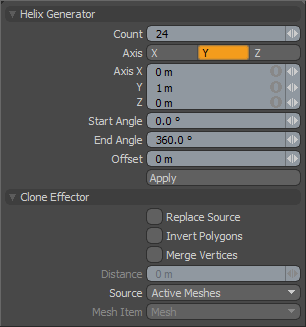 Count: The 'Count' option determines the total number of clones created.
Axis: The 'Axis' option determines along which axis to create the circular array.
Axis XYZ: These three values determine the location of the tools Axis control handles. If the values are set to 1 meter on all axes the handles ends will have one end at -1 X, -1 Y, -1 Z and the other at 1 X, 1 Y, 1 Z creating an skewed off axis plane for the array.
By default the 'Start and End Angles' go from 0 to 360 degrees. This creates an array that completes a full circle. Changing these two values can create an array that revolves many times or one that leaves one side of the circle agape. Setting the end value to greater than 360 degrees is very useful when combined with some non-zero offset value.
Start Angle: The 'Start Angle' option determines the rotation placement for the first cloned geometry as a number of degrees offset from the initial zero degrees.
End Angle: The 'End Angle' option determines the rotation placement for the last cloned element as a number of degrees offset from zero degrees.
Offset: The 'Offset' otion moves each successive clone a user defined distance from the previous along the tools defines 'Axis'. This value is very useful when combined with an End Angle greater than 360 degrees so that the array creates a spiral.
Replace Source: When this toggle is enabled, the original mesh element(s) being cloned by the tool will be replaced with an additional clone at the zero degrees position.

