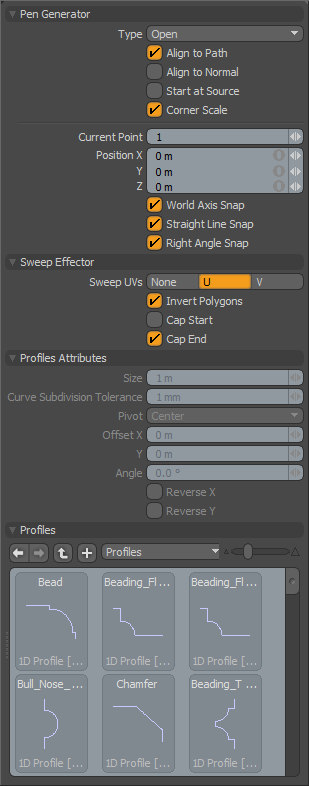
The Pen Extrude tool allows one to quickly extrude a geometry selection along the length of a pen path where each knot creates a new segment. To use, select the tool and make it interactive by clicking in the viewport. Once activated, a number of properties are available.
 Pen Generator--
Type: You can choose to generate an 'Open' or 'Closed' path, 'Closed' automatically generates an extra path between the first and last knots, producing a closed loop.
Align to Path: When enabled the segment edges will align with the curves direction vector producing a consistent thickness.
Align to Normal: Aligns the Extrusion shape to the normal direction of the initial polygon selection.
Start at Source: Often times an extrusion will have its initial control knot imperfectly aligned with the geometry to be extruded. With 'Start at Source' active the curve is used as a relative guide using the original geometry as the true starting location. Disabling this option may cause the newly created geometry to move away from the intended original location.
Corner Scale: Automatically scales corner segments as to maintain the proper thickness over the extrusions length.
Current Point: You can change this setting to change the current vertex to be edited by the numeric values listed as Position X, Y, Z. Since the tool may have created several vertices, it is useful to be able to choose one numerically. The vertices are numbered in sequence as they are generated by the tool.
Position X/Y/Z: This numeric entry field allows you to precisely edit each vertex created by the tool. Simply set the Current Point value to the vertex you wish to edit and enter the numeric values for the X, Y and Z positions.
World Axis Snap: When this is active the pen tool handles will snap along the world XYZ axis once you have created more than one vertex.
Straight Line Snap: Will try to snap the handle to a position that will create a straight line between the next and previous vertices in the polygon being created.
Right Angle Snap: Will effect a snap when the angle created by the current, previous and next vertices create a 90 degree angle.
Sweep Effector--
Sweep UVs: This popup control allows you to choose between the U or V axis when placing UV data for newly created geometry.
Invert Polygons: Reverses the normal facing direction of the polygons generated by the extrusion.
Cap Start/End: This toggle will force the back end of the extruded geometry to be capped or closed.
Profile Attributes--
Size: The size of 1D or 2D profile to sweep. If the size is 0.0, it uses the real size.
Curve Subdivision Tolerance: This is the minimum angle when it subdivides the Bezier curve to a string of two-point polygons for extrusion. This setting basically controls the detail tolerance of the conversion from the original curve to the resulting polygon extrusion.
Pivot: Specify the pivot position of the profile.
Offset X/Y: These are the offset amount on the profile space.
Reverse X/Y: Reverse the selected profile to horizontal or vertical.
Profiles--
Mini Preset browser for viewing various profiles. Works the same as the standard preset browser. Selecting any of the various profiles will modulate the extrusion width with the selected shape over its length. To return to the original polygon selection for the extrusion, Ctrl+click the selected profile to deselect it.


