
The 'Mesh Paint' tool provides an easy method for directly applying one mesh layer onto the surface of another. For instance, with Mesh Paint you can quickly drag a bolt along the hull of a ship or quickly brush many copies of boulders across a landscape. Mesh Paint can create actual geometry or mesh instances and can be used to accurately place a single copy or apply hundreds of copies with a single stroke.
To use 'Mesh Paint' there must be at least two mesh items in the 'Item List'. The currently selected item is the target of the tool and the background (visible but unselected) item will be the source applied onto the target. With this set up users can simply LMB+click and drag across the selected mesh item and the background mesh will be applied along the brush stroke. In the default mode Mesh Paint will apply a single copy of the background mesh item and slide it along the surface (Slide Mode). There are many controls on the Mesh Paint tool property form that allow users to modify the tool to create brush strokes full of geometry with variable size, scale and rotation based on input from the geometry itself, from a tablet or modulated with a falloff.
The tool can be invoked from the MODO standard toolbox, under the 'Duplicate' subtab. It can also be called from the menu bar under "Geometry > Duplicate > Mesh Paint". To create 'Instances' or replicas using 'Replicators', users can access an alternate Mesh Paint tool from the button popup. Hold down a LMB+click over the existing Mesh Paint button to open it. Once the tool is activated, the following attributes appear in the tool properties panel-
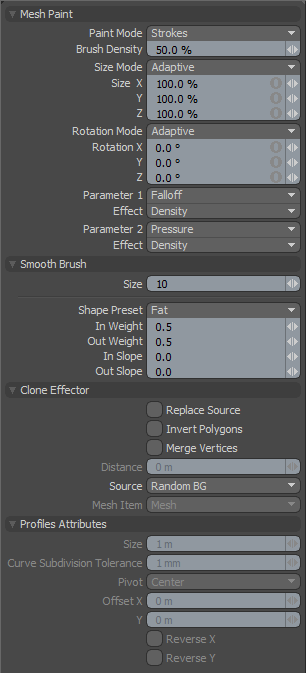 Mesh Paint--
Paint Mode: There are a few different modes that control how the BG mesh item(s) are applied with each stroke-
Slide- A single items is dragged over the target surface and positioned where the mouse button is released. Users can also alternately press 'Ctrl' before clicking to interactively set the scale of duplicates.
Strokes- Multiple items are sprinkled along the brush stroke providing users a means to clone many items across a surface very easily with randomized placements.
Drop- A single item is placed at the intersection of the mouse click position and the target surface, holding down the LMB, users drag to interactively scale and rotate the item.
Size Mode: The 'Size' mode options determine the scale of the placed mesh duplicates onto the surface-
Uniform- Retains the original size of the item when placed. Users can adjust the scale with the X,Y and Z values as a multiplier of the original size (Item mode transforms on source are ignored).
Adaptive- Adapts the size of the item to the size brush. Users can adjust the scale with the X,Y and Z values as a multiplier of generated size (Item mode transforms on source are ignored).
Random- Randomly scales each duplicate as determined by the X,Y and Z values. 0% provides no variation, while larger values will increase the amount of variation.
Adaptive+Random- Combined properties of both Size modes allowing users to add some randomness to the adaptive scaling of cloned duplicates.
Rotation Mode: The 'Rotation' mode determines the orientation of the placed mesh duplicates onto the surface-
Uniform- Retains the original orientation of the item when placed. Users can adjust the rotation with the X,Y and Z values as an offset of the original rotation (Item mode transforms are ignored).
Surface Align- Aligns the target surfaces normal facing direction with the up (Y+) direction of the cloned item.
Random- Randomly rotates each duplicate as determined by the X,Y and Z values. 0° provides no variation, while larger values will increase the amount of variation.
Surface Align+Random- First aligns items up direction to the target surfaces normal facing direction and then randomizes it away from that as determined by the X,Y and Z values.
Surface Align+Tablet- First aligns items up direction to the target surfaces normal facing direction, users can then rotate items based on a stylus' orientation to a tablets surface (requires pan tablet with orientation support).
Surface Align+Tablet (no Pitch)- Same as above but ignores 'Pitch' rotation (Z axis).
Screen Align+Tablet- Orientation of view on-screen is first considered, users can then rotate items based on a stylus' orientation to a tablets surface (requires pan tablet with orientation support).
Screen Align+Tablet (no Pitch)- Same as above but ignores 'Pitch' rotation (Z axis).
Parameter 1/2: The 'Parameter' and 'Effect' options provide additional controls over the duplicated geometry using a number of criteria. The 'Parameter' itself is the controlling factor, while the 'Effect' determines what the Parameter controls.
Falloff- Any of the many 'Falloff' options can be used as a controlling Parameter.
Pressure- Strength of the Stylus' pressure against tablet is a controlling Parameter.
Slope- The Slope angle of the target surface is a controlling Parameter.
Altitude- The Altitude (height) of the target surface is a controlling Parameter.
1.0 Slope- Inverse of the Slope Parameter
1.0 Altitude- Inverse of the Alititude Parameter
Effect: Determines the aspect which is controlled by the above 'Parameter'.
None- Nothing is affected, disables 'Parameter' option.
Density- Parameter settings controls 'Density' (number of duplicates).
Size- Parameter settings controls 'Size' (scale of duplicates).
Rotation- Parameter settings controls orientation.
Size+Density- Parameter simultaneously affects both 'Size' and 'Density' attributes.
Smooth Brush--
The 'Smooth Brush' is one of the standard brushes used in MODO for painting and sculpting covered on its own page of the Painting and Sculpting section of the documentation.
Size: The size and shape of the Smooth Brush controls the area across where duplicates are sprinkled and their initial density when placing elements with the Strokes mode. Larger brushes (in relation to the surface) would spread duplicates across a larger area. When the 'Size mode is set to 'Adaptive', the size of the brush will also affect the size of the duplicated geometry.
Shape Preset: These are quick options to select from preset brush shapes controlling the initial density of the sprinkled duplicates.
Clone Effector--
The Clone Effector determines what mesh items are grabbed when duplicates are generated. This is general purpose effector used for multiple tools, so some settings may appear out of place and should be disregarded.
Replace Source: When enabled, this option replaces the target target surface with a clone, certainly not useful in regards to Mesh Painting. Do not enable.
Invert Polygons: When enabled, this option Inverts the normal facing direction of the duplicated geometry.
Merge Vertices: When enabled, this option merges any overlapping vertices with identical values.
Distance: When 'Merge Vertices' is enabled, users can also define a 'Distance' value that merges any vertices that fall within that range.
Source: The 'Source' option determines the source of the geometry for duplicating onto the target surface. Active meshes are those that are selected and visible in the 'Items List', while background meshes are those that are visible but unselected.
Active Meshes- The Active Meshes duplicated onto the target surface, as duplicates are added, future duplicates will reflect the current active mesh state.
Specific Mesh- Users can specify a specific mesh layer to use as a source using the 'Mesh Item' setting..
All BG- All BG meshes are considered as a single item and duplicated together.
Random BG- For each duplicate, a random BG layer is used as the source, providing users a means to randomly clone many similar but different items onto a surface producing much greater variety.
Preset Mesh- Users can select a mesh preset item from the preset browser as the source for duplicates.
Mesh Item: When the 'Specific Mesh' option is selected, users can define the particular source mash desired using this option.

