
The Track View (also referred to as the 'Dope Sheet') allows users to view and easily edit keyframes directly in a simplified view that can be accessed by expanding the timeline in any time enabled layout. Broadly editing keyframes can be a great workflow improvement in achieving proper timing for any animated situation (especially in the case of character animation). By LMB+clicking on the top frame edge of the timeline itself and dragging upward, the normally hidden viewport will be exposed. If there are selected items in the scene with keyframes assigned, the viewport will be similar to this-
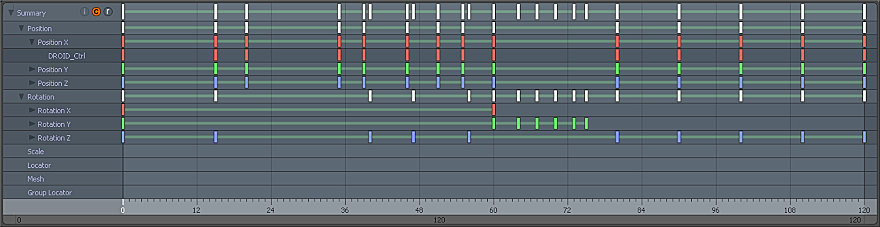
For ease of editing, keyframes can be viewed inside of Track View in three different ways. Selecting an Item will display it's keyframes in a 'Summary' view, a streamlined version with handles signifying frames that have 'keyframes' assigned to them. The handles allows users to easily edit all the keyframes of a specific Item or group of Items. Accessing individual Channels for items are done by expanding the Item group toggle arrow to the left of the Item name and if desired, next to each individual Channel name. Alternatively selecting the small round "C" radio button in the Track View will toggle the display so it is based on Channel types, accessing the Channel for a specific Item requires users to expand the Channel Group toggle. Finally selecting a specific Channel or group of channels in the 'Channels' viewport will display those channels directly in the Track View. Which view method is best is dependent on the type of edits that are desired.
Editing Keyframes
Single keys can be selected by LMB+clicking on a keyframe handle, changing its color to orange, denoting its selected state. Multiple keys can be selected by LMB+clicking in an open area and dragging over multiple keyframe handles. To add to a selection, hold down the 'Shift' key when selecting, and conversely, to delete from a selection hold down the 'Ctrl' key. The white keyframe handles in the topmost row are the master keys that provides a convenient way to adjust all handles on a specific frame, moving the master key will also move all keyframe handles below it. Similarly, when moving a key for say Position X, the related master key is automatically affected as well and will be moved along with the Position X keyframe.
Once selected any keyframe can be LMB+clicked on and dragged left or right to adjust its position along the timeline, moving all selected handles. RMB+clicking and dragging over an empty area of the graph will move the selected handles as well, without needing to click on a specific handle. When moving keyframes, the number of frames offset from where it started (+/-) is shown in real time in the upper left of the Track View. Positive values from the start frame indicate moving to a later time, negative values an earlier time. To move all frames after a selection (without needing to specifically select them) enable the 'Ripple Edit' function, by toggling the small 'r' dot in the upper left corner of the Track View. Please note that when using the RMB in 'Ripple Edit' mode, the RMB click will need to be over the active key zone (indicated by horizontal green bars between keyframes) in order for the Ripple mode to be in effect.
Scaling selected keyframes requires at least two handles to be selected. There are two ways of doing it; first by holding down the 'Shift' key and then RMB+clicking and dragging on an open area will scale the selection from the cursor click location inward or outward depending on the drag direction. The amount of the scaling operation will be displayed in the upper left of the Track View as the cursor is moved. Holding down the 'Ctrl' key and then RMB+clicking and dragging will scale a set of keyframes from the position of the last or the first selected keys, depending on which side of the selection your cursor is closer to. For example, to keep the first key location (in time) at a fixed position and scale the other selected keys relative to it, hold down 'Ctrl' and RMB down to the right of the last key selection and scale by dragging to the right or left. Conversely, to scale a selection relative to the last selected key hold down 'Ctrl' and RMB+click and drag down to the left of the first selected handle and drag to the right or left.
Creating new keyframes can be done by MMB+clicking in the Track View, creating the keyframe at that position on the timeline for all selected channels or Items.
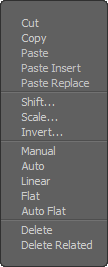 RMB+clicking will open a Track View specific contextual menu. In this menu there are tools that allow you to cut, copy, paste and delete keyframes and also scale and shift keyframes by specific amounts. There are also options for setting the slope of keyframes.
Cut: Cuts the selected keys from the editor and stores them in a temporary buffer for later access.
Copy: Copies the selected keys from the editor and stores them in a temporary buffer for later access.
Paste: Places the keys in the temporary buffer into the timeline, inserting them at the Current Time position.
Paste Insert: Same as 'Paste' but also moves the existing keyframes beyond the insertion point the necessary amount of frames.
Paste Replace: Same as 'Paste' but removes the overlapping keyframes.
Shift: Opens the 'Set Frame' dialogue panel for adjusting the time position-
![]()
Time: Determines the position in time to move the selected keys to.
Absolute: When enabled, Absolute time is used, where a specific time can be defined, when disabled the time will be relative to the current time position.
Linked: When enabled linked keys (such as those of the R,G,B channels) will remain linked in the same relative position, even if only a single channel is edited. When disabled keys can be moved freely.
Ripple: When enabled all following values of those selected will be shifted by the same amount.
Scale: Opens the 'Scale Keys' dialogue panel for scaling the value of the selected keys-
![]()
Scale: Defines the amount of scaling applied to the selected keys.
Center Options: Determines the center location to scale the keys from, which are self-explanatory- 'Start', 'Center', 'End', 'Time' and 'User'. When 'Time' or 'User' is selected, the 'Center Value can be used to define the specific center.
Center Value: Determines the specific center locations when the 'Time' or 'User' options are selected as the 'Center Option'.
Mode: Two modes to determines which direction gets scaled- 'Input' scales the interval (horizontal) while 'Output' scales the value (vertical).
Link: When enabled linked keys (such as those of the R,G,B channels) will remain linked in the same relative position, even if only a single channel is edited. When disabled keys can be moved freely.
Invert: Opens the 'Key Invert' dialogue panel for adjusting the value of the selected keys-
![]()
Mode: Two modes to determines which direction gets inverted- 'Input' inverts along the interval (horizontal) while 'Output' inverts along the value (vertical).
Local: When the 'Local' option is enabled the inversion will happen individually for each channel, when disabled, the inversion will happen as a group for all that is selected.
The next set of option allows users to automatically define the Slope of the interpolation curve connecting keyframes--
Manual- Give user full control over Slope (handle angle).
Auto- Automatically adjusts Slope to produce a smooth ease-in and ease-out from the previous key value to the next.
Linear In- Angles the Incoming Slope to point toward the previous key producing a straight line between keys.
Linear Out- Angles the Outgoing Slope to point toward the next key producing a straight line between keys.
Flat- Sets the Slope to 0 degrees flat regardless of the positions of the previous and next keys.
Auto Flat- Acts just like 'Auto' except when the incoming or outgoing keys match the value, then it acts like 'Flat'.
For more information on Slope and how it relates to keyframes, please reference the Graph Editor page of the documentation.
Delete: Removes the selected keyframes from the Track View.
Delete Related: Removes the selected keyframes from the Track View, as well as any related channel keyframes (such as when deleting just the 'Y' channel, this option will also remove the 'X' & 'Z' channels as related).

