
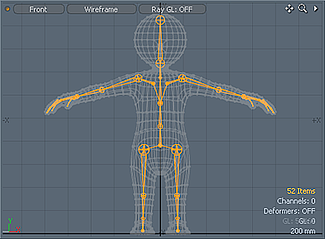
The skeleton tool is used primarily for creating a joint hierarchy for character posing and animations using deformations. Joints are Locator items with custom drawing predefined, a wireframe sphere at the joint's location and a rhombus shape drawn to the location of the joint's first child. Both shapes can be changed in the Display viewport if desired. Once the skeleton is created, it will still be necessary to Bind the joint hierarchy to the mesh using the 'Bind' command while in the 'Setup' action state. For more on Binding, please reference that page of the documentation.
Drawing the Skeleton
Prior to drawing the skeleton, users should give some thought to the position of the root element, this is the base joint for the entire chain, every other joint created is a parent/child cascading hierarchy from this joint. Often times for bipedal human characters, this is placed at the hips, with the legs and spine branching outward. To set the Root, users can simply LMB+click in the viewport over the target geometry (no need to drag out the joint). By default, the 'Intersection' option will be enabled, when it is, MODO will attempt to find the halfway position between the forward and backward facing polygons intersecting with the mouse click position and place the joint segment appropriately. A great time saver for placing joints in hands and feet. If the are no back facing polygons, or 'Intersection' is disabled, the joint will be created at the intersection of the mouse click and the geometry surface. Clicking away from the model creates the joint at the intersection of the mouse click and the current Work Plane. After setting the initial point that represents the base of the joint (its rotations origin), users can LMB+click a second time to set the actual joint, by LMB+click and dragging, users can interactively scale and position that joint. Subsequent mouse clicks will continue to create additional joints in the chain, each a child of its predecessor. Pressing 'Shift' when creating a joint will start a new chain. To add a branch to an existing chain, LMB+click on a joint to select it and the continue to click, drawing the new branch. The position of joints that have been drawn already can be modified by LMB+clicking and dragging on their base, or by entering the 'Edit' action state.
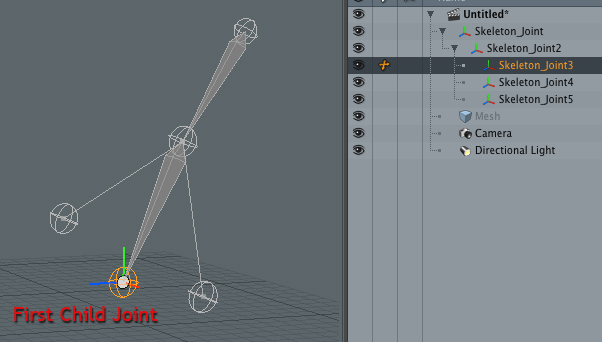
The first child of a joint is important as it defines the alignment of it's parent joint and is also used by other item alignment commands in MODO. To make the first joint easier to identify MODO only draws the rhombus link shape to the first child, links to other child joints are drawn as lines. Changing which joint is first is easily accomplished in the Item List by dragging it directly under it's parent.
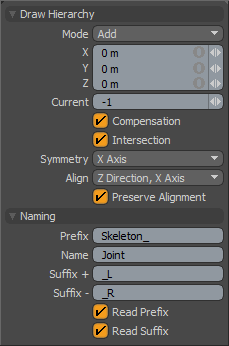 Draw Hierarchy--
Mode: Various action modes of the skeleton tool-
Add- This is the default state, where the joints of the skeleton are created, each LMB+click creates an additional joint as the child of the previous joint, producing a cascading hierarchy.
Edit- The 'Edit' action allow users to modify the position of individual joints without the possibility of accidentally creating a new joint.
Insert- In the 'Insert' action, users can LMB+click on the base of any joint splitting it into two separate joints.
Delete- In the 'Delete' action, users can LMB+click on any joint to remove it from the hierarchy.
X,Y,Z: Displays the joints position in 3D world space, like any other
Current: Displays the joint number (in sequence from the Root), determining the current joint for editing, or the most recently created joint.
Compensation: When 'Compensation' is disabled, child joints will move with the parent, when enabled the child joint will change length with the rest of the chain remaining in position.
Intersection: By default, when drawing out joints, MODO will draw the joint at the intersection of the mouse click and the Work Plane. When 'Intersection' is enabled, MODO will attempt to find the mid-point within a volume, finding forward and backward facing polygons under the mouse pointer and center the joint between them.
Symmetry: When one of the 'Symmetry' options is selected, mirrored joints will automatically be created across the chosen axis. duplicated joints will be automatically named according the 'Naming' options. The 'Off' setting disables symmetry.
Align: The 'Align' option determines how the local axes of joints will be aligned towards its first child joint. 'Direction' specifies which axis will point towards the child joint, 'Axis' specifies the axis running horizontally through the joint. These can be thought of as Roll and Pitch respectively.
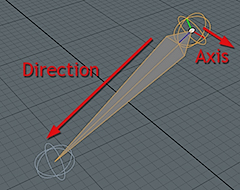
Image shows 'Z Direction, X axis' 'Align' default.
Preserve Alignment: The 'Preserve Alignment' option when enabled, maintains the current alignment of joints when selected. When disabled, the joint will be re-orientated to the alignment chosen in the 'Align' menu. This is a quick way to re-orient a number of joints in a hierarchy, by choosing the desired alignment and then simply LMB+click on on the target joint to be changed.
Naming--
Prefix/Name: Determines the beginning and second parts of the auto-naming string. 'Prefix' and 'Name' will be followed by a number (based on the number of items in the scene with the identical name). When more than one joint is created with an identical string. Values can be changed at any time during the joint creation process to denote different areas of the skeleton.
Suffix +/-: When the Symmetry option is enabled, the Suffix options are appended to the end of the string, based on its position on the X plane, relative to the global YZ plane as either + (positive) or - (negative).
Read Prefix/Suffix: With these options enabled, the prefix and suffix will be read from the joint's current name when it's selected and the edit fields updated. When disabled the appropriate part of the joint's name will be changed to the text in the Prefix and Suffix edit fields when a joint is clicked on.

