

The 'Skin Material' is designed to completely replace the default BRDF shading calculations of the standard Material item when applied to a surface. Human skin is a rather complex organ, made up of multiple layers and materials, each absorbing, scattering and reflecting light differently creating a very subtle but distinct look that we as humans are intimately familiar with. In order to simulate such a complex surface a special Material shader was required. The material is a made up of mostly familiar options, that combine to simulate the subtle nuance that is skin.
Usage
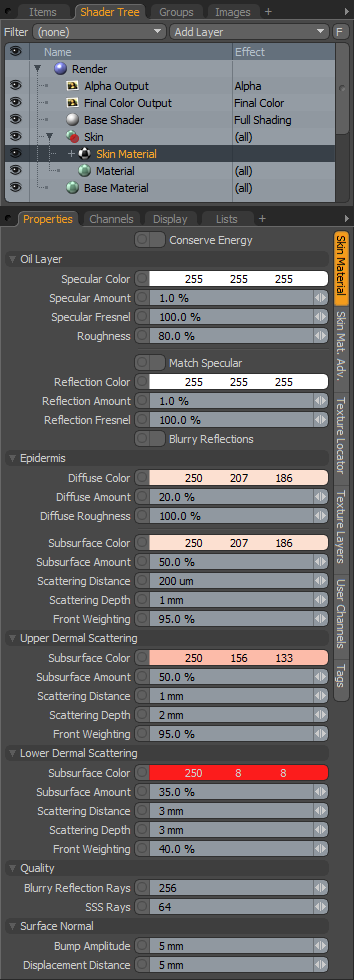
The 'Skin Material' item is added to the Shader Tree using the 'Add Layer' function -"Add Layer > Custom Materials > Skin Material". For more information on adding and manipulating Shader Tree layers, please reference that page of the documentation. For proper results, the Skin Material should be placed above the Material item it is replacing (feel free to disable or remove the Material item). Once positioned, selecting the 'Skin Material' item will reveal its attributes in the 'Properties' viewport where its settings may be adjusted to fine tune the look of the rendered skin. Additionally, skin is not a consistent color across its entire surface and users will want to add texture layers, set to the appropriate 'Effect' to represent the natural variations inherent in skin, necessary in producing the most realistic results. There are a number of special layer Effect types specific to the Skin Material under the "Custom Material Channels > Skin Material Channels" menu that correspond to the settings of the Skin Material itself.
Users should note that the since the Skin Material completely replaces the Material Item's settings, in order to obtain proper results for Bump Maps and Displacement Maps, users will need to adjust the respective attributes directly in the Skin Shader properties panel.
 Conserve Energy: When enabled, the 'Conserve Energy' setting maintains a physically accurate blend of 'Diffuse' and 'Specular' light reflecting over the skins surface. It also accurately spreads the energy of each contribution to the oil and each dermal layer so that the overall contribution is never more than 100%.
Oil Layer--
The uppermost layer of skin excretes an oil that produces a shiny, specular reflection on its surface. Depending on the amount on the skin, it becomes less or more reflective. Skin that is flushed, say from exercise or exertion will be shinier than clean skin or skin with powder make-up on, so the Amount and Roughness will need to be adjusted depending on the desired look.
Specular Color: Determines the color of the highlight created from reflections of direct light sources.
Specular Amount: Determines the strength of the Specular highlight.
Specular Fresnel: At glancing angles (those perpendicular to the camera), reflectance values of skin increase. The Specular Fresnel setting realistically increases the specular amount at these glancing angles producing a physically correct surface.
Roughness: The 'Roughness' setting determines the size of the spread for both 'Specular' and 'Blurry Reflections' when enabled. A clay pot will reflect light very differently than a porcelain cup, though the surfaces appear to both be smooth, on a microscopic level the clay pot is much rougher than the porcelain and this affects how the light is reflected, spreading the reflection across the surface. A higher 'Roughness' value will produce these rougher more spread out highlights, while lower values produce tighter more focused highlights.
Match Specular: When enabled, the Reflection options will be automatically adjusted to to match the equivalent Specular settings.
Reflection Color: Determines the tinting or colorization of Reflections on the surface.
Reflection Amount: Determines the amount of the environment reflections that will appear on the surface, like with the specular setting, oilier surfaces will appear more reflective.
Reflection Fresnel: At glancing angles (those perpendicular to the camera), reflectance values of skin increase. The Reflection Fresnel setting realistically increases the reflection amount at these glancing angles producing a physically correct surface.
Blurry Reflections: When enabled, reflections will take in to account the 'Roughness' option and spread reflections across the surface, such as would happen with real skin.
Epidermis--
The Epidermis is the outer layer of effectively dead skin cells. This layer is quite thin and on a microscopic level looks very much like tiny overlapping scales. This layer is mainly responsible for the color of the skin, depending on the actual amounts of melanin present in the cells.
Diffuse Color: Determines the Diffuse Color of the skins surface, this is the apparent visual color of the skins outer surface that reflects back when illuminated.
Diffuse Amount: Determines the amount of light reflected back from the skins surface, the rest of the light is absorbed for SSS.
Diffuse Roughness: The 'Diffuse Roughness' option represents a lack of specular on a Epidermal surface so reading the Diffuse shading outwards across the surface simulating the tiny microscopic variations of the individual skin cells.
Subsurface Color: Determines the Color of the light that is absorbed, scattered and the reflected back out. The epidermis is fairly translucent and the subsurface color is basically the same color as the Diffuse Color for human skin.
Subsurface Amount: Determines the amount of scattered light that is reflected back out. The subsurface scattering is combined with the Diffuse color to produce the final Epidermal layer.
Scattering Distance: Determines the distance that light scatters through the surface before reflecting back out. Deeper rays will attenuate toward the SSS color, reaching the full SSS color at the Scattering Distance value.
Maximum Depth: Determines the maximum depth where a ray can contribute to the final solution, in essence clipping the SSS to approximate a solid core. A value of '0' disabled the option.
Front Weighting: The 'Front Weighting' option biases the SSS ray forward or backward. Settings between 0-49 bias the SSS rays backwards, 51-100 bias the rays forward and setting of 50% distributes the rays equally in both directions.
Upper Dermal Scattering--
The upper dermal layer contains tissue for cushioning the Epidermis, and also houses the nerve endings, hair follicles, sweat glands and blood vessels. Because of these constructs the light scattered from here will be differently colored than the epidermal layer.
Subsurface Amount: Determines the amount of scattered light that is reflected back out. The Upper Dermal Scattering is combined with the Epidermal layers solution to produce the final shaded result.
Scattering Distance: Determines the distance that light scatters through the surface before reflecting back out. Deeper rays will attenuate toward the SSS color, reaching the full SSS color at the Scattering Distance value.
Maximum Depth: Determines the maximum depth where a ray can contribute to the final solution, in essence clipping the SSS to approximate a solid core. A value of '0' disabled the option.
Front Weighting: The 'Front Weighting' option biases the SSS ray forward or backward. Settings between 0-49 bias the SSS rays backwards, 51-100 bias the rays forward and setting of 50% distributes the rays equally in both directions.
Lower Dermal Scattering--
The Lower Dermal area contains more blood vessels and typically is the layer that contributes the most red because of this.
Subsurface Amount: Determines the amount of scattered light that is reflected back out. The Lower Dermal Scattering is combined with the Upper Dermal and Epidermal layers to produce the final shaded result.
Scattering Distance: Determines the distance that light scatters through the surface before reflecting back out. Deeper rays will attenuate toward the SSS color, reaching the full SSS color at the Scattering Distance value.
Maximum Depth: Determines the maximum depth where a ray can contribute to the final solution, in essence clipping the SSS to approximate a solid core. A value of '0' disabled the option.
Front Weighting: The 'Front Weighting' option biases the SSS ray forward or backward. Settings between 0-49 bias the SSS rays backwards, 51-100 bias the rays forward and setting of 50% distributes the rays equally in both directions.
Quality--
Blurry Reflection Rays: Defines the number of rays used to calculate the 'Blurry Reflections' when that option is enabled. Higher ray counts will produce smoother, more realistic results but will also result in longer calculation times when rendering.
SSS Rays: Defines the number of rays used to calculate the Subsurface Scattering results. Higher ray counts will produce more accurate SSS results but will also take longer to calculate.
Surface Normal--
Bump Amplitude: Determines the maximum strength of any bump map applied to the skin surface.
Displacement Distance: Determines the maximum displacement distance when any type of Displacement texture layer is used.
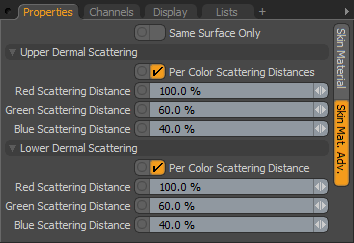
Skin Material Advanced
 Upper Dermal Scattering--
In real skin, each wavelength of light penetrates the skin to a different depth, which attenuates the colors slightly as rays travel further into the surface. For the most accurate results users can enable and adjust these settings, but they will also increase render times as individual rays will need to be fired for each wavelength calculation.
Per Color Scattering Distances: Enable this option to calculate per color Scattering for SSS of the Upper Dermal layer.
Red/Green/Blue: Users can adjust, how each wavelength attenuates through the surface, Red being the highest wavelength should penetrate further than the lower wavelengths of green and then blue. Values of 100% will travel the maximum 'Scattering Distance' specified.
Lower Dermal Scattering--
Per Color Scattering Distances: Enable this option to calculate per color Scattering for SSS of the Lower Dermal layer.
Red/Green/Blue: Users can adjust, how each wavelength attenuates through the surface, Red being the highest wavelength should penetrate further than the lower wavelengths of green and then blue. Values of 100% will travel the maximum 'Scattering Distance' specified.

INFO: Since the Skin Material uses a custom shading model to render the surface, it is not compatible with blending or masking techniques allowed by other layers. Basically this means that any surface with the skin shader applied can only be a skin surface.

