
Rendering is the processing of converting the polygons and lights in a scene, combined with the settings of the Shader Tree to produce a two dimensional bitmap image. Generated from the perspective of the render Camera, it is akin to taking a photograph, converting the three-dimensional scene before the lens into the still image on the camera's sensor. Rendering the scene is like pressing the shutter button where the settings of the current frame are evaluated and displayed as an image in the Render Display where is can be further manipulated or saved. While the 3D GL viewports offer a decent likeness of how a scene looks, including animation and deformers, it is still only an approximation and many advanced or render intensive options are excluded completely.
Rendering shouldn't be thought of as the final step in a linear workflow of modeling, texturing and rendering either. Throughout the process, users can render and preview their scene iteratively ensuring the proper final outcome. However, completely rendering the entire scene continuously would slow down the creative process, therefore modo has a variety of commands to facilitate various workflows, found in the menu bar under the 'Render' menu. Each is intended to give users greater control over the rendering process, ultimately providing a faster, more streamlined workflow. The various commands are especially useful in expediting the preview of large scenes, when combined with the 'Auto Visibility' settings of the Item List. The result of each command is displayed in the 'Render Display' window which automatically opens each time a rendering command is invoked (if not currently open). Users should note that images in the Render Display are cached upon render completion, but are not saved to the users system. Please reference the Saving Images page of the documentation for more on how to save rendered images.
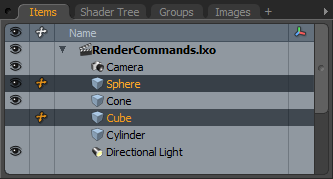
The various commands play off the visibility of items in the 'Item List' (the eye ' ![]() ' column) or as defined in the 'Display' viewport, which can be set to override item list settings. Take, for instance, the example below, there are four simple items, a sphere, a cone, a cube and a cylinder. The sphere is visible and selected, the cone is visible, but not selected and the cube is not visible but selected, and the cylinder is neither visible or selected; one of each possible state.
' column) or as defined in the 'Display' viewport, which can be set to override item list settings. Take, for instance, the example below, there are four simple items, a sphere, a cone, a cube and a cylinder. The sphere is visible and selected, the cone is visible, but not selected and the cube is not visible but selected, and the cylinder is neither visible or selected; one of each possible state.
Render--
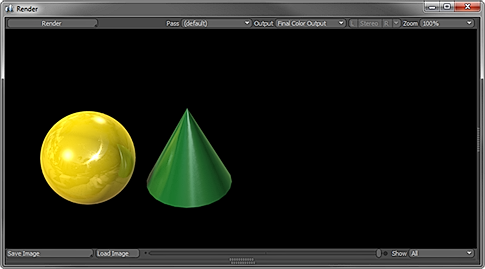
The 'Render' command is the most common of the rendering commands, it is the function invoked when pressing the ubiquitous 'F9' key. This option respects the visibility column of the 'Item List'. Items that are visible will render, regardless of selection, items not visible will not render. From the above Items list, only the Sphere and Cone are visible, therefore the only items in the Render Display window.
Render Selected--
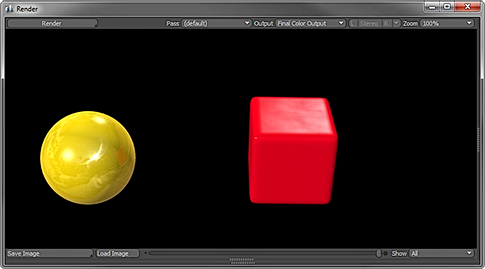
The 'Render Selected' command will only render items that are selected (i.e. highlighted) in the Items list, regardless of their visibility. Therefore, the Sphere and Cube will be the only items in the Render Display, according to the Items list above.
Render All--
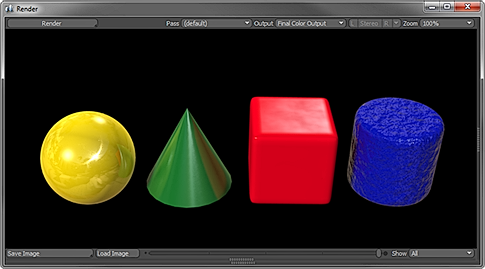
The 'Render All' command will render all items in the Items list regardless of visibility, therefore all four items in the list will be visible when using this command.
Render Current View--
The 3D openGL viewports also respect visibility of the Items list, although the display style of background (unselected) items is controlled differently. Users wishing to render from the unique perspective of a 3D openGL viewport (such as any perspective or orthographic views) can utilize the 'Render Current View' command, which temporarily moves the current 'Render Camera' to match the position of the viewport specific camera, rendering the scene, however, the focal length and aspect ratio cannot be matched precisely, producing a rendered image that is an approximation of the viewports view. Although not exact, this function offers users the ability to move freely through a scene, previewing items without moving the camera item itself. If users wish to move the camera item to match the view of a viewport, use the 'Sync to View' command. Users can also easily enable the 'RayGL' option per viewport to get a preview rendered representation directly in the viewport.
Render Turntable--
The 'Render Turntable' command provides users a simple means to generate 360° turntable animations without the need to keyframe any animations. When users choose the command, they are presented with the following dialog panel-
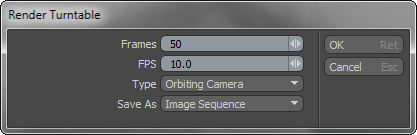
Frames: Sets the total length of the rendered animation in frames.
FPS: Frames Per Second defines how fast or slow the animation will play back if the user chooses to render the turntable as a video file.
Type: There are two options for the turntable type; 'Orbiting Camera' rotates the camera item around the origin and 'Spinning Geometry' which, obviously, spins the geometry itself around the origin, lights and other elements remain still. The main different between the two is in how light and shadow play over the surface as it rotates.
 Orbiting Camera |  Spinning Geometry |
Save As: The 'Save As' option determines how the rendered turntable is saved to disc. There are three options, 'Image Sequence', 'Movie' and 'Layered Images'. Image Sequence will save a series of numbered frames, where Movie will render out a platform appropriate video file. If the users wishes additional alternative, the 'Layered Images' option will rendered out a sequence of frames, saving all the different render outputs of the Shader Tree within a single layered file. File formats supported by modo are fully covered on the 'Saving Images' page of the documentation.
Before generating a turntable, user will need to position the camera, framing the image as they wish. This will be the base position of the camera. Users should also make sure the geometry is centered at the origin, as this is the center of rotation for both the 'Orbiting Camera' and 'Spinning Geometry' types of turntables.
Render Animation--
The 'Render Animation' command instructs modo to render out a sequence of frames, by default, determined by the 'Scene Range' values. Users can override this range by adjusting the values directly in the 'Render Animation' dialog. Users can then choose how the sequence of frames are rendered and saved to disc. The 'Render Animation' command will default to saving files to the name and location defined in the render output, if specified, asking if users would like to override or accept the designations. When no filename is specified, modo will open a OS specific dialog prompting users to choose the filename and save location.
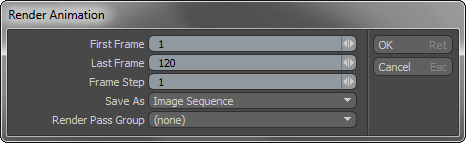
First/Last Frame: Determines the sequence of frames rendered.
Frame Step: Determines the progression of rendered frames, useful in skipping frames to speed up a render. A 'Frame Step' of 1 would render every frame, a Frame Step of 2 would render every other frame and so on. To play back a sequence at the correct speed, divide the real FPS (frames per second) by the 'Frame Step' value to get the new FPS.
Save As: modo provides several options for saving the image sequences--
Image Sequence- Each rendered frame is saved individually, with the frame number appended to the filename as well as 'L' or 'R' for stereo pairs, if applicable.
Movie- Frames are rendered as a single animation file. Format option are dependent on platform. This option is also necessary to save still images as stereo pairs when rendering stereoscopic sequences.
Layered Images- The 'Layered Images' option acts exactly like the Image Sequence option, however, each active 'Render Output' is combined into a layered file, which can be very useful in reducing clutter when compositing images in an external application, reducing the number of files necessary to import. Check to make sure your target application can accept layered files before proceeding with this option.
Render Pass Group: Determines the 'Pass Group' to render. Pass Groups are separate iterations of a single scene that can be rendered sequentially. Users can define as many passes as they wish to a Pass Group. When that Group is specified, each iteration will be rendered and saved according to the settings of the Render Output, with naming that conforms to the settings of the Frame 'Output Pattern' option. For more information on creating and working with 'Render Passes', please reference that page of the documentation.
Render Passes--
Passes are collections of setting that when rendered produce multiple variations of an scene from the same camera. The 'Render Passes' command facilitates the rendering of a Pass Group when rendering still images; as the standard 'Render' commands only render the currently selected pass. For more information on 'Render Passes', please reference that page of the documentation. Selecting the 'Render Passes' command opens the 'Render Passes' dialog where users can select the target Pass Group and all the passes within the selected group will render consecutively and display in the Render Display viewport.

Open Preview Render--
This command opens a new window that contains a Preview viewport, which uses the modo render engine in a progressive refinement mode, allowing users to see all changes to your scene as a fully rendered image. Within the default modo interface, a Preview viewport is embedded under the 'Render' tab, providing users a fast, interactive means of determining lighting and surfacing settings, albeit some throttling to the quality settings. This command calls the same display technology, but from within anywhere in modo. User may also open a Preview Render window by pressing the 'F8' keyboard shortcut.
Open Last Render--
This command simply opens the Render Display window, and displays the last successful full render without the need to invoke any of the render commands.

