
Bitmap images are an essential component of texturing, painting and image based sculpting. To simplify this common requirement, saving users a trip to an image editing application, modo allows users to create blank images directly in modo, easily and quickly for a variety of applications using the 'New Image' command found in all image browsing palettes and in the image selector drop downs of many panel options. Additionally, users can use the 'New Image' command in the menu bar under "File > New Image" menu. Once an image is created, it must be properly placed in the Shader Tree, so that it is applied to the surface the user wishes to affect. It also may be necessary to set its layer 'Effect' to the proper option, such as 'Displacement' for image based displacement. For more information on working with layers in the Shader Tree and assigning their 'Effect', please reference the Shader Tree page of the documentation. Modo also has a variety of utilities to make it easier to add specific types of new images to the Shader Tree which are covered below.
When the 'New Image' command is invoked, users will first be presented with a OS specific dialog window where user specify the saved files name, location and format. Once that requirement is filled, the following modo panel opens up to designate specifics of the image itself.
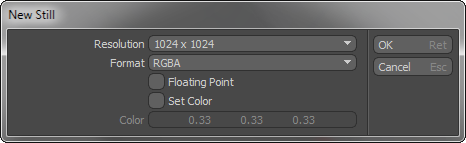
Resolution: When painting in 3D the images are displayed via OpenGL. Performance of GL texture rendering is superior when working with square images. As a result the choices for Resolution are based on standard GL texture sizes (64x64, 128x128, 256x256, 512x512, 1024x1024, 2048x2048, 4096x4096 and 8192x8192)
Format: The created image can be gray, RGB color or RGBA color with an alpha channel. Gray images are typically smaller in file size and are very useful for textures that will be used for displacement or bump maps. Typically the best choice for color textures is RGBA so that the new image texture does not completely obscure the materials and textures layered beneath it. RGB images are opaque.
Floating Point: Also known as HDRI (High Dynamic Range Images), floating point images give a much broader range of potential color values. Whereas an integer (default) image defines colors in 8 bits per channel (0 to 255) a floating point image can use values many times larger. This can be incredibly useful when using images as light sources or to drive finely detailed displacement maps.
Set Color: This toggle defaults to off so that new images are completely "blank" meaning they have no color or alpha pixels. Turning this option on will create an image with a opaque alpha so all pixels are visible and a base color for the image. The color is set by the color component under this toggle option.
Color: The color swatch is only applicable when the Set Color toggle is active. This color value will be used to fill the new image.

TIP: To save an image as 16bit, users must enable the 'Floating Point' option or images will default to 8 bit regardless of the chosen image format.
Users can add image sequences as easily as adding still images. Sequences are simply a series of still frames stored as consecutivly numbered image files. These can be useful for baking out animated textures, or painting animated sequences. When applied to a surface, the sequence frame number will equal the rendered frame number. When frames go missing, the last plausible frame will be repeated until another frame is found. To create a 'New Sequence' users can use the menu bar command "File > New Image Sequence" or use the 'New Sequence' option in the clips browser. When invoked, an OS specific dialog will open for users to define the name, location and format of the files. Then click 'OK' for the modo dialog where users define the resolution and other aspects of the frames themselves.
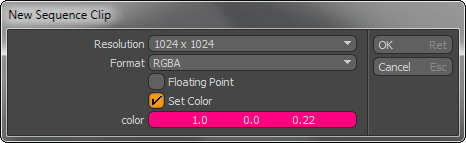
Resolution: When painting in 3D the images are displayed via OpenGL. Performance of GL texture rendering is superior when working with square images. As a result the choices for Resolution are based on standard GL texture sizes (64x64, 128x128, 256x256, 512x512, 1024x1024, 2048x2048, 4096x4096 and 8192x8192)
Format: The created image can be gray, 'RGB' color or 'RGBA' color with an alpha channel. 'Gray' images are typically smaller in file size and are very useful for textures that will be used for displacement or bump maps. Typically the best choice for color textures is RGBA so that the new image texture does not completely obscure the materials and textures layered beneath it. RGB images are opaque.
Floating Point: Also known as HDRI (High Dynamic Range Images), floating point images give a much broader range of potential color values. Whereas an integer (default) image defines colors in 8 bits per channel (0 to 255) a floating point image can use values many times larger. This can be incredibly useful when using images as light sources or to drive finely detailed displacement maps.
Set Color: This toggle defaults to off so that new images are completely "blank" meaning they have no color or alpha pixels. Turning this option on will create an image with a opaque alpha so all pixels are visible and a base color for the image. The color is set by the color component under this toggle option.
Color: The color swatch is only applicable when the Set Color toggle is active. This color value will be used to fill the new image.
Once users have modified their images or sequences in modo in any way, through baking, sculpting or painting, the images themselves will need to be saved. This can be done several ways. Typically, users can select a particular image in the 'Images' viewport, RMB+click to open the context menu and then select the 'Save' option. Users can also select the particular image they wish to save and use the menu bar commands "File > Save Image/Save Sequence". If users want to simply save all changes, they can use the menu bar command "File Save All Images". When closing a modo session, users will be prompted by a dialog to save any unsaved images if not saved prior to closing the application.
The Add Texture commands appear in the main 'Paint' interface tab, under the 'Utilities' subtab of the toolbox, with some additional options available under the 'Hair Tools' subtab. Users can use these as shortcuts to quickly add the appropriate image type to the Shader Tree for the most common Image Mapping options.
![]() Add Color Texture--
Add Color Texture--
This command automatically creates a blank new 'Image Map' texture layer in the Shader Tree, set as 'Diffuse Color' for the 'Effect'. This is the necessary option for painting a surface with the Paint tools. The image is added to whatever Material Group is currently selected in the Shader Tree, regardless of the current foreground item selections. To ensure proper Shader Tree placement, users should first select the Material Group Item where they want the texture layer to reside. It may also be necessary to adjust the projection method in the Texture Locator. The image format will default to whatever is specified by the 'Default Image Format' defined by the user Preference setting but can be changed in the 'New Image' dialog window that opens when the command is invoked.
![]() Add Displacement Texture--
Add Displacement Texture--
This command automatically creates a blank new OpenEXR format 'Image Map' texture layer in the Shader Tree, set as 'Vector Displacement' for the 'Effect'. This is the most flexible option for image based sculpting with the Sculpting tools. The image is added to whatever Material Group is currently selected in the Shader Tree, regardless of the current foreground item selections. To ensure proper Shader Tree placement, users should first select the Material Group Item where they want the texture layer to reside. It may also be necessary to adjust the projection method in the Texture Locator. For best results, users should accept the default values of the 'New Still' popup window, only adjusting the resolution as necessary.
![]() Add Mask Texture--
Add Mask Texture--
This command automatically creates a blank new 'Image Map' texture layer in the Shader Tree, set as 'Layer Mask' for the 'Effect'. Mask Textures are useful in limiting the affect another texture layer has on a shaded surface. The image is added to whatever Material Group is currently selected in the Shader Tree, regardless of the current foreground item selections. To ensure proper Shader Tree placement, users should first select the Material Group Item where they want the texture layer to reside. This layers position in the Shader Tree is important as a 'Layer Mask' will only mask the texture layer directly above it in the tree. It may also be necessary to adjust the projection method in the Texture Locator. The image format will default to whatever is specified by the 'Default Image Format' defined by the user Preference setting but can be changed in the 'New Image' dialog window that opens when the command is invoked.
![]() Add Fur Texture--
Add Fur Texture--
There are four 'Add Fur' commands that automatically creates new, blank OpenEXR format 'Image Map' texture layers in the Shader Tree. The 'Add Fur Texture' option, once added to the Shader Tree, is set as 'Fur Vector' for the 'Effect'. The 'Fur Direction' and Fur Length' options are set to 'Fur Direction' and 'Fur Length' as their 'Effect' respectively. These options provide the most flexible method of styling Fur material layers using the Styling tools. The images are added to whatever Material Group is currently selected in the Shader Tree, regardless of the current foreground item selections. To ensure proper Shader Tree placement, users should first select the Material Group Item where they want the texture layer to reside, such as the group with the 'Fur Material' item. It may also be necessary to adjust the projection method in the Texture Locator. For best results, users should accept the default values of the 'New Still' popup window, only adjusting the resolution as necessary.

