
There are seven total selection modes in modo. The first three- 'Vertices, Edges, and Polygons' are known as the component selections modes. In these modes users can use the mouse pointer to select the component elements of the geometry for manipulation using modo's many various modeling and transform tools. When in 'Items' mode, users can transform and entire item layer as a whole, move, rotate or scale. If you think of item layers as a container, component edits manipulate the contents of the container, and item edits transform the container itself. Next, the 'Materials' selection mode will allow the user to automatically select a shader tree layer by clicking on a polygonal surface within the 3D viewport (no more guessing which surface belongs to what geometry). The last two modes 'Pivot' and 'Center' allow the user to select the center and pivot elements of an item layer and manipulate them directly modifying their position and orientation to the associated geometry for animation purposes. Users can directly select any of these modes using the keyboard shortcuts-
1 = Vertices
2 = Edges
3 = Polygons
4 =
Materials
5 = Items
6 = Pivot
7 = Center
This command cycles through the component selection types of Vertices, Edges and Polygons. In the modo default configuration this is mapped to the 'Spacebar' key. If there is a tool selected the tool is first dropped. If no tool is selected, the command cycles the selection sequentially from vertices to edges to polygon and back to vertices in a continuous loop.
Modes
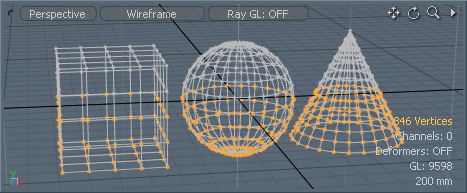
Vertices are a single point that represents a position in 3D space. When in Vertices selection mode users can use the basic paint or lasso selection options to quickly select one or more vertices for precise editing. Selected vertices will be highlighted an orange color to distinguish them from unselected vertices. Using the 'LMB+click and dragging over an object, users can paint a selection of one of more vertices or use the RMB+click and drag, drawing a lasso loop around the selection area selecting multiple vertices at once. There are also a number of selection options that can be used with vertices such as Loop Select, Select More/Less and many more (found on the 'Selection Modifiers' page of the documentation). Users can change the Lasso Style by going to the menu bar and choosing "Select > Lasso Style" and making the choice there.
Vertices selection mode can be activated LMB+clicking the 'Vertices' interface button in the modes toolbar. Alternatively, users can use the menu bar command "Select > Vertices", "1" keyboard shortcut, or by RMB+click away from any geometry in the 3D viewport to open a context menu and selecting the 'Vertices' option. And if that isn't enough, users can also switch to Vertices selection mode by simply MMB+clicking on any vertex in the viewport.
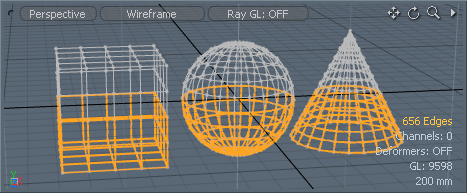
Edges are defined by two vertices, the edge itself is the resulting line between them. When in 'Edges' selection mode users can use the basic paint or lasso selection options to quickly select one or more edges of their geometry for precise editing. Selected edges will be highlighted an orange color to distinguish them from unselected edges. Using the 'LMB+click and drag' over an object to paint a selection of one or more edges or use the RMB+click and drag, drawing a lasso loop around the selection area selecting multiple edges at once. There are also a number of selection options that can be used with edges such as Loop Select, Ring Select and many more (found on the 'Selection Modifiers' page of the documentation). Users can change the Lasso Style by going to the menu bar and choosing "Select > Lasso Style" and making the choice there.
Edges selection mode can be activated LMB+clicking the 'Edges' interface button in the modes toolbar. Alternatively, users can use the menu bar command "Select > Edges", "2" keyboard shortcut, or by RMB+click away from any geometry in the 3D viewport to open a context menu and selecting the 'Edges' option. And if that isn't enough, users can also switch to Edges selection mode by simply MMB+clicking on any edge in the viewport.
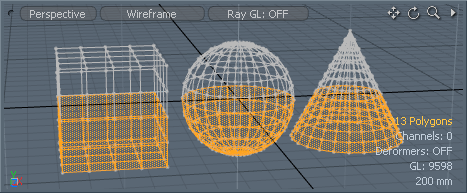
Polygons are the closed plane that is created from three or more edges that produces a renderable surface. When in 'Polygons' selection mode users can use the basic paint or lasso selection options to quickly select one or more polygons of their geometry for precise editing. Selected polygons will be highlighted an orange color to distinguish them from unselected polygons. Using the 'LMB+click and drag' over an object to paint a selection of one or more polygons or use the RMB+click and drag, drawing a lasso loop around the selection area selecting multiple polygons at once. There are also a number of selection options that can be used with polygons such as Loop Select, Select Connected and many more (found on the 'Selection Modifiers' page of the documentation). Users can change the Lasso Style by going to the menu bar and choosing "Select > Lasso Style" and making the choice there.
Polygons selection mode can be activated LMB+clicking the 'Polygons' interface button in the modes toolbar. Alternatively, users can use the menu bar command "Select > Polygons", "3" keyboard shortcut, or by RMB+click away from any geometry in the 3D viewport to open a context menu and selecting the 'Polygons' option. And if that isn't enough, users can also switch to Polygons selection mode by simply MMB+clicking on any polygon in the 3D viewport (except in Wireframe draw mode).
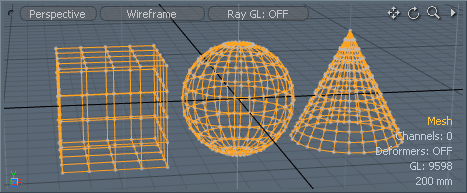
Items represent individual object layers in a scene, whether its a 'Camera', 'Light', 'Locator', 'Mesh' or other type of object, each one is individually an item. When modeling, users are working in one of the component modes, Vertex, Edge, or Polygon. In these modes the users are modifying the contents of the layer items, but while in Items mode users can select and transform entire layers. Only mesh layers can be modified in the component modes, all other elements are transformed in Items mode. For more information the subtleties of the modes, please see the Items vs Components page of the documentation. All keyframes for animation are set while in Items mode. Component animation is only possible through the use of mesh Deformers.
Items selection mode can be activated by LMB+clicking the 'Items' interface button in the modes toolbar. Alternatively, users can use the menu bar command "Select > Items", "5" keyboard shortcut, or by RMB+click away from any geometry in the 3D viewport to open a context menu and selecting the 'Items' option.
Materials are defined when users make specific polygon selections and assign a 'Material' tag. These tags then produce a material 'Group' item in the Shader Tree that represents the tagged polygons for masking. Any surfacing is applied to the geometry using this mask. Users can then utilize the 'Material' selection mode to select geometry based on the tag definitions. Material selections are displayed as orange outlines surrounding the tags defined area. Users can either use the selection to edit the geometry, or to simply adjust surfacing within the Shader Tree. When a specific material tag is selected in the 3D viewport, the corresponding Group item is also selected in the Shader Tree making it easier to locate a specific Shader Tree layer in a complex scene.
Material selection mode is somewhat of a misnomer, as it is possible to select from several polygon tag types that modo offers. Using the menu bar options found in "Select > Polygon Tag Type", users can set the "Materials" selection mode to select based on Material, Part or Smoothing Group polygon tags.
Materials selection mode can be activated LMB+clicking the 'Materials' interface button in the modes toolbar (found in the flyout menu under the 'Items' button. LMB+click and hold to open). Alternatively, users can use the menu bar command "Select > Materials", "4" keyboard shortcut, or by RMB+click away from any geometry in the 3D viewport to open a context menu and selecting the 'Materials' option.

The 'Center' element represents the center location of the associated item layer. Each layer in the 'Items' list has its own corresponding Center position. This location defines where all Position, Scale and Rotate transforms originate from for that particular layer. While users can use 'Action Centers' to dynamically define transform origins for modeling operations, Centers define the origin when animating in modo. By default, the Center is located at the world position origin of 0,0,0 for any item layer. Users can enter 'Centers' mode, selecting the Center element by LMB+clicking on the center icon widget. Users can then use the 'Move' and 'Rotate' transform tools to reposition the center point in relation to the geometry without affecting the geometry position itself.
Center selection mode can be activated by LMB+clicking the 'Center' interface button in the modes toolbar (found in the flyout menu under the 'Items' button. LMB+click and hold to open). Alternatively, users can use the menu bar command "Select > Center", "7" keyboard shortcut, or by RMB+click away from any geometry in the 3D viewport to open a context menu and selecting the 'Centers' option.

The Pivot is a secondary center-like element that is defined by an offset away from the Center itself. Typically the Pivot and Center positions coincide precisely for any layer, if the user modifies the Pivot expressly, that then becomes the animation origin, overriding the position of the Center. Pivots are differentiated from Centers in that their position and rotation can be keyframe animated, whereas a Center cannot. This allows certain interesting possibilities.
Pivot selection mode can be activated by LMB+clicking the 'Pivot' interface button in the modes toolbar (found in the flyout menu under the 'Items' button. LMB+click and hold to open). Alternatively, users can use the menu bar command "Select > Pivot", "6" keyboard shortcut, or by RMB+click away from any geometry in the 3D viewport to open a context menu and selecting the 'Pivots' option.
Implicit Selections for Component Modes
Beyond the direct selection of elements, all the selection modes implicitly select vertices, polygons and edges. In other words, when a polygon is selected, the four vertices that make up that polygon are also implicitly selected. In this way you can select a polygon and still perform a vertex bevel, for example, and the four vertices in that polygon will be the active mesh elements for that particular tool. The vertices will not appear as selected in the viewport, but you will be able to perform vertex operations on them just the same.
In all modes, if nothing is directly selected then all vertices, polygons or edges are implicitly selected.
Direct selections result in the following implicit selections:
Vertex mode
- selected vertices only
Edge mode
- vertices of selected edges
- selected edges
Polygon mode
- vertices of selected polygons
- contour edges of selected polygons
- selected polygons
Contour edge can be defined as follows: if you select a batch of polygons in polygon mode, and then try to use an edge tool, the action is applied to all the edges around your polygon group. This is a simple one-step method for selecting certain types of edge loops.
Using the 'Alt' key, users can convert implicit selections to direct selections. For example, if you have 3 polygons selected, holding down the 'Alt' key and LMB+clicking on the Polygon selection button in the 'Modes' toolbar will change the viewport selection to edges. Doing the same for Edge selections will convert the selection to vertices. The 'Ctrl' key will change Edge selection button to a Boundary selection button where users can convert existing Polygon selections to boundary edge selections.
Selection Styles
Geometry selections can be painted by clicking on elements in 3D view:
Left mouse button+drag first deselects everything and then selects all elements under the mouse as it moves (clicking off any element deselects all). In this manner, you can quickly "paint" a selection by dragging over the desired component.
Shift+click adds more of the current selection mode elements to the selection, anything hit by the mouse pointer as it moves across the geometry. You can either shift+click on single elements or shift+drag across multiple elements to add to the selection with a paint selection style.
Ctrl+click removes items from the selection.
Geometry selections can be made using a lasso in 3D view, activated using the right-mouse button. Geometry must be fully enclosed in the lasso to be selected.
In Shaded mode, the right-mouse button lasso uses a backface cull, so polygons, edges or vertices facing away from the view plane are not selected. Using a lasso activated with the middle-mouse button will select through the geometry, making selections on the backside as well. This is reversed in Wireframe mode; the right-mouse button selects through the mesh, the middle-mouse button uses the backface cull, only selecting facing geometry.
To add new geometry to a selection, hold down the SHIFT key and continue using the lasso selection. The new selection is added to the original.
To remove geometry from a selection, hold down the CTRL key and continue using the lasso selection. The newly selected geometry is removed from the existing selection.
You can also change the Lasso Style to a Rectangle, Circle or Ellipse by choosing "Select > Lasso Type" and picking an alternate style. These other types follow the same behavior as the default Lasso.
Lasso Style: Select Lasso Style allows you to choose the shape of lasso selection. The style defaults to a regular lasso, but can be changed to a rectangle, circle, or ellipse shape.
To deselect, or "drop" the current selection you can simply click anywhere in a 3D viewport, press the Space bar or ESC key. If you happen to click on another element of the current selection mode, the original selection will be dropped and the element you clicked on will become selected. Selections are an undoable action so you can easily undo back to a selection state if you accidentally drop a selection. When nothing is selected, everything is considered active by the tools and commands. This makes dropping selection a quick way to select everything.

