
![]()
Across the bottom of the 'Animation' interface, under the keyframing and timeline transport controls is located the Actor, Action and Pose control bar. These controls provide users with a streamlined method of animating in modo. An Actor is a special type of 'Group', acting as a container that stores Items and/or Channels. This allows users to quickly assign keyframes for all associated Channels, then save the Channels values as alternate layers using the 'Action' function, where each 'Action' is an alternate of the entire timeline. Additionally, the 'Pose' function stores specific keyframe values that can then be easily applied at any point along the timeline.
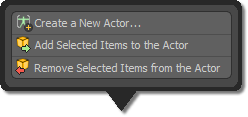
An 'Actor' is simply a container that groups together related items. This could be an entire hierarchy of joints for a character, or it could be all the parts to a dump truck, an 'Actor' doesn't need to be a character at all. The main benefit to creating an Actor would be that is makes applying keyframes for all associated items easier. To create an 'Actor', make sure to select all the target items you want to include and then LMB+click on the 'Actors' button. This opens the 'Actor' popup menu-
Pressing the 'Create New Actor...' button then opens the 'New Actor' dialog box where the actual 'Actor' Group is created-
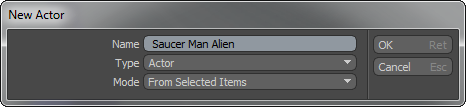
The 'Name' option defines the Name of the resulting Group that is created. By default the 'Type' option is set to 'Actor' (and should remain that way), defining how the Group is treated once created. The 'Mode' menu lets users choose which Items or Channels will be automatically added to the new 'Actor' when it is created- there are several options all dependent on the selection made prior to invoking the command. 'Empty' will create an Actor Group with no automatically assigned Items. The 'From Selected Items/Channels' options will automatically add all the selected elements in the scene and the 'From Item/Channel Edits' will add any items of Channels from the current selection that have been changed from their rest state (modified from the 'Setup' action state). In most cases, users will use the 'From Selected Items' entry. What this means is that all selected items will be automatically added to the 'Actor' (Group) when it is created. LMB+click 'OK' to create the Actor. If you need to add more Items or Channels to an Actor, or remove Items/Channels from an Actor, this can be done from the 'Add' and 'Remove' commands in the 'Actor' popup menu by selecting the target element and invoking the appropriate command.
Setting Keyframes
With an 'Actor' defined, users can simply LMB+click on the 'Key' button to define keyframes for every animated channel belonging to each item in the 'Actor'. Make sure to define at least one keyframe for each channel you wish to work with before hand (For Characters this would typically be the Position and/or Rotation channels). For information on creating keyframes, reference the 'Working with the Timeline' page of the documentation.
'Actions' serve to store keyframes for the entire timeline per 'Actor', what this means is that each separate Action can be complete set of keyframes for the entire length of a given scene within a particular 'Actor' group. Each 'Action' can be created as either a completely separate animation, like a run cycle in one and a Crouch action in another, or a subtle reworking of an existing animation, such as non-destructively modifying a characters motions. In movie terms, each 'Action' is its own take of the scene. To create a new 'Action' layer make sure the 'Actor' control menu shows the particular Actor for which a new animation is desired. Next, LMB+click on the 'Actor' button next to the 'Actions' control, opening the 'Create New Action' popup-
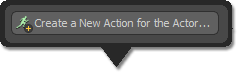
Pressing the 'Create a New Action for the Actor...' button then opens the 'New Action' dialog box where the actual 'Action' is created-

Enter a name for the 'Action' and click OK to create it. Now when you animate the items belonging to the current 'Actor' the keyframes for the animation will be stored in the current 'Action'. Any number of alternate animations can be created for an 'Actor' by repeating the above steps. Enabling the 'Transfer' option in the 'New Action' dialog will copy any keyframes assigned to the item at the scene level into the new Action. You can choose which action to view or edit by simply selecting it from the 'Action' control menu. Deleting an Action is done in the 'Groups' viewport by selecting the Action and pressing the 'Delete' key or choosing 'Delete' from the RMB+click context menu.

IMPORTANT: When animating in a scene with multiple 'Actors', the current Actor will switch automatically when any item belonging to an another 'Actor' is selected and that Actor's last active 'Action' will become the current Action.
A 'Pose' stores a static snapshot of the current keyframe values of the active 'Actor' that can then be easily applied back to itself at another point in time. Poses don't need to be the full character either, they can be limited to just part of it, or even a single joint. For example, one might want to create poses for a character's hand positions, such as "Fist", "Point", etc. These Poses can then be quickly applied to the Actor at any point in the timeline.
To create a 'Pose' users must first position the target elements as desired and define keyframes for them. For the hand example this would be making the hand look like a fist by bending the fingers appropriately. Then with all the target items selected (LMB+double clicking on the wrist joint will select the item and all its children automatically!) Next, press the 'Poses' button opening the Store Poses popup-
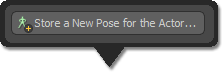
Pressing the 'Store a New Pose for the Actor...' button then opens the 'Store Pose' dialog box where the actual 'Pose' is stored-
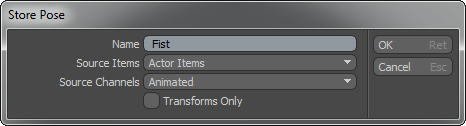
Defining a name in the 'Name' input field, then selecting the 'Selected Actor Items' option from the Source Items options and finally pressing 'OK' will store the Pose for later application. The options for the 'Store Pose' dialog include the 'Source Items' option which allows users to choose which Items belonging to the 'Actor' will be stored in the 'Pose'- 'Actor Items' will store values for all elements in the Actor, disregarding any current selection and 'Selected Actor Items' will limit the values stored to the current Item selection. The 'Source Channels' option controls which channels from the Source are stored- 'Edited' will store Channel values from the Source elements only for channels that are different than their rest state (modified from the 'Setup' action state), 'Animated' will store only Channels from the Source elements that have keyframes applied to them, 'All' will store all related Channels, animated or not, from the Source elements in the Pose. The 'Transforms Only' option when enabled will only store transform specific Channels- Position, Rotation and Scale.

TIP: The items in the actor will not be affected when creating a Pose, their channel values are copied not cut. This allows further Poses to be created using the current values as a starting point.
Applying a Pose
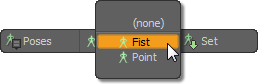
To apply a stored pose, go to the position on the timeline where the pose is desired and choose from one of the stored 'Poses' in the Poses popup menu. With the Pose now active, LMB+click on 'Set' button to assign it and all the stored Channel values for the elements within the Pose will be assigned as keyframes. Once the values are set, they can be treated like any other keyframe value.

