
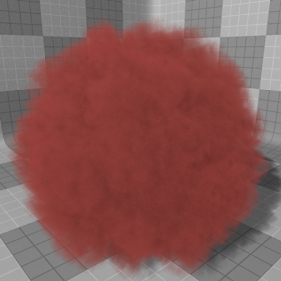
The 'Volume' item is very flexible, open-ended function that provides users a means to create many unique and interesting forms that would be impossible to create otherwise, such as smoke, vapor clouds, dust clouds and well, cloud clouds. They can also be further enhanced (and controlled) by modo's numerous 3D procedural textures. There are several ways to create the volume effect, one being the single spherical volume that is created by the locator representation in the 3D scene once the Volume item is added. When using the 'Geometry' option, the volume will be confined to the inside of any completely closed, arbitrary geometric shape (closed meaning it is water-tight with no holes). When using the 'Particle Source' option, the source elements vertex positions will determine multiple cloned volumes that combine to make the final overall shape (often overlaping). The shape of the volume particles are then controlled by the settings of the 'Volume' item.
Adding Volumes
A Volume item can be added to a scene by utilizing the 'Add Item' function found in the 'Items List'. Users can LMB+click the button itself, opening the popup menu and select the "Volumes > Volume" option, creating the item in the scene at the origin. Once added, the item layer will appear at the bottom of the Items List viewport. When selected, a number of attributes controlling the volumetric form appear in the 'Properties' viewport. This is where users can also define a 'Surface as Volume' item, or a 'Point Source'. Either can be a good way to control the overall shape of the rendered volume. When neither is defined, the volume will simply render as a spherical, cubic or cylindrical form based on the Radius value of the 'Geometry' section (where its base shape can also be defined).
Applying Materials
Normally, surfaces are applied through the use of polygon tags that define masks in the Shader Tree controlling material placement, however, 'Volumes' are a procedural construct created at render time and have no user selectable polygons to apply a tag to, so surfacing is applied to the 'Volume' item itself through the use of an Item Mask. This type of mask links shading properties directly with an item layer. Users can quickly create an 'Item Mask' by RMB+clicking on the Volume item in the Items list and choosing the 'Create Item Mask' option from the contextual menu. This will add a properly defined Material Group item of the same name as the Volume item to the Shader Tree, where users can then add 'Materials' and other Shader Tree items, setting the appropriate 'Effect' for each layer, building up surfacing attributes just as one would for any other surface. Users may wish to control additional attributes of the Particle Source that are not surface specific, such as density, size and dissolve amount. This can be done by creating an additional Item Mask and applying texture layers set to the appropriate 'Effect' type using the 'FX' item of the Shader Tree.

TIP: When a Mesh item is defined in the 'Surface as Volume' option, the resulting volume will then pick up its surfacing from the target Mesh item, so any surfacing meant for the Volume, will need to be applied in the group specific to the geometry that is defined as the 'Surface as Volume.
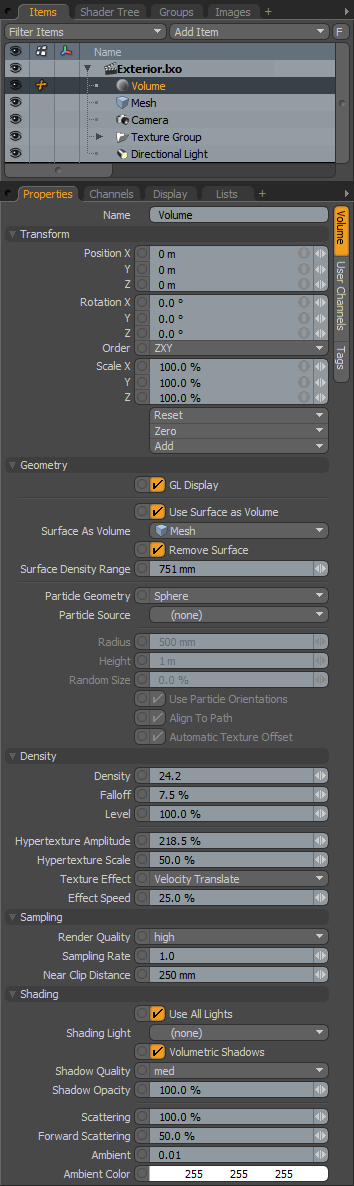 Name: This data field displays the current item name. Users may easily change it by LMB-clicking within the field and typing the new name.
Transform--
Position: An Item transform that allows the user to numerically position the item in XYZ space. By default, Position transforms originates from the Center position.
Rotation: An Item transform that allows the user to numerically set the rotation of the item. By default, Rotation transforms originate from the Center position.
Order: Allows the user to set the order that rotations are applied to the camera item. Changing the order that rotations are applied can sometimes help to reduce or eliminate gimbal lock.
Scale: An Item transform that allows the user to numerically set the size of the item. By default, Scale transforms originate from the Center position.
Reset: Resets the selected transform values to (0,0,0) returning the items back to their default state.
Zero: Resets the chosen transform property values to '0', leaving the 'Center' position and Mesh position intact.
Add: The 'Add' function will add the selected set of transforms to the channel list. Useful when animating complex motions, providing a layered approach to the transforms.
Geometry--
GL Display: This option toggles the display of the 'Sprite' proxy in the 3D OpenGL viewport, generally user will want this enabled to get an approximation of how the sprite particles will render (the default state), but in heavy scenes it may be useful to disable this option to increase scene interactivity.
Use Surface as Volume: When the 'Use Surface as Volume' option is enabled, users can specify an arbitrary mesh layer that will be used to contain the Volume effect allowing users ultimate control over the shape of the resulting rendered volume. The target Mesh item will need to be one that is completely closed, or water-tight (meaning it could hold water without leaking). Mesh volumes with open seams or non-manifold surfaces will likely produce undesirable results. To test an object for holes, in 'Polygons' selection mode under one of the Modeling tabs, press and hold the 'Ctrl' key, changing the 'Edges' button into one that says 'Boundary', LMB+click that button, any highlighted edges represent holes within the mesh's surface.
Surface As Volume: This option determines the particular mesh layer that will be used for the volume effect when 'Use Surface as Volume' is enabled. For proper results, target mesh item must be fully enclosed (water-tight, meaning no holes).
Remove Surface: When this option is enabled (the default behavior), the specified Surface as Volume mesh layer will be hidden at render time, and will only show the resulting volume effect.
Surface Density Range: This value determines the amount of attenuation from the surface of the volume inward.
Particle Geometry: When the 'Use Surface as Volume' option is disabled, users can specify a 'Particle Geometry' element. What this does is creates a procedural geometric shaped volume around each vertex of a Particle Source (or the Volume locator itself when none is defined). Particle can be few or many, but the combination of the particle positions and the Particle Geometry shape determines the overall volume effect at render time. It is recommended to only have as many particles as are necessary to determing the final form, as having many overlapping Volumes can slow rendering calculations considerably.
Particle Source: When a 'Volume' item is created, it is represented by a single locator type point at the world origin producing a single particle volume. To produce additional Particle Geometry volumes users will want to define a 'Particle Source', this can be any item layer that contains vertices, where each vertex position is used to determine the position of the volume (any type of geometry can be used- single point polygons, vertices, two-point polygons and regular polygons, however, only the vertex positions of any component will be used). Source layers can be normal geometric forms, point clouds that are imported or created using the 'Particle Cloud' item or any of the 'Particle Tools'. They can be imported particle simulations controlled by way of a MDD deformer, RealFlow Point Cache or an Alembic format data file.
Radius/Height: Defines the outside dimensions of the Particle Geometry object. 'Radius' refers to the overall dimensions of the 'Sphere' and 'Cube' shapes, and 'Radius' and 'Height' work together to define the dimensions of a 'Cylinder'. From there, the size can be altered via the 'Random Size' option, the addition of a 'Particle Size' vertex map that allows users to paint the scale for individual particles interactively, or with the application of a texture layer, under the FX item of the shader tree, set to control 'Particle Size'.
Random Size: This option controls the amount of randomness added to the scale of each individual particle blob. The amount is determined by a scale percentage- a setting of 25% would adjust the scale of the base radius size by an amount of 0%-25% randomly across all particles, a setting of 50% would adjust the size by 0%-50% randomly across all particles and so on.
Use Particle Orientations: Aligns the particle to the direction vector from the particle source. The direction vector is usually the surface normal for surface particles or the particle velocity vector for simulation particles (like from RealFlow).
Align to Path: Aligns the particle to its local motion vector.
Automatic Texture Offset: Adds an offset to the hypertexture different for each particle so that each particle looks different.
Density--
Density: The 'Density' value determines the thickness or opacity of the volume, controlling the apparent amount of particular matter that is visible. This is a multiplier of the base value defined in the Material item. Please reference that page for Density samples.
Falloff: The 'Falloff' determines the attenuation of the volume from its center point out toward its total Radius.
Level: Changes the level in the hypertexture.
Hypertexture Amplitude: Determines the amplitude (intensity) of a 'Volume Density' texture layer applied to the Volume. The higher the value the more you see the effect of the density texture. It's similar in concept to displacement amplitude but applies to volumes
Hypertexture Scale: The 'Hypertexture Scale' option changes the size of the Hypertexture, it is the same things as changing the Texture Locator 'Scale' setting valuess.
Texture Effect: Hypertextures can be animated on particles to create billowing or dissipation effects. The goal of these effects is to add secondary animation to the particles, which is important for explosions and smoke.
The various texture effects are the following-
None- Disables the Texture Effect.
Velocity Translate- moves the texture in the direction of the velocity vector.
Expand- the texture is scaled over time to give the impression that it expands.
Expand and Dissolve- like the previous effect but with the addition of a dissolve effect so as the texture expands it also dissolves.
Pyroclastic- a boiling like motion where hot gas swirls around within the form adding a realistic secondary motion to the volume. Good for smoke.
Effect Speed: Controls the speed at which the 'Texture Effect' animates through the volume.
Sampling--
Render Quality: Determines the overall render quality of the resulting Volume. The options are self explanatory- 'Low', 'Med', 'High', 'Very High' and 'Best'. As the quality increases, render times will increase as well.
Sampling Rate: This is like the render quality option but can fine tuned in case the render quality is not enough. Like all 'rates' in modo smaller means better but also slower. Use it with caution, using a rate of 0.5 instead of 1.0 will greatly improve the sampling quality but also multiplies render time by 4.
Near Clip Distance: modo starts integrating the volume densities at a fixed distance from the camera. This also controls the initial integration step, so very small values will lead to long render times if the camera is inside the volume. Think of it as a windshield around the camera. In general this value only needs to be adjusted when you are inside a volume, like when you fly through a cloud.
Shading--
Use All Lights: By default modo uses all lights in the scene to compute the volume illumination, this can be very expensive however if the scene has many lights so that can be disabled.
Shading Light: When 'Use all Lights' option is disabled users can select which light or 'Group' of Lights contribute to the volumes illumination. For information on creating a 'Group' see that page of the documentation.
Volumetric Shadows: When a light shines on a volume, the light is attenuated as it travels through the volume because of absorption, this is like self shadowing on surfaces. For effects like smoke that don't need self shadowing it is better to disable this option as it will save on render time. Another way to optimize volumetric shadows is to use deep shadow maps on the lights but that comes at the expense of precision and memory, though it can dramatically improve render times.
Shadow Quality: Volume self shadowing is the most expensive effect to render, it has its own quality setting which is derived from the overall render quality. This is an important setting as it usually plays a big role in controlling volume aliasing. Note that for very faint volumes it is not necessary to use a high shadow quality as the shadows are not really visible.
Shadow Opacity: Volume self shadowing also depends on the volume opacity (how much absorption is going on), this number can be tweaked with that setting to change the look of shadows without changing the overall volume opacity.
Scattering: This is the overall scattering amount on the item, this is similar to the volume scattering amount in the material. This is a multiplier of the base value defined in the Material item. Please reference that page for Density samples.
Forward Scattering: Light scattering usually scatters more strongly in the forward direction, that's why clouds are brighter when the light comes behind the cloud. This control allows users to tweak this behavior.
Ambient: Volume items have their own ambient lighting settings to approximate multiple scattering effects that naturally happen inside clouds: when a photon scatters inside a cloud it actually bounces many times before it reaches the viewer, each bounce adding more scattering. This effect is called multiple scattering, it is the equivalent of global illumination for surfaces. So one way to approximate it is to use a global ambient light setting, it is a crude approximation but it looks correct for most volume renderings.
Ambient Color: When using an 'Ambient' value above 0, the 'Ambient Color' determines the actual color value that contributes to the added Ambient calculations, affecting the overall volumes color.

