
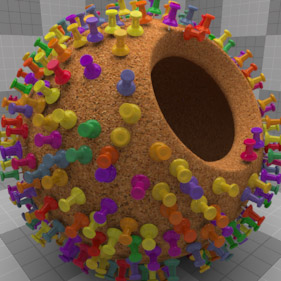
The Surface Generator works in tandem with a Replicator item offering a greater degree of control over the random placement and density of replicated objects. Once a Surface Generator is employed, additional texture layers can be used to control density, size, direction and even coloration, by setting the texture layer to the proper 'Effect'. Please reference the 'Shader Tree' page of the documentation for help with adding new layers and setting their 'Effect'. Replicators themselves use vertex data to propagate replicas, and even though there is an amount of randomization available, there is still a certain degree of regularity to the replicas. The 'Surface Generator' is a means of generating random points across the surface of mesh item, information that the surface generator then passes along to the replicator for Prototype propagation.
This is especially useful for situations like if you had modeled a tree and wanted to replicate leaves over its surface. You would want better control of the overall density than you could get by simply replicating them at only vertex positions, additionally, a weight map could be employed to limit the distribution the leaves on branches themselves and not the trunk with some additional color variation added by a gradient layer, producing far more realistic results.
Adding a Surface Generator--
When adding a surface generator, is is easiest to start with a working 'Replicator' in the item list, meaning the Prototype and Point Source items are defined as such in their respective properties. Once created, RMB+click in the Items List on the Replicator layer itself and select the 'Scatter Replicas' command from the context menu and that's it; an appropriate Surface Generator has been created in the shader tree updating the viewport with the new settings. Users may now select the 'Surface Generator' in the Shader Tree to modify its properties, making updates to the default settings.
If you prefer doing things manually, or you're just curious what happened in the background. Basically, modo created an item mask for the mesh that was specified as the 'Point Source'. An item mask is a shader tree group that calls a specific mesh item instead of the usual material tag. Under that shader tree group a 'Surface Generator' layer was added with some default values appropriate to the scale of the objects. Lastly, the 'Point Source' selector in the replicator now calls the 'Surface Generator' instead of the 'Point Source' item itself.
 Layer--
Enable: Toggles the effect of the layer on and off, duplicating the functionality of toggling visibility in the Shader Tree. When un-checked (disabled), the layer has no effect on the shading of the scene. However, disabled layers are saved with the scene and are persistent across modo sessions.
Invert: Inverts the RGB values for the layer producing a negative effect.
Blend Mode: Affects blending between different layers of the same effect type, allowing user the ability to stack several layers for different effects. For more on blending, please reference the 'Blend Modes' page of the documentation.
Opacity: Changes the transparency of the current layer. Reducing this values will increasingly reveal lower layers in the shader tree if present, or dim the effect of the layer itself on the surface.
Surface Generator--
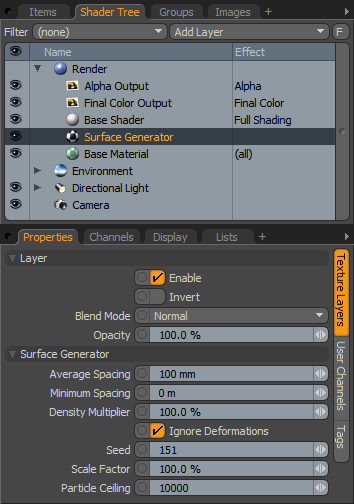
Average Spacing: Precisely as the name implies, the 'Average Spacing' value specifies the average distance between replicated items.
Minimum Spacing: Where the 'Average Spacing value only specifies an average, the 'Minimum Spacing' value allows one to specify the minimum amount of space between replicated items, especially useful in eliminating overlaps for neighboring replicas.
Density Multiplier: The 'Density Multiplier' offers simplified control over the overall density of replicated items. Lower values will reduce the overall number of replicas while higher values will increase the overall number of replicas up to the 'Particle Ceiling' value.
Ignore Deformations: When applying an animated deformer, such as a Morph or Weight deformer, changes to the underlying surface will trigger modo to re-distribute surface particles so they retain their 'Average' and 'Minimum' spacing values. When 'Ignore Deformations' is enabled, particle positions on a surface are maintained through the deformation as if they're were were stuck to their respective positions.
Seed: The 'Seed' value is an initial setting used when random numbers are generated. Different 'Seed' values will produce different random variations, in this case, initial clone positions. However you will want to use the same 'Seed' value when it is necessary that items retain the same variations.
Scale Factor: The 'Scale Factor' acts to control the scale of replicated objects, eliminating the need to manually scale the base 'Prototype' item. With a value of 100%, replicated items would be generated at the identical size of the prototype, smaller values would decrease each replicas size, while larger value would increase each replicas size.
Particle Ceiling: The 'Particle Ceiling' is a maximum for the total number of generated replicas.

TIP: If you're looking for a way to add some variety to replicated objects, one needs to look no further than Groups. By creating a group from multiple mesh items, and specifying that group as the Prototype to be cloned, the Replicator will pull random items from within the group adding further randomness and variation to the cloned objects. Once a group has been created, it will show up in the 'Prototype' drop down of the Replicator item. Additionally, surfacing for replicas can be further randomized with Gradients set to the 'Particle ID' Input Parameter.

