
The 'Fold' tool creates a "hill and valley" effect by pushing vertices at the center of the brush in and pulling vertices at the edge of the brush outward. As with all sculpting tools the profile of the brush is very important in the final look of the surface. Pressing the 'Ctrl' key down while using the tool will invert the effect forcing the center outward and the edges inward. Pressing 'Shift' while using the tool will enable the 'Smooth' function. The 'Fold' tool can be found under the 'Paint' tab for the interface in the 'Sculpt' submenu of the toolbox. The tool can also be called from the menu bar under the "Texture > Sculpt Tools" menu. Additionally, the tool can be combined with the various 'Tips' as well as the 'Inks' and 'Nozzle' to further customize the way the brush affects the surface. When activated the following attributes are displayed in the Properties panel.
Sculpt: Fold--
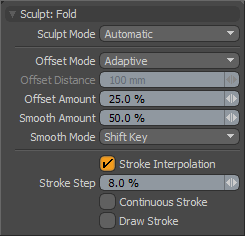 Sculpt Mode: The 'Sculpt Mode' determines which method of sculpting is to be used. By default the setting is 'Automatic' which will perform mesh based sculpts when there are no displacement images and automatically switch to image based sculpting when there an image is available. There are times when you may want to force modo into mesh based sculpting even if you have an image applied for displacement. This can be very helpful for blocking out shapes and form, as mesh sculpting is only affecting the cage vertices of the base geometry.
Automatic-- chooses between mesh and image sculpting depending on availability of displacement image map texture.
Mesh-- forces the tools to perform mesh sculpting only.
Image Map (Details)-- forces the tools to perform image sculpting only.
Offset Mode: modo provides two methods for calculating the way the tool moves the surface when brushing.
Adaptive: The adaptive mode will adapt to the surface that is being brushed on based on the setting for 'Offset Amount' and the size of the brush.
Absolute: When in 'Absolute' mode, the 'Offset Distance' setting will become active and users may enter a specific distance value the brush will conform to regardless of brush scale.
Offset Distance: This control is disabled unless the 'Offset Mode' is set to 'Absolute'. When active, the value determines specifically how far to displace the surface.
Offset Amount: Active only when the 'Offset Mode' is set to 'Adaptive', this percentage value modulates the extent of the brushstroke. The total scale of the sculpt deformation will be equal to the brush size times the offset amount percentage.
(Note: This is a very important value for controlling sculpted detail and as such it can be adjusted interactively by using the MMB+click and hauling left or right.)
Smooth Amount: The Smooth tool is such a useful method for controlling sculpt detail it is available with almost every sculpting tool in modo and can be accessed by simply holding the Shift key down while sculpting. The Smooth amount attribute allows you to control the amount of smoothing applied when using the Shift qualifier with that specific tool. This is a convenience feature implemented specifically to enhance the sculpting workflow.
Smooth Mode: modo provides alternate methods for applying smoothing while sculpting-
Shift Key-- The smooth mode is enabled when the 'Shift' key is depressed.
Low Pressure-- When using a pressure sensitive tablet, users may apply the 'Low Pressure' option, where light sculpting strokes will have a smoothing affect on the surface. Once the pressure threshold is exceeded, the smoothing effect will attenuate toward the full pressure effect where the brush will work normally as determined by the tool providing a dual function to the brush.
Uniform-- When set to 'Uniform', smoothing is always on while sculpting, thus making softer strokes.
Stroke Interpolation: When the option 'Interpolation' is enabled, modo will add additional sample points and filter out small variances in pressure and position resulting in smoother strokes.
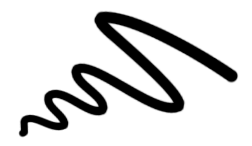
Stroke Step: Generally, paint strokes are not a continuous lines, but a series of dots or dabs placed on the canvas. This option defines the distance between each dab as a percentage of the brush size. By default, this value is set to 8%. So for an 64 pixel sized brush, dabs would be placed approx every 7 pixels. Users can increase or reduce this value for a variety of effects. Increasing it toward 100% will produce individual dots, rather than what looks like a stroked line.
Continuous Stroke: When this option is enabled, modo will continuously draw a stroke like a line, instead of as individual dabs. modo will draw the stroke as a linear segments between each interpolation step dab so increasing the scale of the interpolation steps will reveal the linear nature of the continuous stroke option.
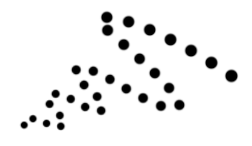
 Default 10% 'Interpolation Step' produces smooth stroke |
 Interpolation Step set to 200% reveals individual dabs |
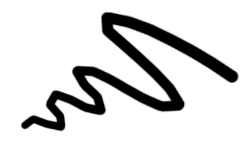 200% Interpolation Step with Continuous Stroke enabled |
Draw Stroke: When enabled, this option simply draws a line in the interface defined by the path for the brush stroke.

